Help Toolbar (select a button to browse other online help sections) Home Tutorials Resources Search Tabs & Menus Button Bar Table & Data Display |
Entering Provincial Health Settings
For this tutorial, we will add Provincial Health rates for your payroll, and assign the rates to the applicable earnings and benefits as needed. eNETEmployer requires these rates in order to calculate the remittance amounts that fund your provincially-regulated health plan.
There are three parts to this tutorial:
- Step1: Adding Provincial Health settings for your province - This section will show you how to add a provincial health record for your province (or multiple records if you have employees who work in different provinces).
- Step 2 (Optional): Assigning provincial health settings to applicable earnings - This section will show you how to apply your provincial health settings to applicable earnings in your payroll.
- Step 3 (Optional): Assigning provincial health settings to applicable benefits - This section will show you how to apply your provincial health settings to applicable benefits in your payroll.
NOTE: Click on the images below to view them at full size
1) To Define Provincial Health Settings for Your Payroll:
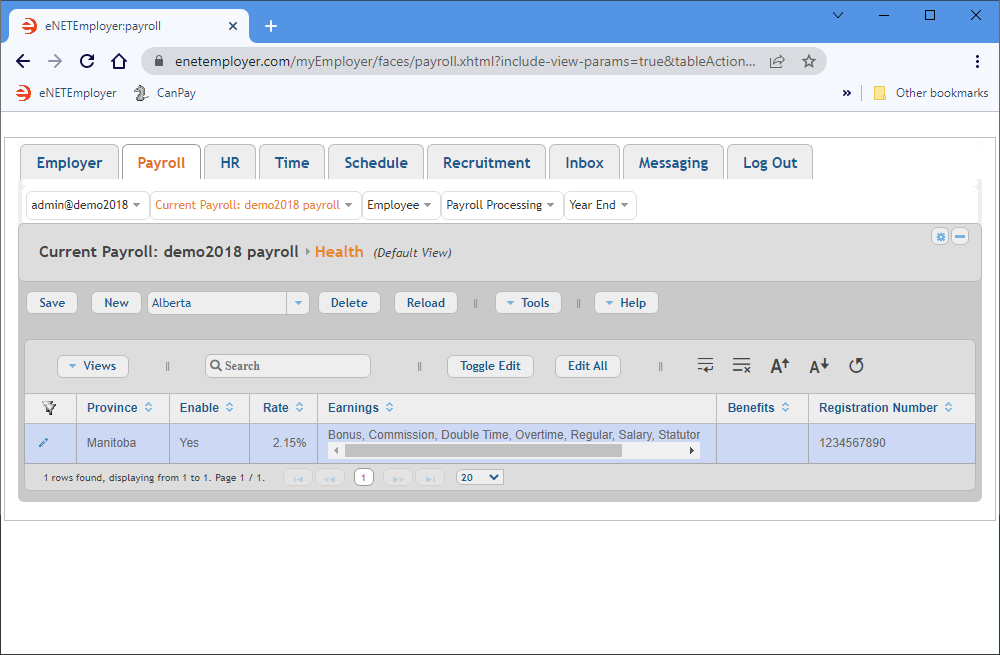
- From the Payroll tab, open the Current Payroll - Prov. Health screen. This screen is used to define your province's health premium rates so that eNETEmployer can allocate the cost of provincial health to all the areas that your employees have worked. Entering the rate will also provide you with a reporting method for the province(s) you maintain for employment purposes.
- Choose your province from the drop-down list beside the New button, and then click the button to insert a new provincial health row into the table.
- Edit the various cells as needed as they relate to your region's provincial health settings (using the Online Help system if you need to look up a definition for the various cells).
- If your business has more than one account, use the New button to add another account type along with its pertinent information.
Example: In our example, we have defined a provincial health record for Manitoba. Its premium rate is set to 2.15% of the employees applicable earnings (as shown in the Earnings column).
Province Enable Rate Registration Number Manitoba Yes 2.15% 123456780 - Once your data is complete, select the Save icon for each row (the check mark icon at the left side of the row). This accepts the changes and the Edit Mode icons are removed to indicate that the entire row has been saved. You can also choose the Save button from the Button Bar above the table.
Now you can proceed to Step 2 below and apply the provincial health settings to the appropriate earnings in your payroll.
2) To assign a provincial health record to your payroll earnings
This step is optional - If your payroll does not include any earnings that are subject to Provincial Health, then you can skip this step.
- From the Payroll tab, open the Current Payroll - Earnings screen. This screen allows you to work with the your payroll earnings (the records that control the wages or salary for each employee) that are used in your payroll.
- Double-click on the desired earning (or select the Pencil icon from the left side of the row). This opens the row for editing.
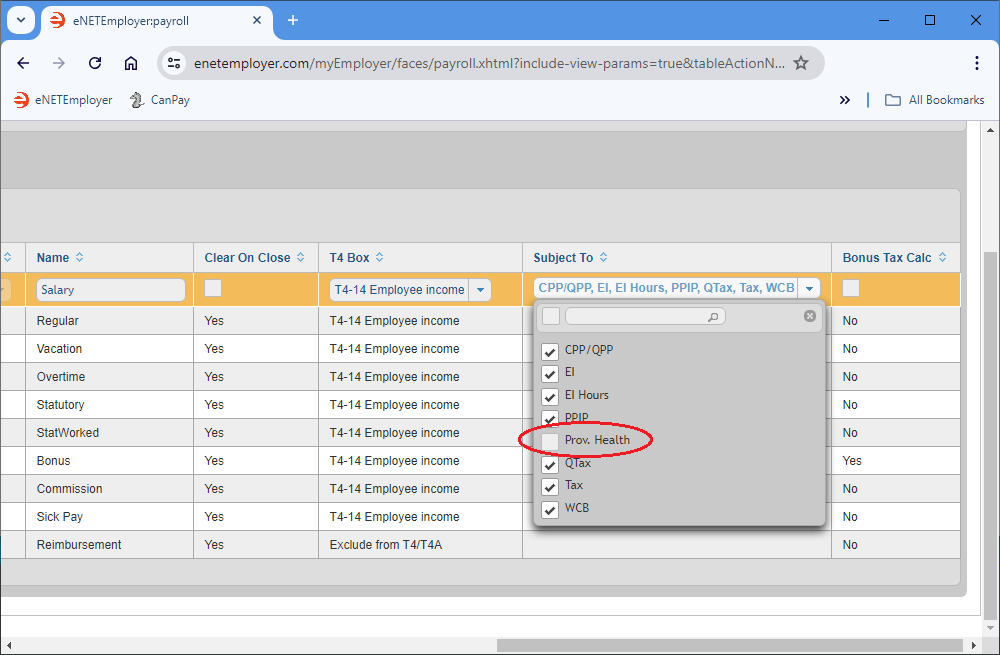
- Scroll over to the Subject To cell, and then click on the downward arrow to open the drop down list of options for the cell. You will see that that the Prov. Health option does not have its box checked. This default ensures that provincial health will not be active for this earning until you choose to do so.
Example: In Fig. 02 below, we see that the Prov. Health checkbox is not active by default.
- Place a check in the Prov. Health checkbox, and then select the Save icon (the check mark icon at the left side of the row). This accepts the changes and the Edit Mode icons are removed to indicate that the entire row has been saved. You can also choose the Save button from the Button Bar above the table.
- Repeat the preceding three steps for each earning that is subject to provincial health.
Now you can proceed to Step 3 below and apply the provincial health settings to the appropriate benefits in your payroll.
3) To assign a provincial health record to your payroll benefits
This step is optional - If your payroll does not include any benefits that are subject to Provincial Health, then you can skip this step.
- From the Payroll tab, open the Current Payroll - Benefits screen. This screen allows you to work with the your company benefits (payments made by the company on the employee's behalf).
- Double-click on the desired benefit (or select the Pencil icon from the left side of the row). This opens the row for editing.
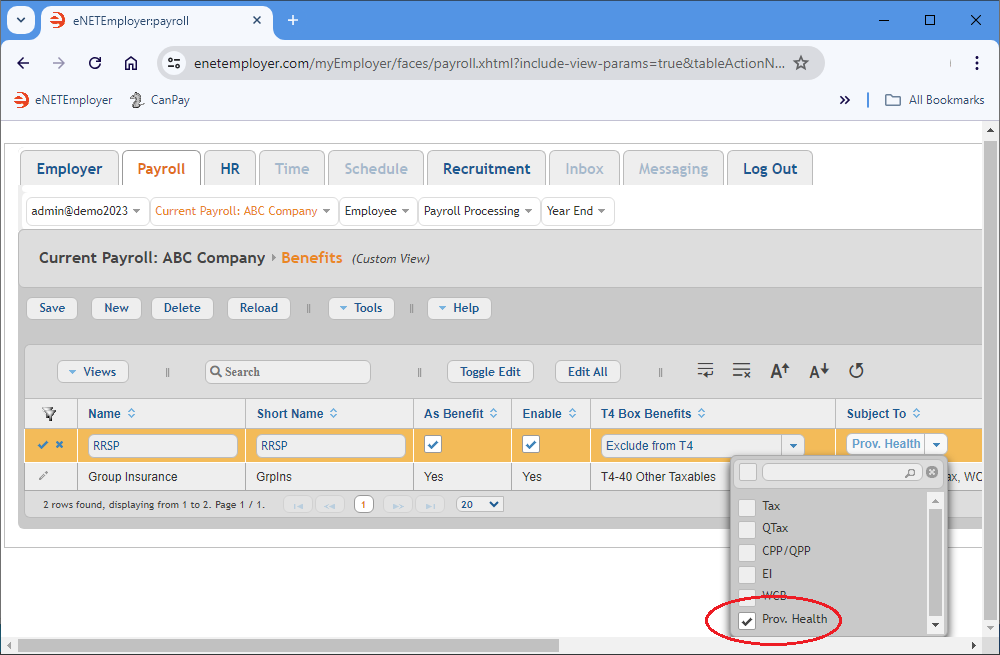
- Scroll over to the Subject To cell, and then click on the downward arrow to open the drop down list of options for the cell. You will see that that the Prov. Health option does not have its box checked. This default ensures that provincial health will not be active for this benefit until you choose to do so.
- Place a check in the Prov. Health checkbox, and then select the Save icon (the check mark icon at the left side of the row). This accepts the changes and the Edit Mode icons are removed to indicate that the entire row has been saved. You can also choose the Save button from the Button Bar above the table.
Example: In Fig. 03 below, we see that the Prov. Health checkbox has been checked.
- Repeat the preceding three steps for each benefit that is subject to provincial health.
This completes the tutorial on defining your company's provincial health settings.
Note: If you are working through the payroll setup process in order, you will need to continue through the Payroll menu to finish entering the data that is required for your particular payroll.
See Also:


