Help Toolbar (select a button to browse other online help sections) Home Tutorials Resources Search Tabs & Menus Button Bar Table & Data Display |
 Table Display and Data Controls
eNETEmployer provides many useful features to help you work efficiently with the program's data tables. This functionality is provided through a variety of icons, buttons and keyboard commands. Use this help page to learn more about the various features that control the data tables throughout the program.
Note: The colors of the various controls shown on this page may differ from those that appear on your program screen. We have used the "eNETEmployer" design theme that displays many of the items in shades of blue. You can change your design theme in the User - Options screen.
Scrolling the Table
There are different ways to scroll through each table on the screen. You can use the arrow keys, the scroll bars, the mouse, or a combination of each to move between cells and to move quickly to different areas of the table.
- Scroll Right
- With Mouse and Keyboard: Press and hold the <Ctrl> key on your keyboard, and then scroll downward with your mouse wheel.
- With the Mouse: Click and hold the right horizontal scroll button (the right-facing arrow) located at the bottom right of the table. To scroll more quickly, click and drag the scroll bar thumb (the movable area between scroll arrows) the to the right.
- Scroll Left
- With Mouse and Keyboard: Press and hold the <Ctrl> key on your keyboard, and then scroll upward with your mouse wheel.
- With the Mouse: Click and hold the left horizontal scroll button (the left -facing arrow) located at the bottom left of the table. To scroll more quickly, click and drag the scroll bar thumb (the movable area between scroll arrows) the to the left.
- Scroll Down
- With the Keyboard: Press and hold the Down arrow on your keyboard. To scroll down one page at a time, press the <Page Down> key. To scroll to the bottom of the page quickly, press and hold the <Ctrl> key and then press the <End> key.
- With the mouse: Move the scroll wheel on your mouse backward.
- Scroll Up
- With the Keyboard: Press and hold the Up arrow on your keyboard. To scroll up one page at a time, press the <Page Up> key. To scroll to the top of the page quickly, press and hold the <Ctrl> key and then press the <Home> key.
- With the mouse: Move the scroll wheel on your mouse forward.
Filter Icons 
These icons are used to control the filtering and display of table rows so you can display data according to your needs. For example, you may use the filter option to view only a subset of data for a page that offers a large amount of rows.
- Filter - Select the Filter icon (the Grey funnels
 located at the top left of the row) to activate the Filtering feature for the current table. Choosing this icon adds an editable Filter field to the top of each row header in the table. Use this field to enter the desired text for which you wish to search. As you type your word into the field, the table will change to show only those rows that contains the characters that you type (provided that you enter the search characters beginning from the start of the word). For example, if you are searching for a row that contains the word "Isabelle", typing "Isa" will display the desired row. However, typing "belle" will not display the row because the search characters do not appear at the beginning of the word.
 - Clear Column Filters - Select the Clear Filters icon (the single funnel
 with the Red X) to remove the text from the Filter field and restore all of the rows to the display.
 - To Remove the Filter Fields - Select the Filter icon icon once again to remove the Filter fields. Note: If you have not yet cleared a search, any rows that remain will display the previous filtered results.
Sort Icons 
These icons are used to control the sorting of table rows. This can be useful when you have a large amount of rows and wish to work with in an alphabetical or numerical manner. Note: All sort functions are cleared when you exit or reload the page. To retain a sort order indefinitely, set the desired sort order, and then create a new Customized View.
- Primary Sort (
 ) - Select the Primary Sort icon (the two arrows shown at the top of each column) to reorder the display of the current column in a reverse alphabetical manner from bottom to top (selecting the text label located at the top of the column performs this same function). Click on the icon or column name once again to reverse the order.
 - First Level Sort (
 ) - The first time a column is sorted, the icon at the top will change to the First Level Sort icon (an arrow with a number one ). The First Level Sort icon signifies that this column is now designated as the primary column for any subsequent sort operation should you decide to add another column for further sorting. Click on the icon or column name once again to reverse the order.
- To Sort Using Multiple Levels - You can sort by more than one level if you currently have at least one column set to a primary sort (signified by the First Level Sort icon ). To further sort your data by a second level, simply hold down the <Ctrl> key on your keyboard, and then select the Primary Sort icon located at the top of a second desired column. Sorting a second column changes its column's icon to a Second Level Sort icon (an arrow with a number two
 ). This signifies that this column is now designated as the secondary column for any subsequent sort operation. This step can be repeated to define further multiple sort orders with each subsequent sort having an incremented number added to its sort icon. Note: Although you can sort by several columns deep, the sorting procedure may become cumbersome once you get past the third level.
 - To Reassign a Secondary Column as the Primary Sort - Simply select the secondary column name and it will change that column to the new Primary sort (and automatically deactivate the original primary sort from the other column).
- To Sort Using Multiple Levels - You can sort by more than one level if you currently have at least one column set to a primary sort (signified by the First Level Sort icon
- Clear Sort Order (
 ) - Select this icon to replace all sort order icons with the default Primary Sort icon ().
Expand / Collapse / Group Icons 
These icons are used to control the viewing of hidden (collapsed) table rows. This can be useful when you have a large amount of employees (that would require many rows to be displayed on the screen) but wish to work with one employee's details at a time. Note: These icons appear only for certain pages where the expand/collapse row functionality is required (e.g. the Employee Earnings screen, the Bank Accounts screen, etc.).
- Expand Rows (
 ) - Select the Expand Row icon (the right-facing triangle located at the beginning of the row) to reveal additional hidden rows and cells that are available for the row. The Orange triangle is replaced with the Collapse Row icon (the downward triangle).
 - Collapse Rows (
 ) - Select the Collapse Row icon (the downward triangle located at the beginning of the row) to hide the additional rows that have previously been revealed. Once selected, the Expand Row icon will appear once again at the head of the row. Note: If you make changes to your data and collapse the rows without saving the changes (via the Save icon
  - see below), the changes will automatically be saved.
 - Delete Group Rows (
 ) - Select the Delete Group Rows icon (the trash can located at the beginning of the row) to remove the entire set of rows including the main row.
Edit Icons 
These icons are used to control how changes are processed for each row.
- Edit (
 ) - Select this icon to activate Edit Mode for the current row so that you can make changes to the various cells. When you select this icon, it will be replaced with the Save and Cancel Edit icons (described below) so that you can commit or discard your changes.
 - Save () - Select this icon to accept changes in the current row and commit them to the database. Depending in which column the Save icon appears, it performs in a different manner as follows:
- If you are choosing this icon from the first column in any table, all pending changes in the row will be accepted and the icon will be removed to indicate that the entire row has been saved.
- If you are choosing this icon from a secondary column or hidden row, choosing the icon will save the current cell's changes as requested, but the Save icon at the beginning of the row (and those in any other rows) will remain so that you can save them explicity as needed while continuing to make other changes.
- Cancel Edit (
 ) - Select this icon to cancel (undo) the most recent change to the current row. Depending in which column the icon appears, it performs in a different manner as follows:
- If you are choosing this icon from the first column in any table, all pending changes in the row will be discarded and the icon will be removed to indicate that the entire row has been restored to its pre-edited state.
- If you are choosing this icon from a secondary column or hidden row, choosing the icon will discard the current cell's changes as requested, but the Save icon at the beginning of the row (and those in any other rows) will remain so that you can save them explicity as needed while continuing to make other changes.
Automatic Saving - If you have a number of unsaved changes, remember that eNETEmployer will automatically save them each time a different row becomes selected. This can occur any time you click on a new row, use the mouse to move up or down to a new row, or if you select a command button that causes the current row's selection to be updated (e.g. New, Toggle Edit, Customize View, etc.).
This is important for users who prefer to "queue" numerous changes before they perform a Save operation. While queing multiple changes may save a minimal amount of time between each and every change, it does increase the chance of data loss due to browser connectivity or other factors. If you are working with a large database and prefer the queued approach to data saving, we suggest that you balance it against a practical approach where data changes are saved more frequently in order to mitigate data loss.
Text View Icons 
These icons are used to control the size and attributes of text in the data tables. For example, if you are working with a smaller laptop screen, you can use these features to increase the size of your table text.
- Word Wrap (
 ) - When this icon is selected, any words that extend beyond the current width of a table column will wrap and be displayed on the next line. This is useful for viewing cells with large amounts of text and negates you having to scroll horizontally to view all of the text in a wide cell.
 - No Word Wrap (
 ) - When this icon is selected, the Word Wrap feature will be deactivated. In this state, any cells with large amounts of text will have a horizontal scroll bar added to the bottom of the cell so that you can view all of its text.
 - Increase Font Size (
 ) - Select the Increase Font Size icon to make the size of the table text bigger by one increment. This is useful if you wish to view your table text in a larger size without having to change your monitor's resolution.
 - Decrease Font Size (
 ) - Select the Decrease Font Size icon to reduce the size of your table text by one increment.
 - Restore Font Settings (
 ) - Select the Restore Font Settings icon to reset the font size and viewing attributes to their default settings.
These controls are used to modifying the table row display and for displaying menu options on each screen. These features can be particularly useful when you are working with tables that contain many rows.
- Rows Per Page (
 ) - This drop-down list allows you to control the number of rows that you wish to display on the screen at any given time. Type in a value, then press <Enter> on your keyboard to apply the setting. This feature is particularly useful for large data tables with many rows. For example, if your table has 200 hundred rows (that may take additional time to calculate and display), you can instruct the program to display only 20 rows at a time. This will allow for faster table updates. The text to the right of the field displays the following three indicators: the total number of rows in the table, the number of rows that are currently being displayed, and the current page in the row set.
If you constrain your row display such that the program can no longer display all of the rows on one page, a set of buttons will appear below the table so that you may access the additional rows. For example, if we have a table with 150 rows and wish to only view 50 at a time, we would enter the number 50 in the Rows per Page field. This would constrain the table display to 50 rows per page and the buttons below would provide access to three pages in total, each containing 50 rows:

- Collapse Table (
 ) - This icon (located at the top right of each table if the table is Expanded) is used to hide/collapse the entire table. When selected, all rows in the table will be hidden from view. This can be useful if you wish to temporarily restrict others from viewing your data without having to exit the program.
- Expand Table (
 ) - This icon (located at the top right of each table if the table is Collapsed) is used to expand the table if all rows have been hidden (via the Collapse Table icon).
- Show Menu (
 ) - This icon (located at the top right of each table) displays the Action Menu that provides access to commands and functions that can be applied both to the data table and the screen. Depending on the option you choose, the command may apply to either the current row only, selected rows, the entire table, or the entire page. Note: The Expand/Collapse menu options will only appear for screens that contain more than one row.
Use the following section to learn more about the various menu commands that are available.
Action Menu
- Save - Clicking this button submits all unsaved changes in the table to the database. If a row is currently being edited, its checkmark (
- New - Clicking this button creates a new row item in the current table. The new row will appear at the top of the table, ready for editing. Note: This command only appears for tables that allow rows to be added. For example, the New option will be available for the Earnings screen as you can add many earning items, but the New option will not appear for the Company or Password screens since they only contain one row each.
- Delete - Clicking this button removes the current row. If you have multiple rows selected, all of the rows will be removed. When you click the button, you are prompted to make sure you want to delete the items as the action cannot be undone. Note: Similar to the New command (see above), this option will only appear for tables with rows that can be deleted.
- Reload - Clicking this button replaces the data in the current screen with the last saved copy in the database. This is useful if you have made a number of changes to a row and wish to discard them all in one operation. Note: Keep in mind that the program saves the changes to a row each time a new row is selected. Thus, if you edit three rows in succession and then select the Reload button, only the third row will be restored.
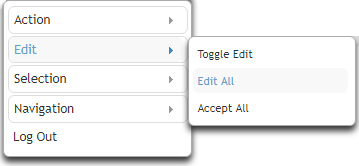
Edit Menu
- Toggle Edit - This command switches from the current mode of editing to the opposing mode (either On or Off). Refer to the Edit Mode description on this help page to learn more about this feature.
- Edit All - This command activates Edit Mode for all of the rows in the table. Note: If the current table has many rows and columns visible, choosing this command will use an increased amount of your system resources.
- Accept All - This command saves the changes for all of the rows in the table. Any rows that are currently being edited will have Edit Mode toggled to the Off state.
Global Edit Mode - If the Edit Mode cell is activated in the User - Options screen, the preceding Edit commands will not appear in the contextual menus.
Selection Menu
- Select All - This command selects all of the visible rows in the current table (i.e. highlights all of them). This can be useful if you wish to perform a batch action for all rows. Refer to the Selection Mode description on this help page to learn more about this feature.
- Clear Selection - This command deactivates Selection Mode for all of the rows in the table.
- Reverse Selection - This command changes the selection to the opposing mode for all of the rows in the table. Any rows that were selected will be unselected and any unselected rows will become highlighed.
Expand / Collapse Menu
- Expand - This command reveals additional rows and cells that are available for the row. Refer to the Expand description on this help page to learn more about this feature.
- Collapse - This command hides additional rows and cells that are available for the row. Refer to the Collapse description on this help page to learn more about this feature.
- Expand All - This command reveals additional rows and cells (if available) for all of the rows in the table.
- Collapse - This command hides additional rows and cells (that were previously revealed) for all of the rows in the table.
- Back (Ctrl+Left) - This command allows you to navigate quickly to the previous screen in your program navigation history (i.e. the most recent screen you were viewing, prior to the current screen). The command displays the name of the screen that will be displayed if the command is chosen. You can also press the <Ctrl+Left Arrow> keys on your computer keyboard to perform the same function. Note: This menu item will appear as "None" until you build a navigation history that can be traversed (i.e. you have navigated to at least two program screens).
- Forward (Ctrl+Right) - This command allows you to navigate quickly to the next screen in your program navigation history. The menu item displays the name of the screen that will be displayed if the command is chosen. You can also press the <Ctrl+Right Arrow> keys on your computer keyboard to perform the same function. Note: This menu item will appear as "None" until you build a navigation history that can be traversed (i.e. you have navigated to at least two program screens).
- Previous (Left) - This command allows you to navigate quickly to the previous logical screen based on the order shown in the Menu Bar at the top of the page. The menu item displays the name of the screen that will be displayed if the command is chosen. You can also press the <Left Arrow> key on your computer keyboard to perform the same function.
- Next (Right) - This command allows you to navigate quickly to the next logical screen based on the order shown in the Menu Bar at the top of the page. The menu item displays the name of the screen that will be displayed if the command is chosen. You can also press the <Right Arrow> key on your computer keyboard to perform the same function.
Selection Mode 
These controls are used for controling your method of choosing (highlighting) rows and will only appear if Selection Mode has been deactivated from the Options page. Selection Mode is a global setting that applies to all pages.
- When Selection Mode is set to Yes (the default setting), clicking on a row will highlight it to indicate that it is designated as the current (or active) row. In this mode, you can add other rows to your selection my holding down the <Ctrl> key on your keyboard as you click on each new row. Multiple row selection is useful when you wish to perform a selected action to more than one row in a single action (e.g. if you wish to delete a series of rows).
- When Selection Mode is set to No, each row will have a checkbox added (
 ) so that you can highlight multiple rows as needed. While In this mode, you cannot edit a row by double-clicking on it. To enter Edit Mode, you must either choose the Toggle Edit button in the Button Bar or you can right-click on the desired row and choose the Edit - Toggle Edit command from the pop-up menu that appears.
Edit Mode - This mode is distinct from Selection Mode, however the two features function in tandem. Edit Mode refers to the state where a row is highlighted and all of its various controls (e.g. cells, drop-down lists, checkboxes, etc.). are ready for editing. This mode can be useful in certain cases such as during the payroll setup process when you are constantly entering large amounts of data on each screen and want to save the time of having to explicitly activate Edit Mode for each row you encounter.
Edit mode can be activated in a number of ways. Depending on your preference, this mode can be applied to individual pages, the current session only, or to all pages at all times.
To work in Edit Mode for single pages:
- Double-Click - Double-click on the row. This will highlight the row and activate it for editing.
- Toggle Edit Button - Click on a row to highlight it, and then select the Toggle Edit button from the button bar. This will activate the row for editing.
- Properties Menu - Click on a row to highlight it, then right-click on the row to display the Table Properties menu. Choose the Edit - Toggle Edit command from this menu and the row will change to edit mode.
To work in Edit Mode for multiple pages:
- Multi-Selection - Select the multiple rows you wish to edit by holding down the <Ctrl> key on your keyboard as you click each desired row. When all of the rows are selected, you can use any of the three methods listed above to activate Edit Mode for all of the selected rows.
- Set the Mode Globally - Choose the <Username> - Options menu command (the <Username> menu is located at the top left of the screen). When User - Options screen appears, double-click the Edit Mode cell and then place a check in its checkbox and Save the change. The Edit Mode cell will now read True, and every table row in the program will be in edit mode at all times.
Note: Setting Edit Mode for all pages can result in reduced program performance if you have a large payroll with many employees and items. It is recommended that you use this feature only on occasion, such as when you are creating a new payroll where being in edit mode at all times would be the most efficient.