Help Toolbar (select a button to browse other online help sections) Home Tutorials Resources Search Tabs & Menus Button Bar Table & Data Display |
Viewing Payroll Transactions
During the payroll review process, it is sometimes necessary to review past payroll transactions, whether they be for the current pay sequence or for a historical pay run. This tutorial will show you how to review transactions that have been calculated for each pay run.
For this tutorial, we will discuss how to view transactions for the current pay period, to create a custom transaction view, and to export your transaction data to a .CSV spreadsheet.
- Part 1 - To view payroll transactions
- Part 2 - To create a custom transaction view
- Part 3 - To export transaction data to a .CSV spreadsheet
NOTE: Click on the images below to view them at full size
Part 1) To view payroll transactions:
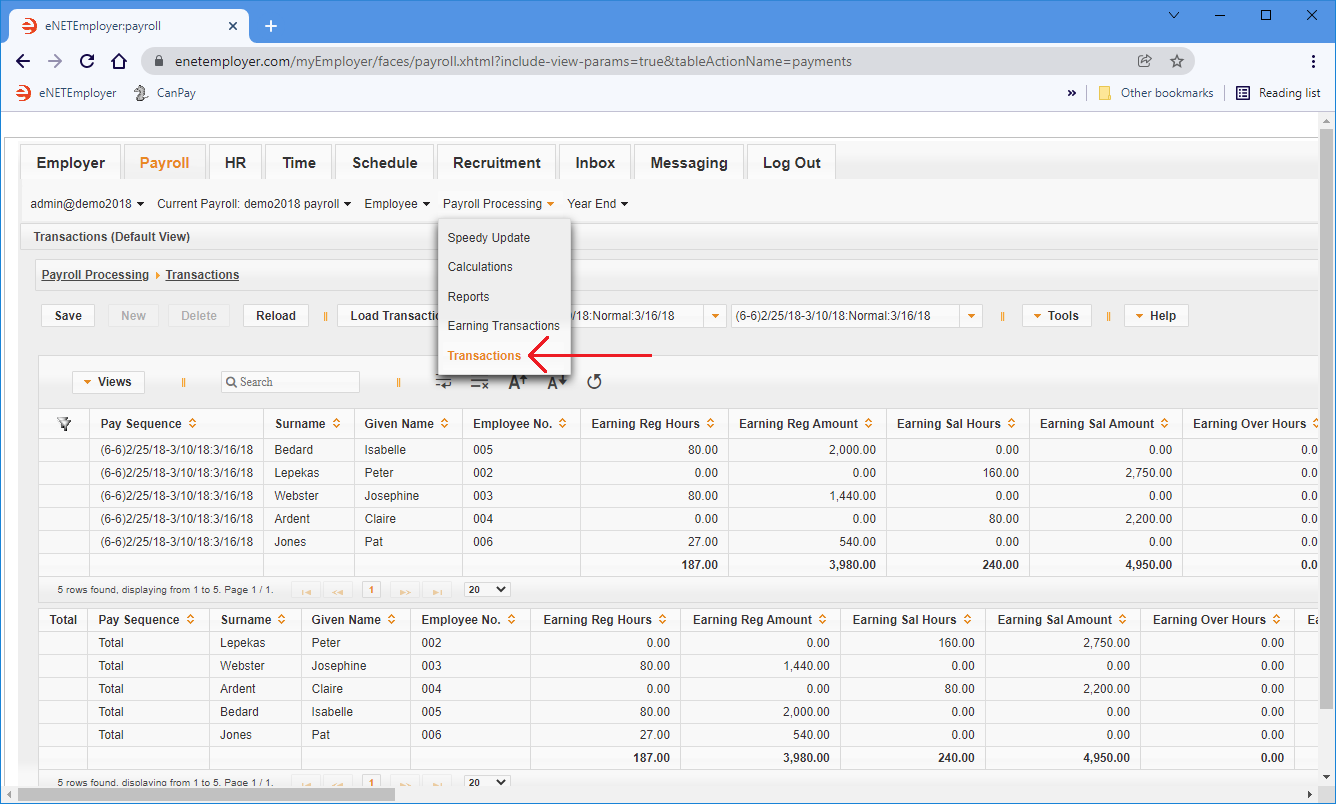
- From the Payroll tab, select the Payroll Processing - Transactions menu option. This opens the Transactions screen where you can view payroll transaction data for one or more sequences.
Transactions Help page...
When the Transactions screen appears, the data for the last closed pay sequence is pre-loaded for easy viewing.
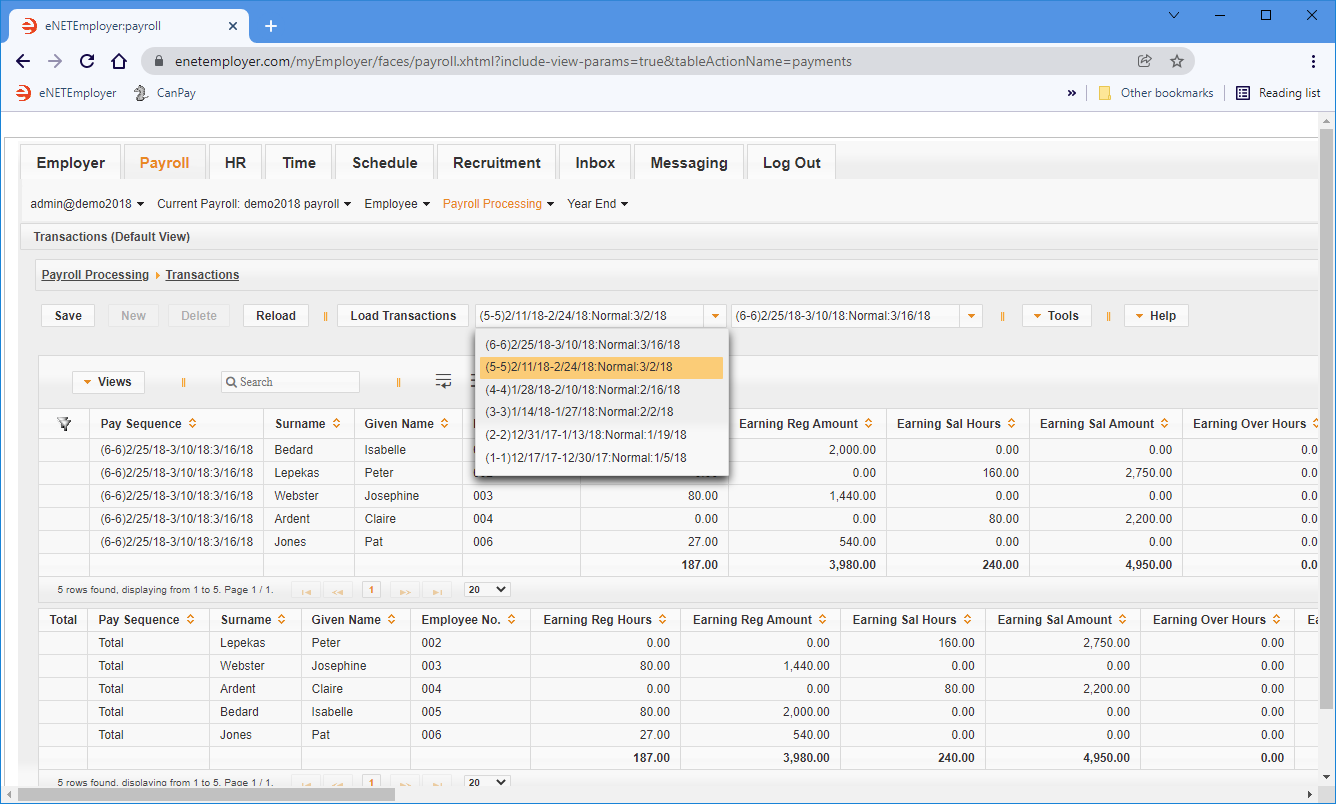
Example: In Fig. 01 below, the transactions for pay sequence #6 are shown (this is the most recent pay sequence that was closed). - When the Transactions screen appears, click on the first drop-down list that appears beside the Load Sequence button. This list shows the pay sequences that are associated with the active payroll, beginning with the current (open) sequence at the top, followed by the historical sequences (ordered by date).
We will use this list to designate the "starting" pay sequence as we view a range of transactions from our payroll. - From the open list of sequences, choose a pay run that has occurred at least one or two periods ago.
Example: In Fig. 02 below, we have chosen sequence #5 - the previous sequence in our payroll.
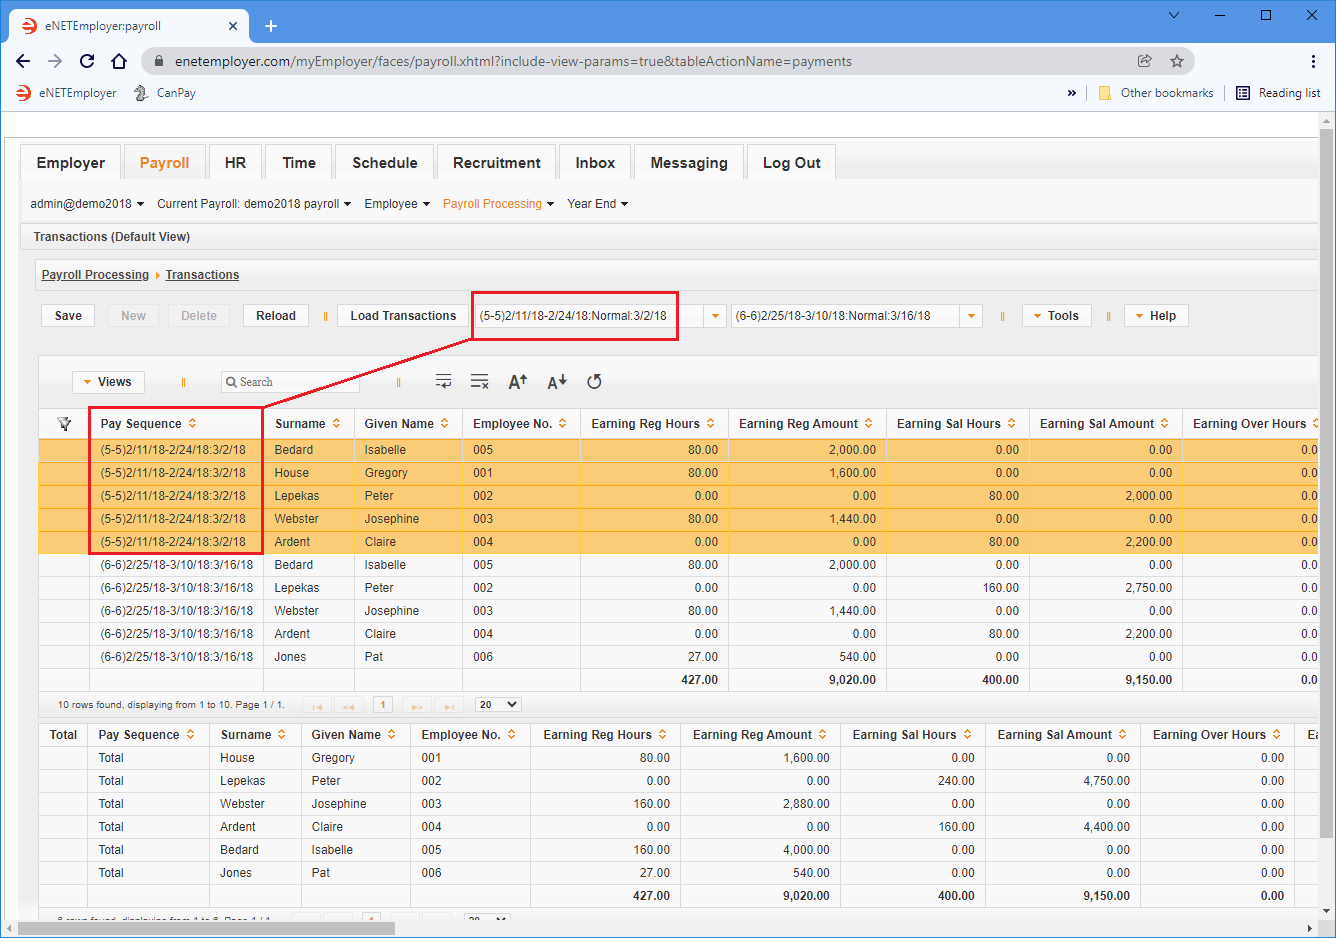
- Select the Load Transactions button. This will update the table to display each employee's payroll transactions for the chosen pay sequences. The rows at the top of the first table show the data from the starting pay sequence (the first drop-down list).
Example: In Fig. 03 below, the data is displayed for sequence #5 and followed by sequence #6.
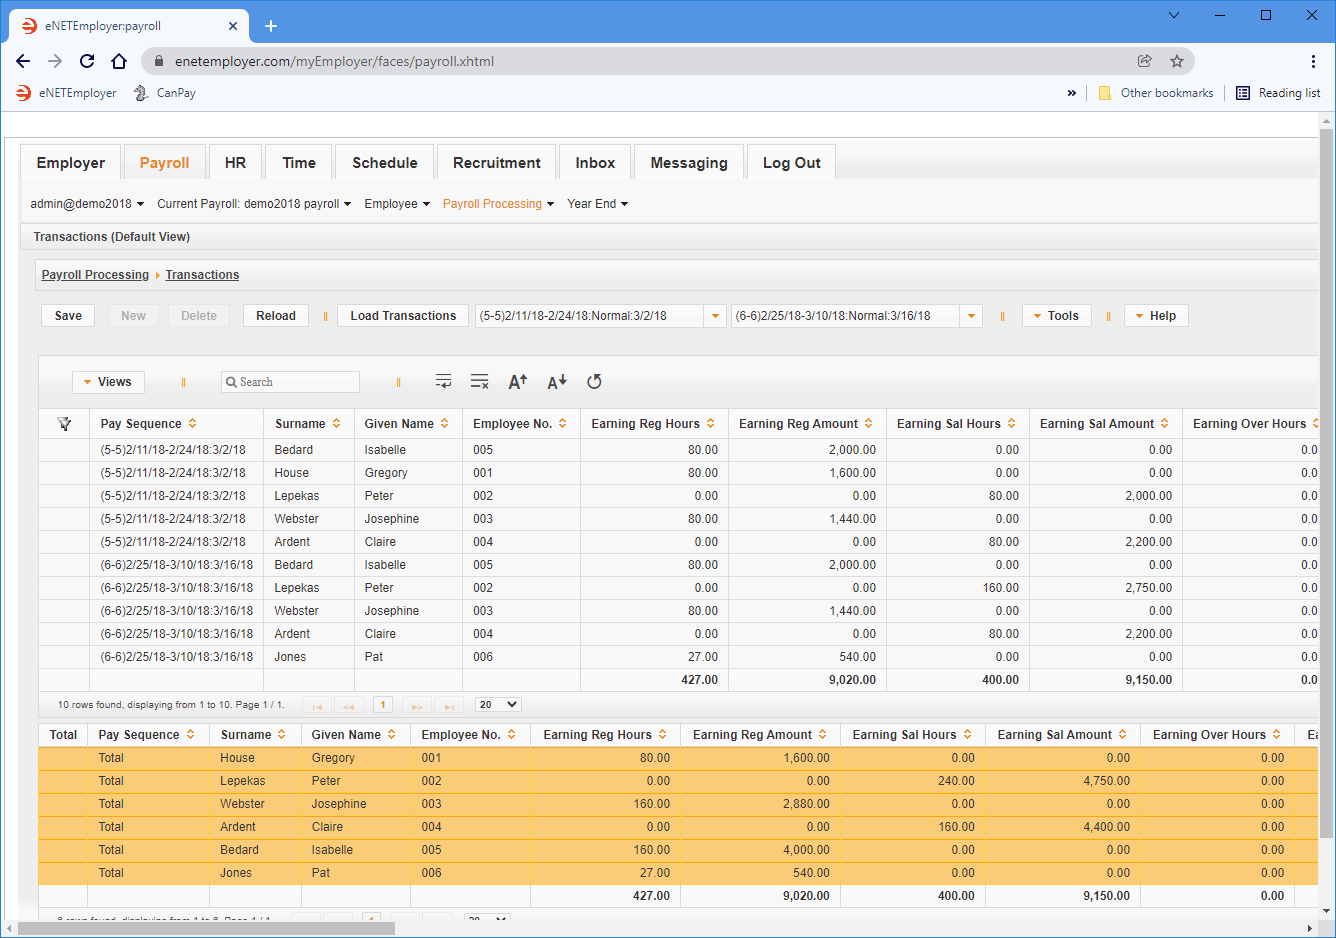
Take note of the column labels at the top of the first table. Beginning with payroll earnings, the column titles are based on the earning's Short Name as defined the Earnings screen.
Example: In Fig 04 below, the first three columns show the data for our Regular, Salary, and Overtime earnings (whose Short Names were defined as Reg, Sal, and Over respectively).
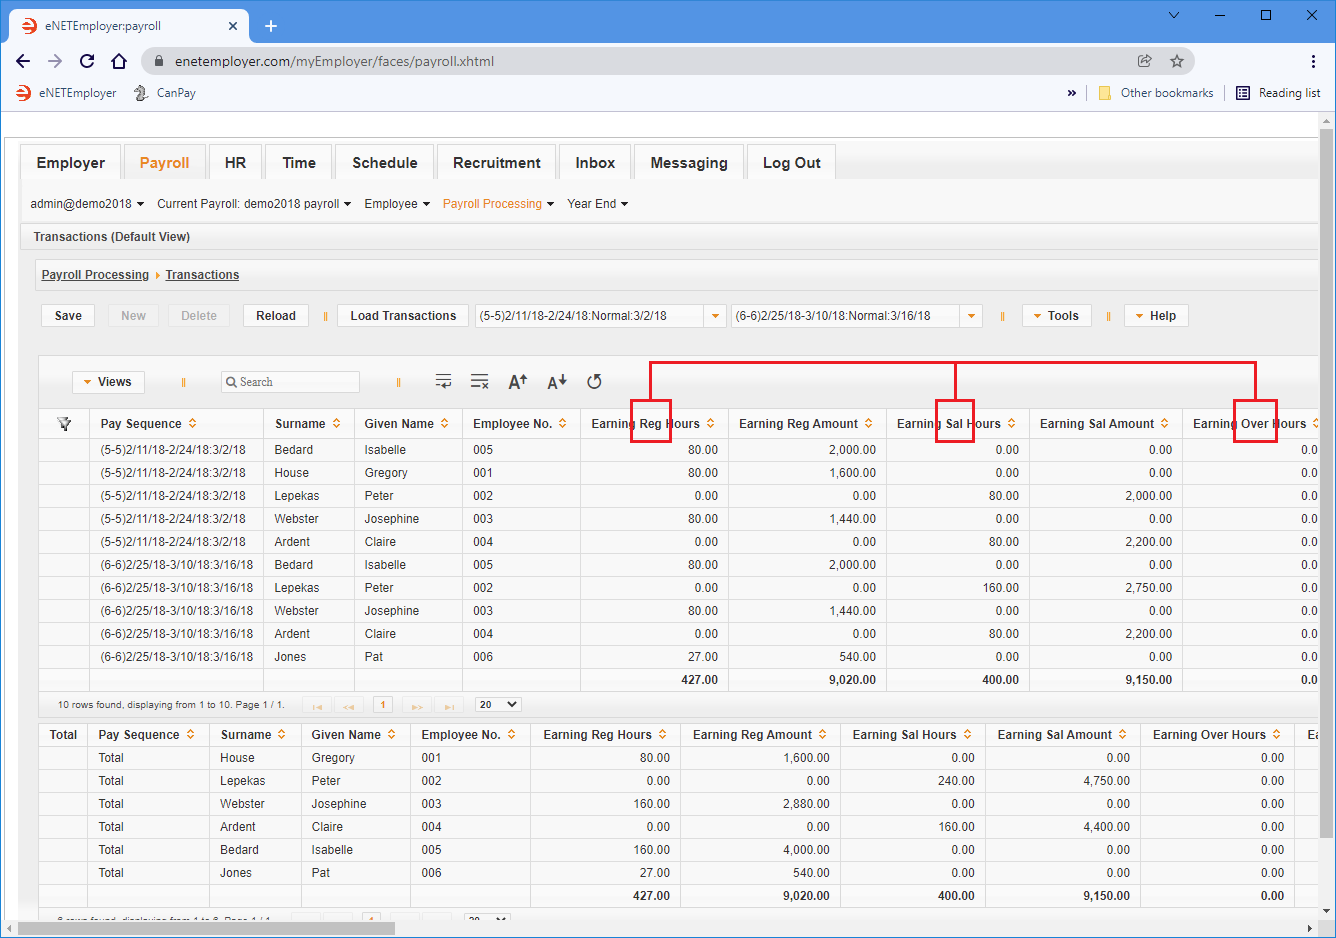 Fig. 04: Each column's label is based on the item's "Short Name" as defined when the item was added to the payroll.
The bottom table displays the totals of all pay sequences in the chosen range of pay runs.
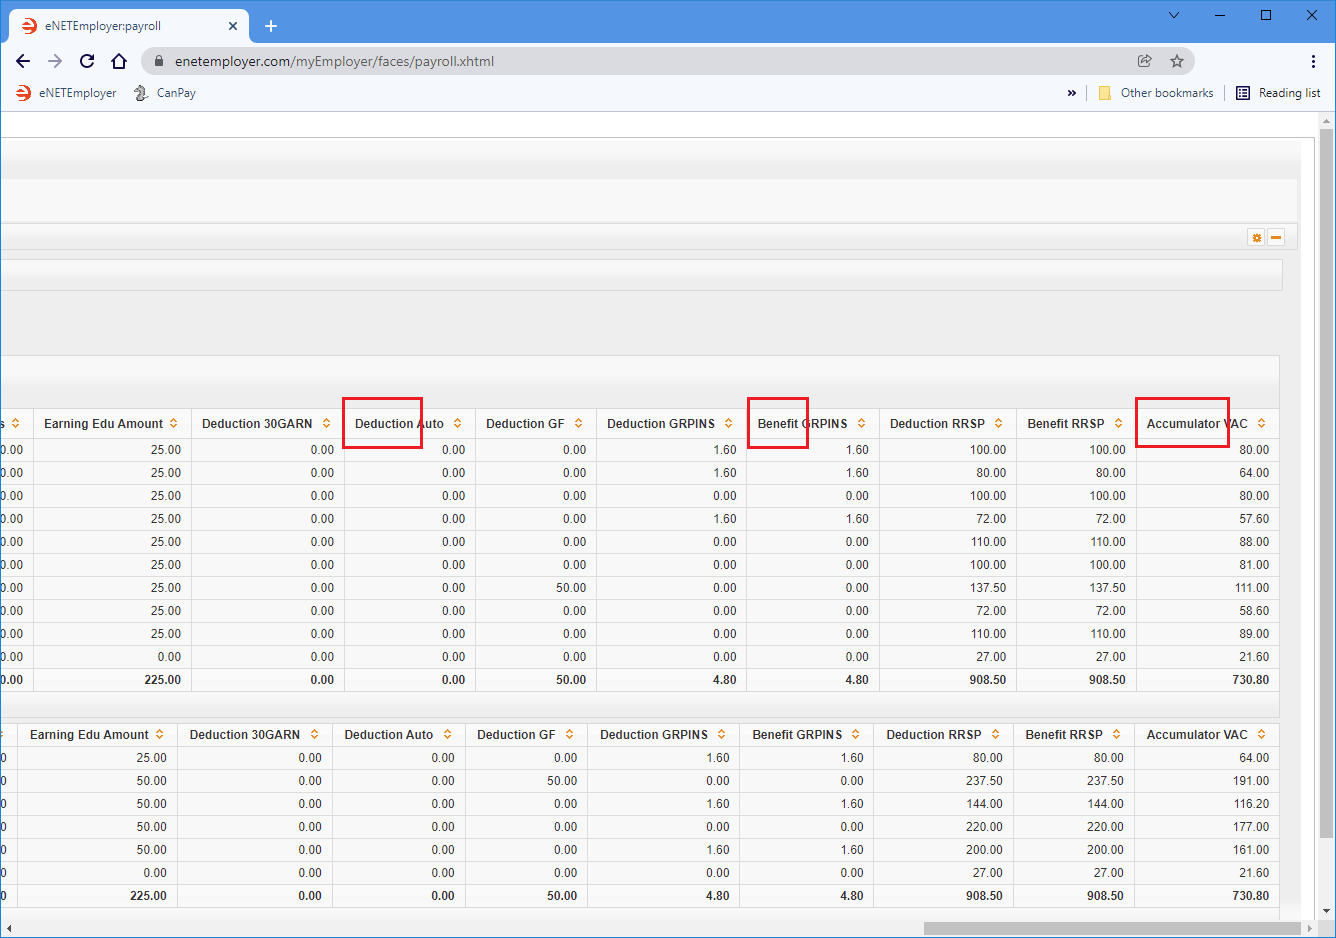
- Using the scroll bar at the bottom of the browser, scroll to the right side of the table and you will see the other types of transactions including deductions, benefits, and accumulators.
Now that you've learned how to view all available payroll transactions, let's use a custom view to focus on one type of earning only.
Part 2) To create a custom transaction view:
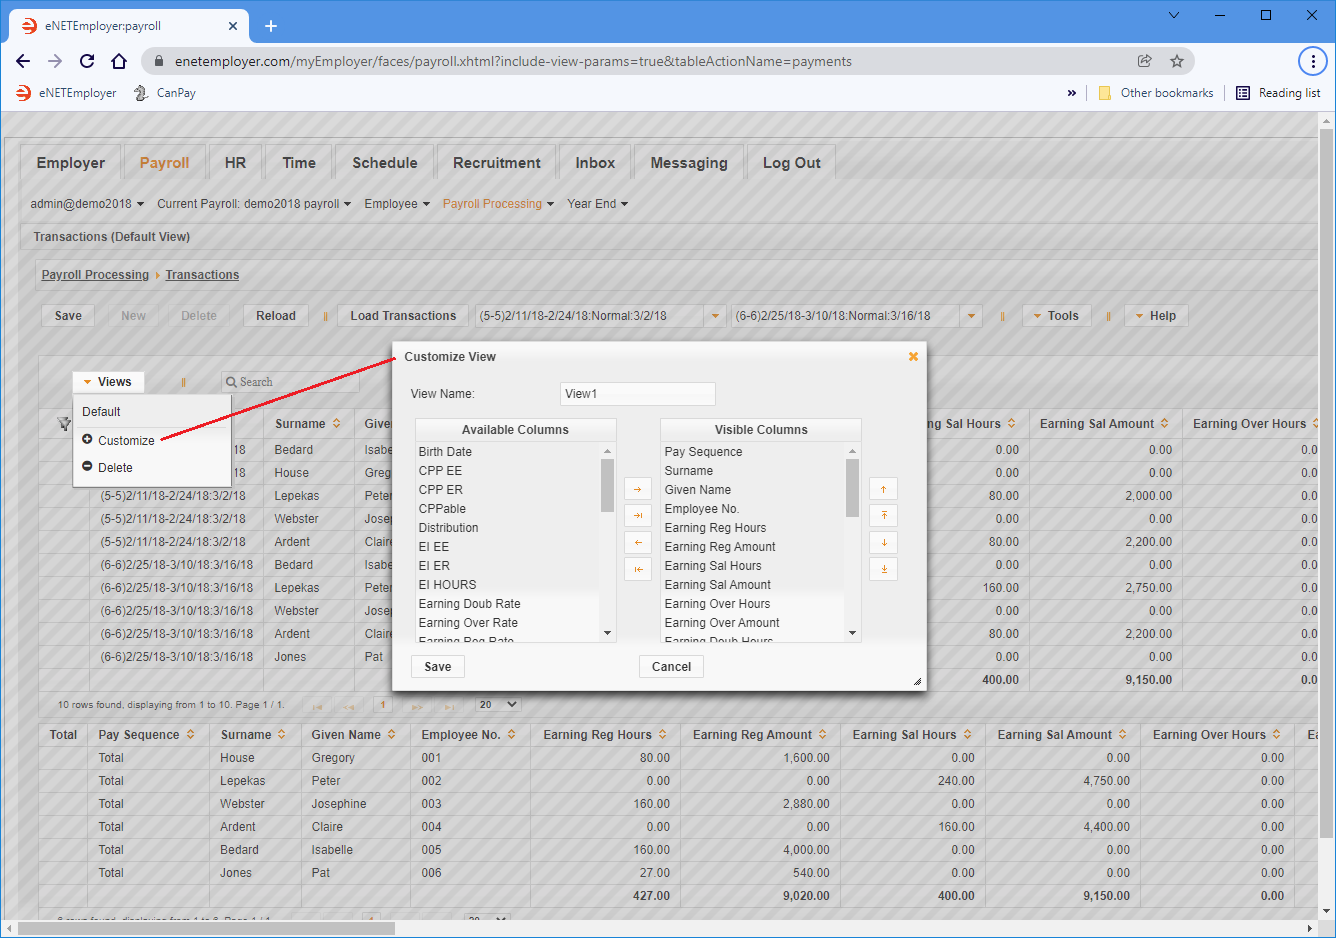
- Select the Views button from the top left side of the table, and then choose the Customize option. This displays the Customize View pop-up window.
The Visible Columns section on the right section of the window shows the set of data columns that are currently visible in the table. The column on the left shows many other data columns that you can choose to display in your table simply by moving its corresponding label over to the right section of the window. Columns can be moved in a number of ways:a) Clicking on a column name and dragging it to the opposing section or into a new location in the same section.
We will now remove some of these items so that we only display the Regular Hours columns.
b) Double-clicking on a column name (which will move it to the opposing section).
c) Using the Arrow icons located in the center of the window to move an item(s) from one section to another.
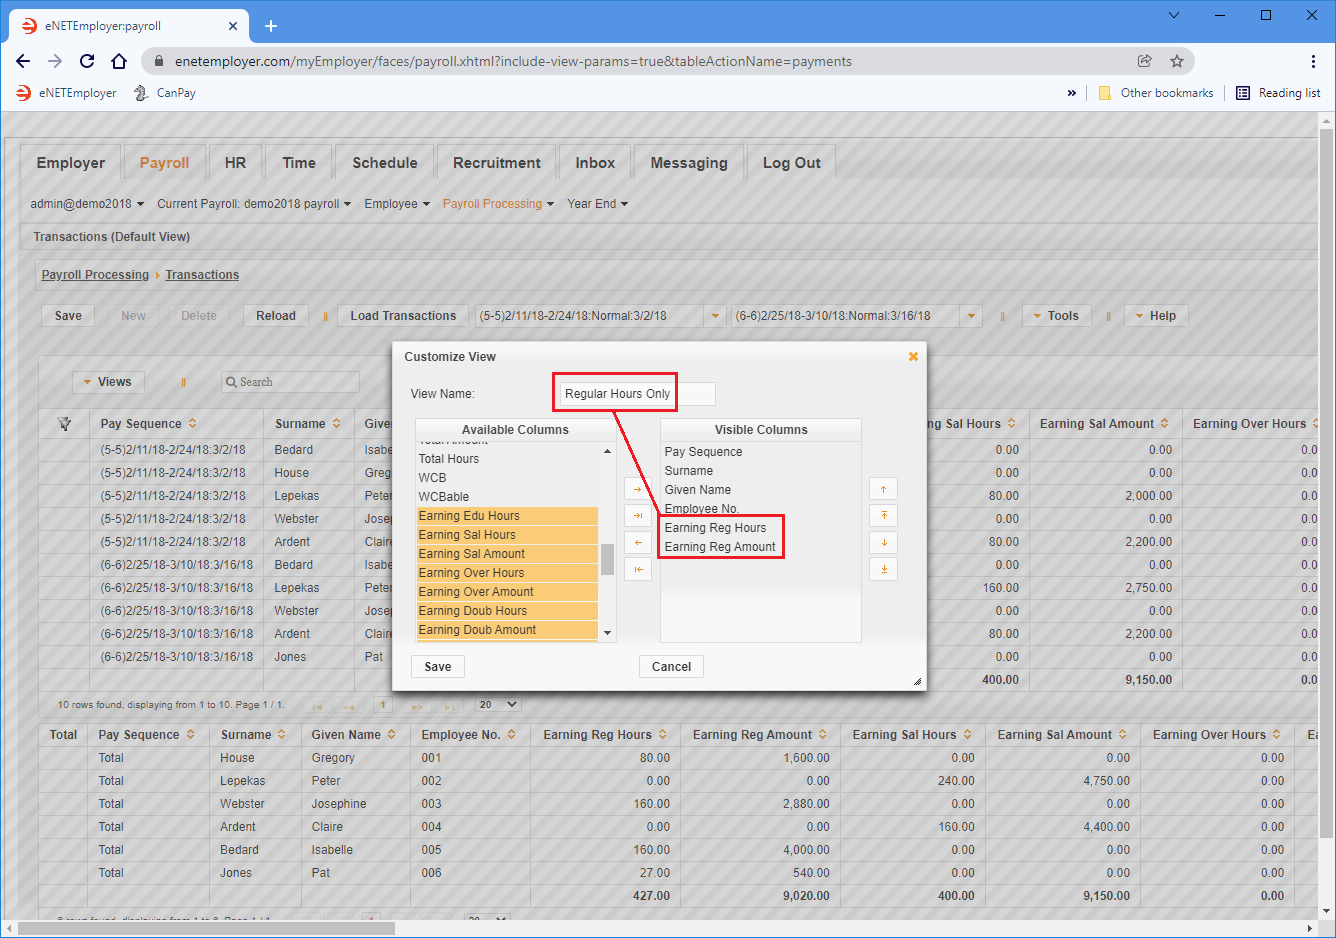
d) To select multiple items, you can hold down the <Ctrl> key on your keyboard as you select each item. - Starting from the bottom of the Visible Columns section, select all of the items except for your Regular Hours columns, and then move them to the Available Columns section using any of the four methods listed above.
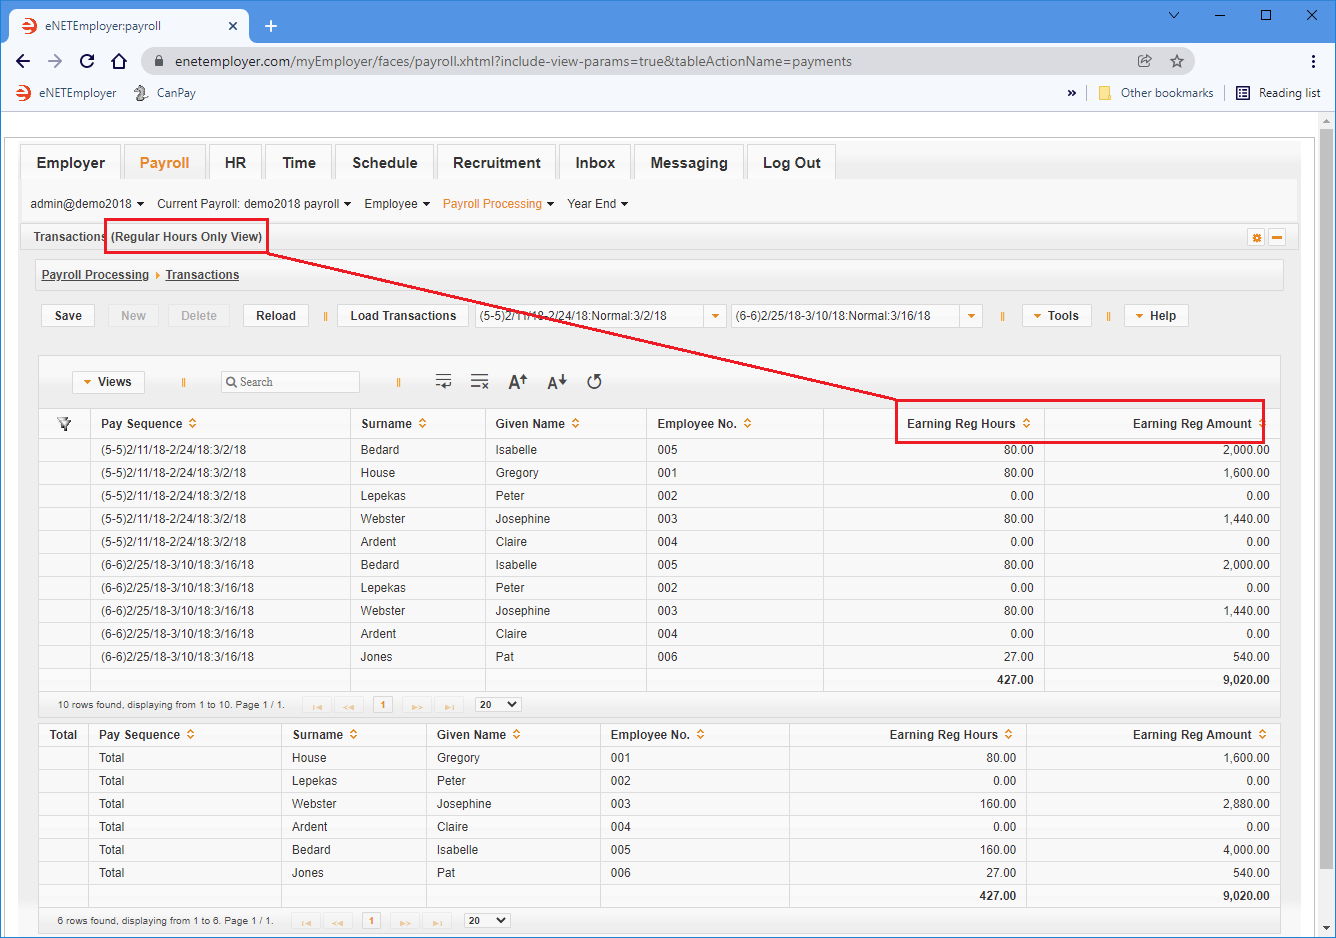
Example: In Fig. 08 below, we have removed a number of items so that we will have a much simplified view - one that includes only our regular hourly totals. - Enter a name for your custom view in the View Name column and then choose the Save button. The screen is refreshed and the table now excludes the columns that you have hidden. The title for the screen is also changed to reflect the custom name that you entered (we entered "Regular Hours Only" as our custom name).
Example: In Fig. 09 below, we can now view our earning-specific data. Now that you know how to create a custom view, proceed to the next section and learn how to export your transaction data to a spreadsheet for further review and reporting.
Part 3) To export your transaction data to a .CSV spreadsheet:
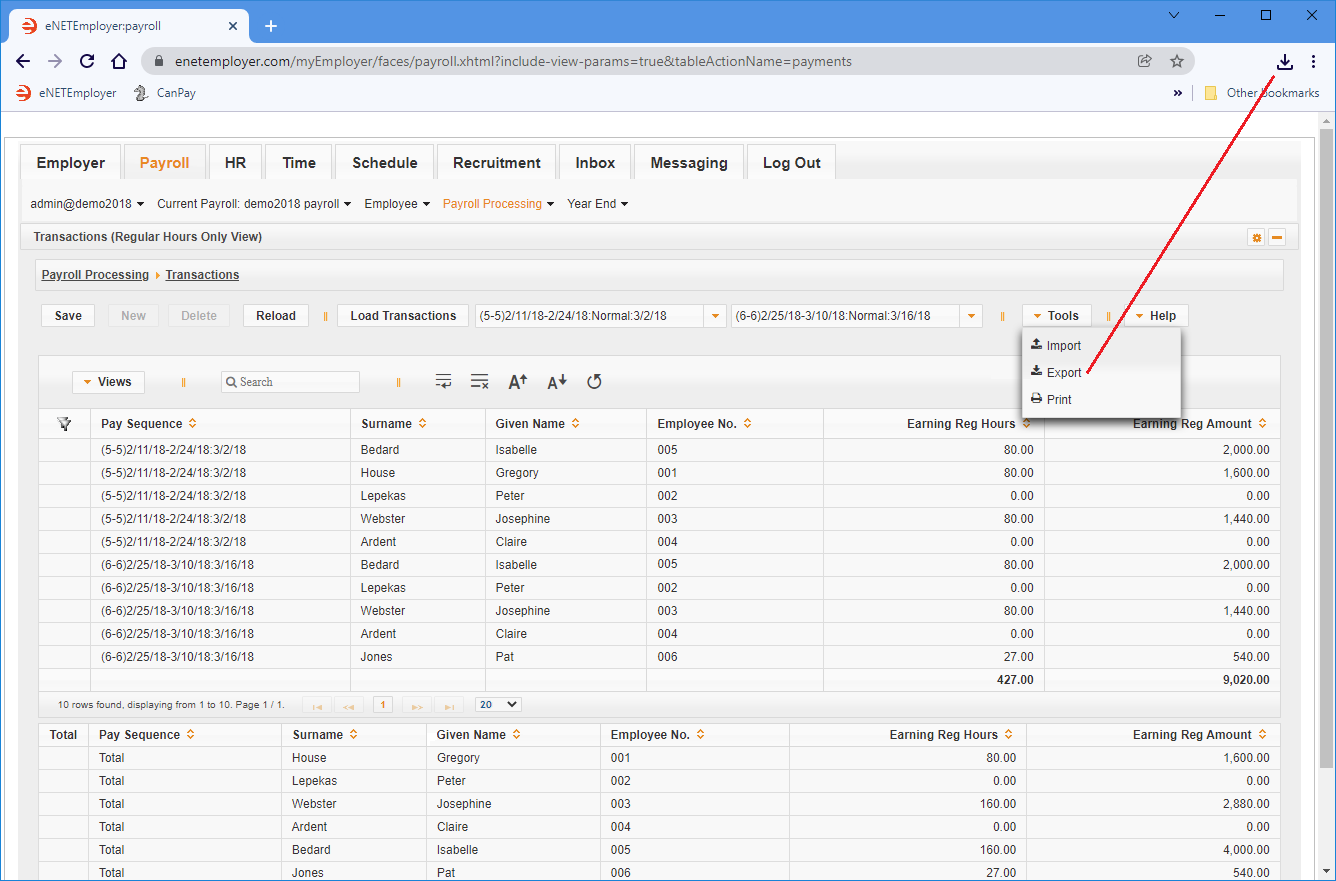
- Select the Tools button that is located at the top right of the table, and then choose the Export option from the drop-down menu. This action exports the current table's data as a comma-separated values (CSV) file. Depending on your browser settings, the resulting document will either be stored in your Downloads folder or you may be presented with a window that will prompt you where to save the file. In most browsers, the document can be viewed via a link that appears at the top-right of your browser.
Example: In Fig. 10 below, our browser provides access to the downloaded file via an icon that appears at the top-right of the browser window.
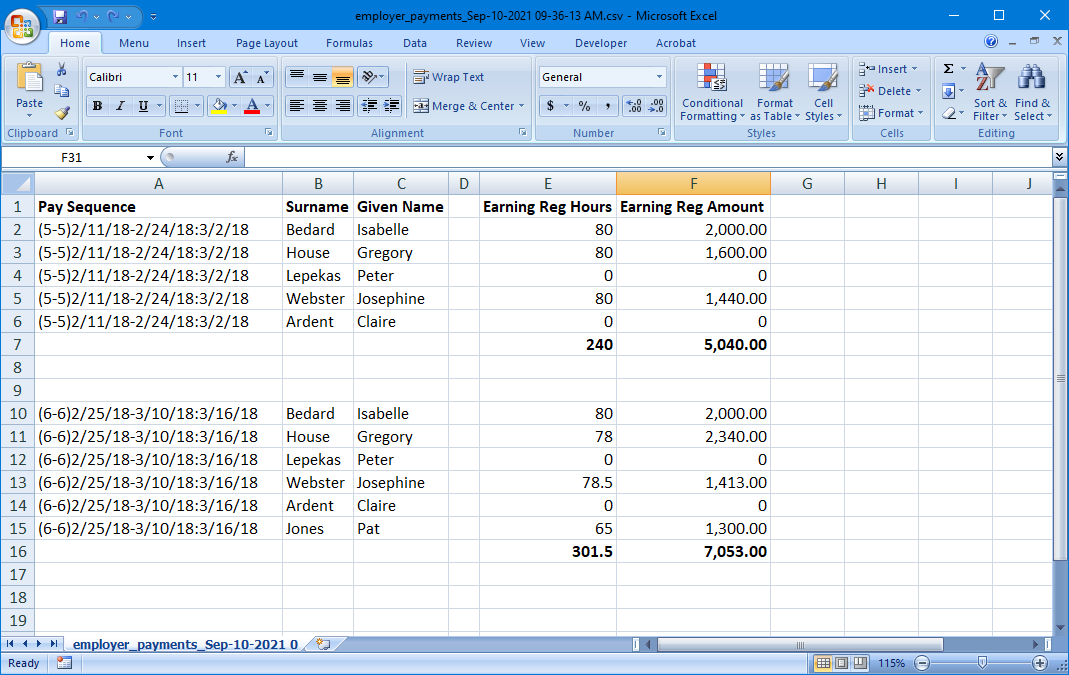
- Click the Download link to access the file, or navigate to your Downloads folder and open the .CSV file using your preferred spreadsheet program.
Example: In Fig. 11 below, we have edited the data and applied some basic formatting to create a custom report.
This completes the tutorial on how to review your payroll transactions, how to create a custom report, and how to export your trransaction data to a .CSV spreadsheet.
See Also:
