Help Toolbar (select a button to browse other online help sections) Home Tutorials Resources Search Tabs & Menus Button Bar Table & Data Display |
Working with Sick Time
eNETEmployer allows you to work with employee sick time, where an employee can be paid while they are away from work while they are on sick leave. Sick time accruals can be stored in dollars or hours. When the employee wishes to withdraw sick time, the corresponding hours are deducted from their sick time bank and paid at their standard hourly rate.
For this tutorial, we will show you how to create two different types of sick time accumulators:
- Method 1: Sick Time by Dollar Amount - You manually enter an employee's sick time based on its dollar value.
- Method 2: Sick Time by Hours - eNETEmployer automatically accumulates the sick time by the hour.
Method 1: Sick Time by Dollar Amount
This lesson will show you how to create a sick time earning and its related accumulator, so that you can manually assign sick hours and withdraw from the employee's accrued amounts as needed. The lesson is comprised of four sections:
- Create the sick time earning and related accumulator.
- Assign the sick time earning and accumulator to the employee.
- Add any pre-existing amounts to the sick time accumulator.
- Pay out sick time.
A: Create the sick time earning and related accumulator:
- From the Payroll tab, open the Current Payroll - Earnings screen where you can work with your payroll earning types.
- Choose the New button to insert an earning row in the table. The row appears in Edit Mode with its cells ready for editing.
- Move to the Name cell and enter "SickTime", and then set the Short Name to "Sick".
- Set the Type to Hourly and change the Calculate Method to As Rate Of.
- Set the earning's Rate to "1", then choose the Regular earning from the Rate of Earning drop-down list. When the SickTime earning pays out an amount, it will do so at at 1x the employee's Regular earning rate.
Example: In Fig. 01 below, we have created the SickTime earning and its related settings. - From the Payroll tab, open the Current Payroll - Accumulators screen, and then choose the New button to insert an accumulator row in the table.
- Move to the Name cell and enter "SickTime", and then set the Short Name to "Sick".
- Place a check in the Appear on Pay Statement box. This will display the accumulated amounts on the employee's pay stub.
- Set the Pay Out As cell to use the SickTime earning.
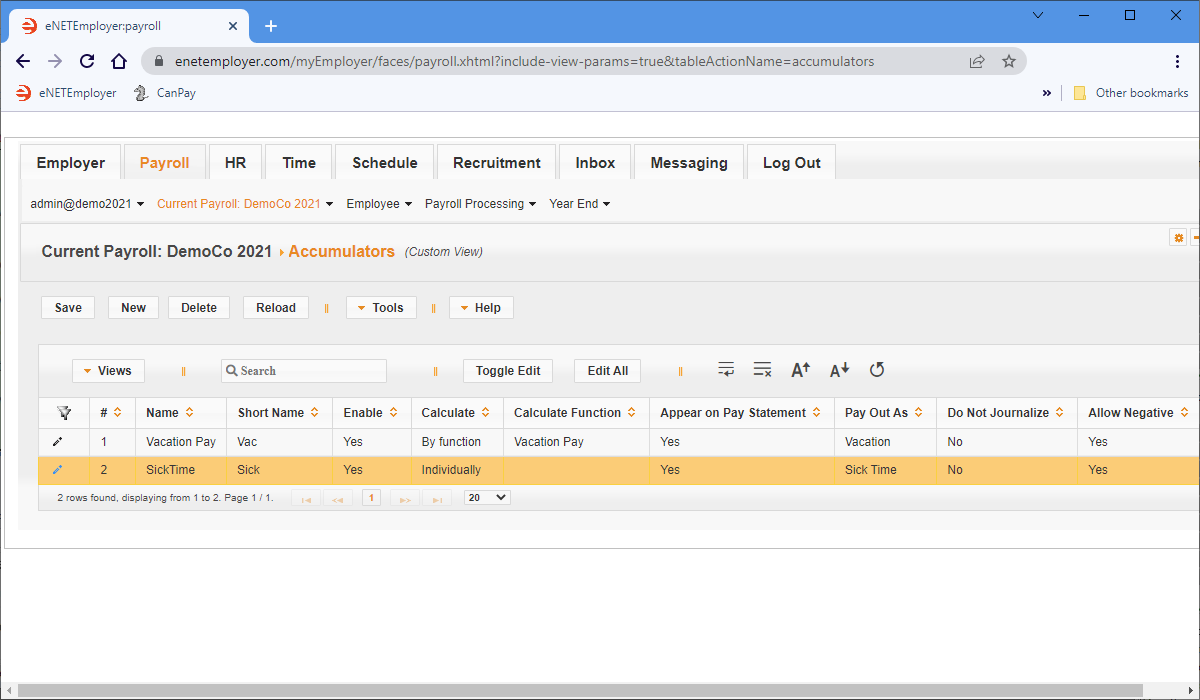
Example: In Fig. 02 below, we have created the SickTime accumulator and its related settings.

Now we can create the related accumulator that will accrue the amounts until you are ready to pay them out.
Now we can assign the sick time earning and related accumulator to an employee.
B: Assign the sick time earning and accumulator to the employee:
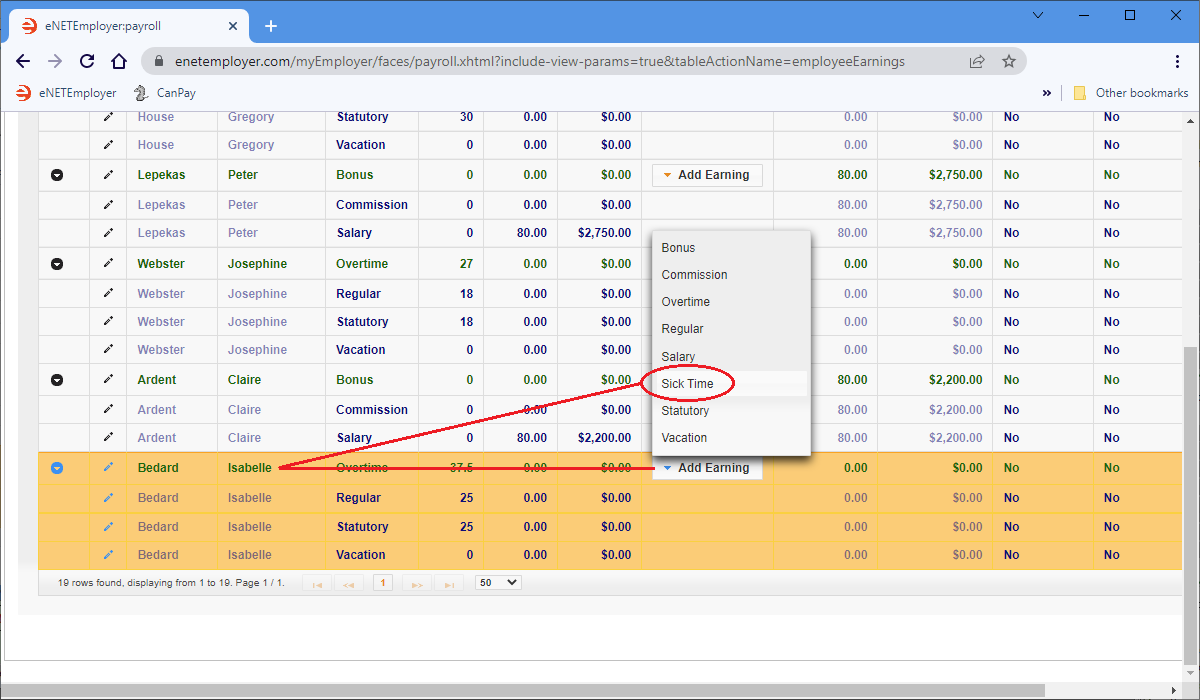
- From the Payroll tab, open the Employee - Earning Items screen, and then click the Add Earning button for the employee who will be assigned the sick time earning. This displays a pop-up list of earnings that can be assigned to the employee.
- Select the SickTime option from the list to assign the earning to the employee, and then Save the row.
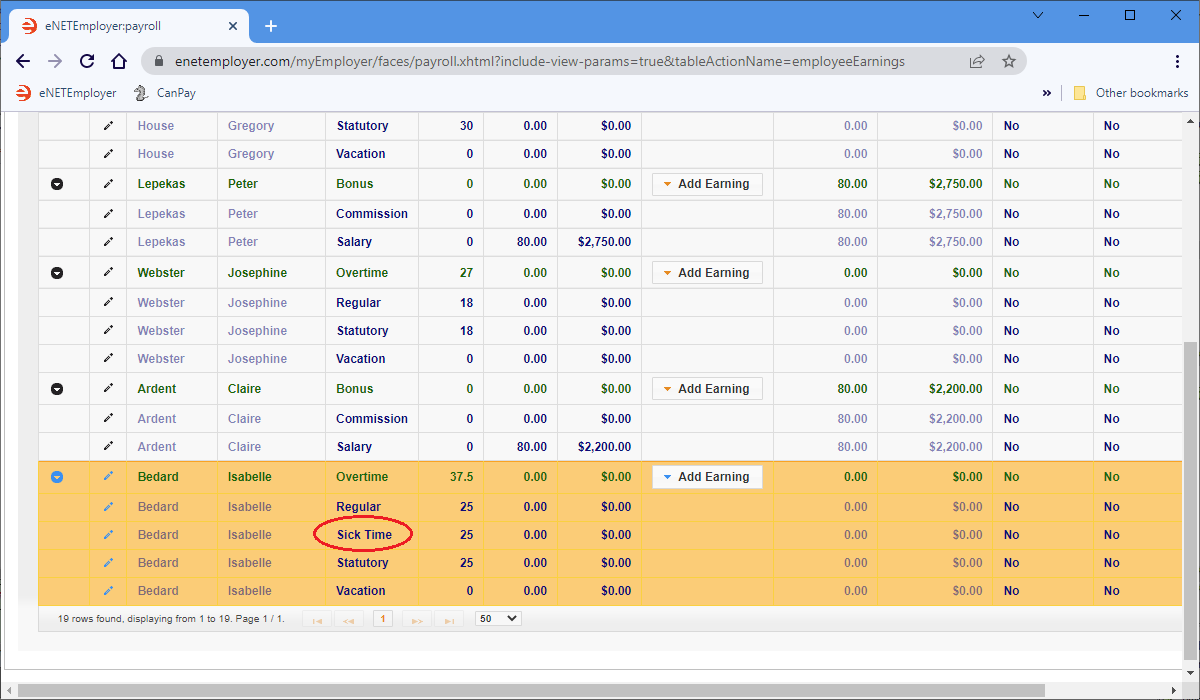
- Select the Update All Rates button from above the table to apply the earning rate multiplier to the SickTime earning (we set the rate multipler back in Step 1 when we set the SickTime earning's Calculate Method to As Rate Of the Regular earning). Note: If you prefer, you can also set the rate manually by moving to the Rate cell and entering the earning's rate of pay.
Example: In Fig. 04 below, we have assigned the SickTime earning to the employee, and have set its pay rate to match the employee's Regular rate.
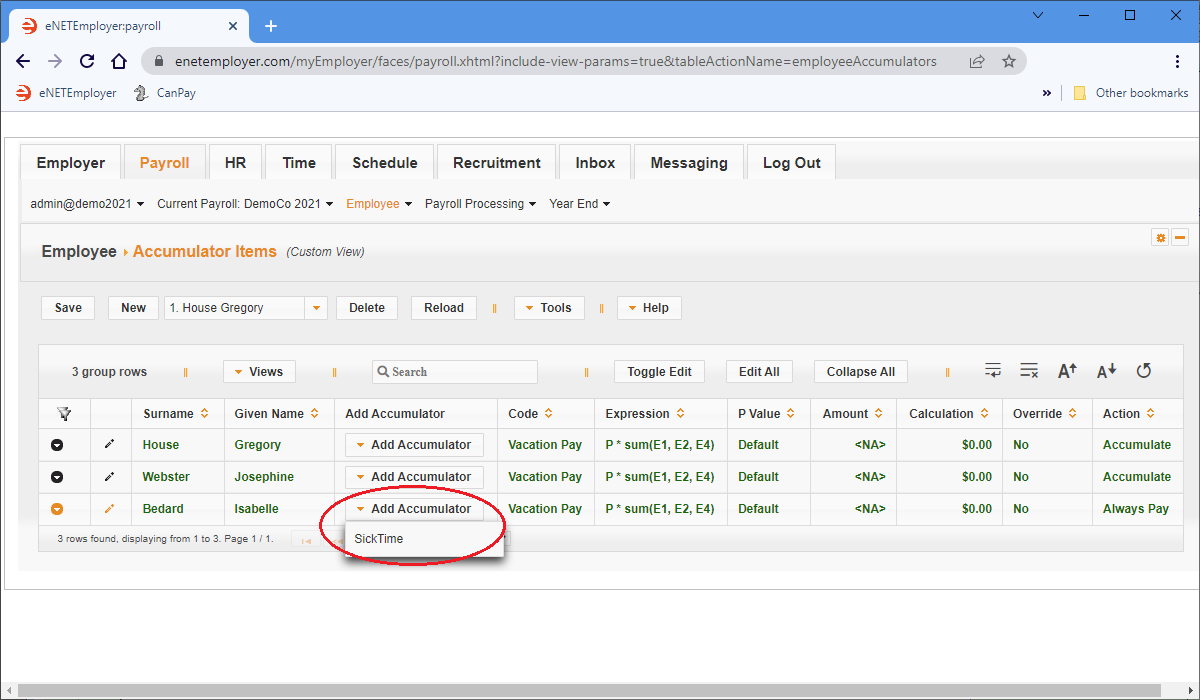
- From the Payroll tab, open the Employee - Accumulators screen, and then click the Add Accumulator button for the employee who will be assigned the accumulator. This displays a pop-up list of accumulators that can be assigned to the employee.
- Select the SickTime option from the list to assign the accumulator to the employee.
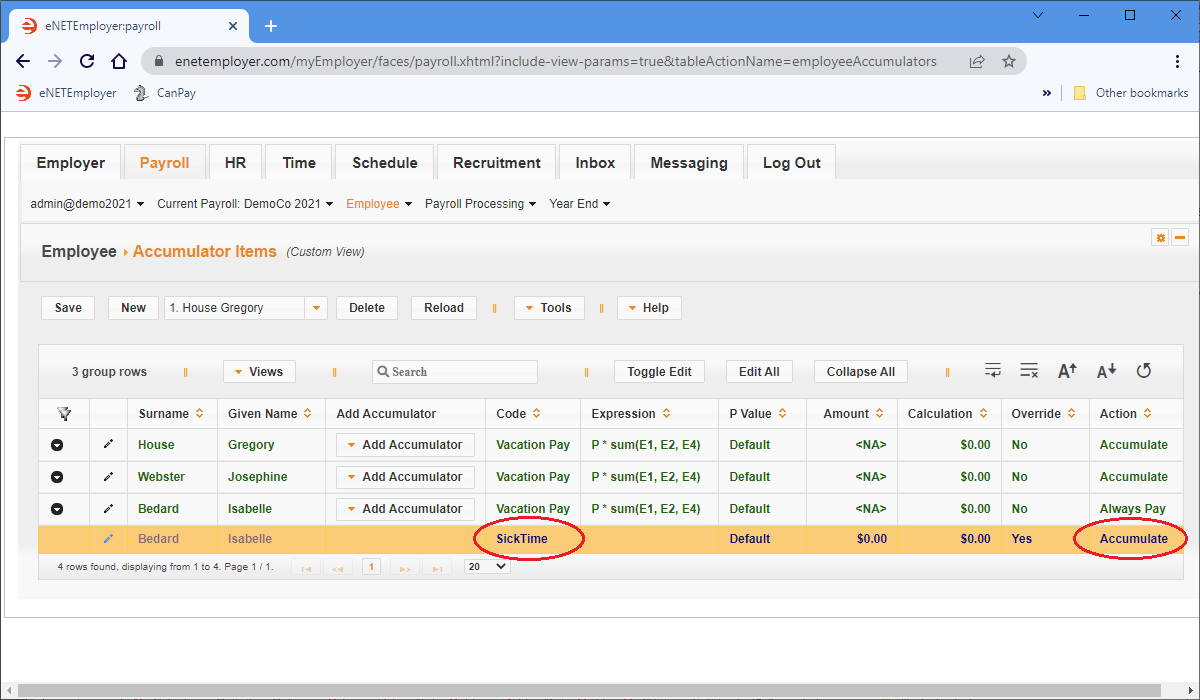
Example: In Fig. 06 below, we have assigned the SickTime accumulator to the employee, and its default action will be to accrue all sick amounts.
Earning Items Help page...
Example: In Fig. 03 below, we will assign the SickTime earning to the last employee in the list - Isabelle.
Now we can assign the related accumulator.
Accumulator Items Help page...
Example: In Fig. 05 below, we will assign the SickTime accumulator to our sample employee.
If you have any year-to-date balances for your sick time accumulator, you can proceed to the next step and enter the accrued amounts. If you do not have any accrued amounts, you may skip this section and proceed to step D below.
C: Add any pre-existing amounts to the sick accumulator:
- From the Payroll tab, open the Employee - YTD Accumulators screen. This screen allows you to view and modify year-to-date accumulator values for your employees.
- Double-click on the accumulator row for the employee whose sick time you wish to enter. Note: If you cannot see all of the rows for a given employee, use the Expand icon (the right-facing arrow located at the left side of each row) to expand all of the rows for the employee.
- Move to the Adjustment cell and enter a dollar amount for the employee's existing sick time. This amount will remain until a portion (or all) is paid out.
Example: In Fig. 07 below, we have expanded the two accumulator rows for our sample employee, and have entered an existing sick value of $500.00.
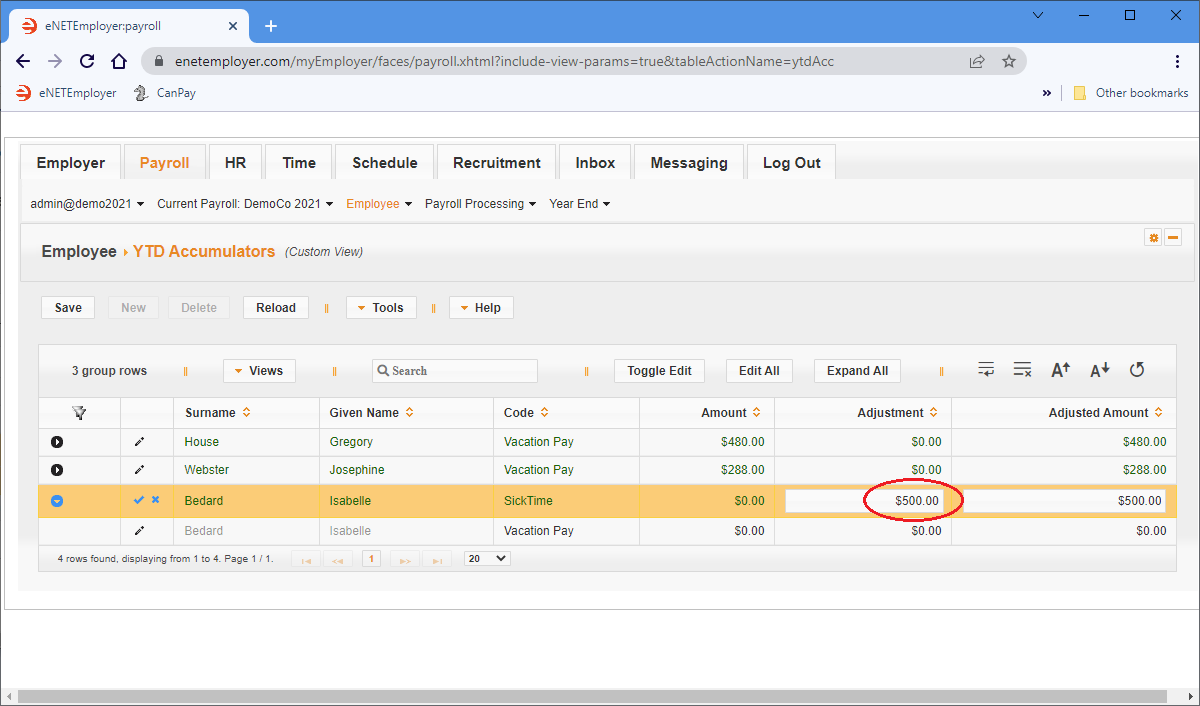
You may also notice that our sample employee's "Vacation Pay" accumulator shows a value of zero. This is because the related accumulator's Action is set to "Always Pay" (thus the employee receives all calculated vacation amounts on each cheque). The other two sample employees are set to have their Vacation "Accrue", and their YTD vacation amounts will continue to build until they are paid out.
When you are ready to pay out a portion (or all) of the employee's sick time, you can proceed to the final step below.
D: Pay out sick time:
- From the Payroll tab, open Payroll Processing - Speedy Update screen, and then edit the row for the given employee.
- Move to the Sick Hours cell, enter the number of hours that will be paid out for the period.
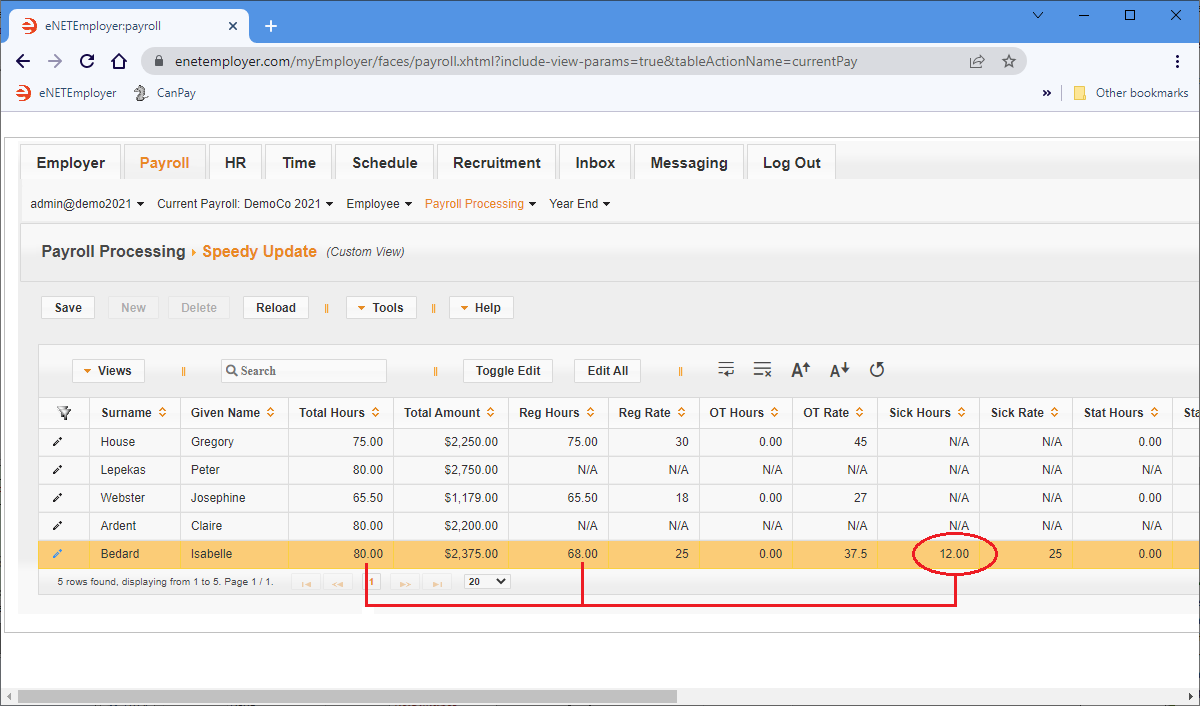
Example: In Fig. 08 below, we have entered 12 sick hours to bring our employee up to a full 80 hours for the pay period.
- Save the row, and then calculate the payroll.
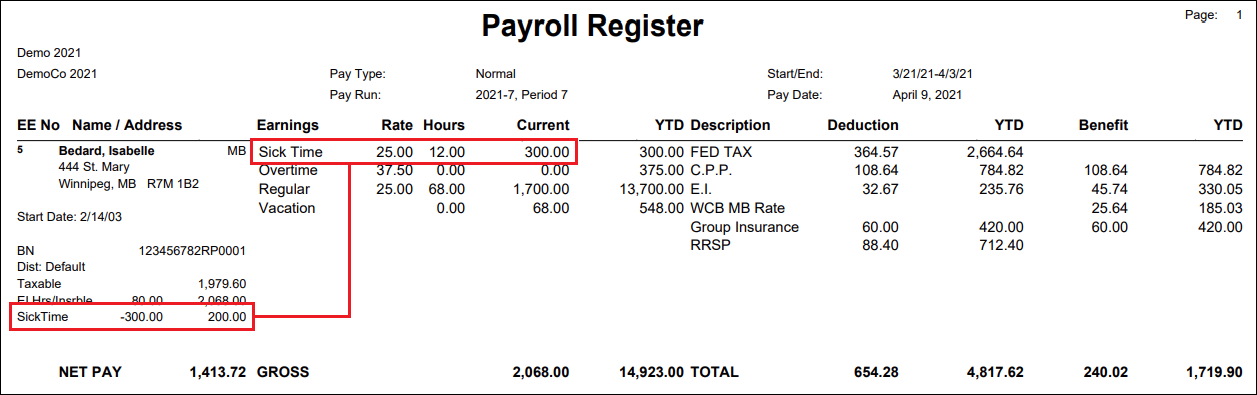
- The Pay Register report will show the paid amount on the SickTime row.
- The left column of the Pay Register report will show a negative payout value for the SickTime accumulator.
- The employee's pay stub will also show the payout and remaining amounts (if any).
Example: In Fig. 09 below, our sample employee is paid $300.00 of their sick time (12 hours at $25.00 per hour), and the accumulator totals at the bottom left show the remaining sick amount ($200.00).
Method 2: Sick Time by Hours
This lesson will show you how to record an employee's sick time by the hour. It is a similar process to the first lesson on this page, except you will add a Function that will instruct eNETEmployer to treat the withdrawal amounts as Hours instead of Dollars. As with the previous lesson, you also will create a sick time earning and its related accumulator. Once these items are created, you will assign the earning to an employee and apply any pre-existing banked sick hours (if applicable) for later withdrawal. The lesson is comprised of four sections:
- Create the sick time Earning, Function, and Accumulator.
- Assign the sick time earning and accumulator to the employee.
- Add any pre-existing banked amounts to the sick time accumulator.
- Pay out sick time.
A: Create the Sick Time Earning, Function, and Accumulator:
- Open the Current Payroll - Earnings screen and press the New button to add a new earning row.
- Make the following changes to the row (the rest of the cells can be left with the default settings):
- Name = "Sick Time"
- Type = "Hourly"
- Save the row.
Example: In Fig. 10 below, we have added the payout earning that will be used when the employee requests time from their banked sick hours. - Open the Current Payroll - Functions screen, press the New button to add a blank function, and then press the Add Variable button to add a sub row for the new function.
- Make the following changes to the Green main row (the rest of the cells can be left with the default settings):
- Type = "P Value"
- Symbol = "P"
- Value = "0"
- Expression = "P*HRS"
- Make the following changes to the sub row (the rest of the cells can be left with the default settings):
- Type = "Hours"
- Value = "0"
- Symbol = "HRS"
- Save both row changes.
Example: In Fig. 11 below, we have added a function that will instruct eNETEmployer to treat withdrawals as Hours instead of Dollars.
- Open the Current Payroll - Accumulators screen, add a new accumulator row entitled "Sick Hours", and then set its Type to Hourly.
- Make the following changes to the row (the rest of the cells can be left with the default settings):
- Name = "Sick Time"
- Calculate = "By Function"
- Calculate Funtion = "Sick Hours"
- Show on Pay Statement = "Yes"
- Payour Earning = "Sick Time"
- Save the row.
Example: In Fig. 12 below, we have added the accumulator that will accrue each employee's sick hours, and have set it to pay out to the Sick Hours earnings when sick time is withdrawn.
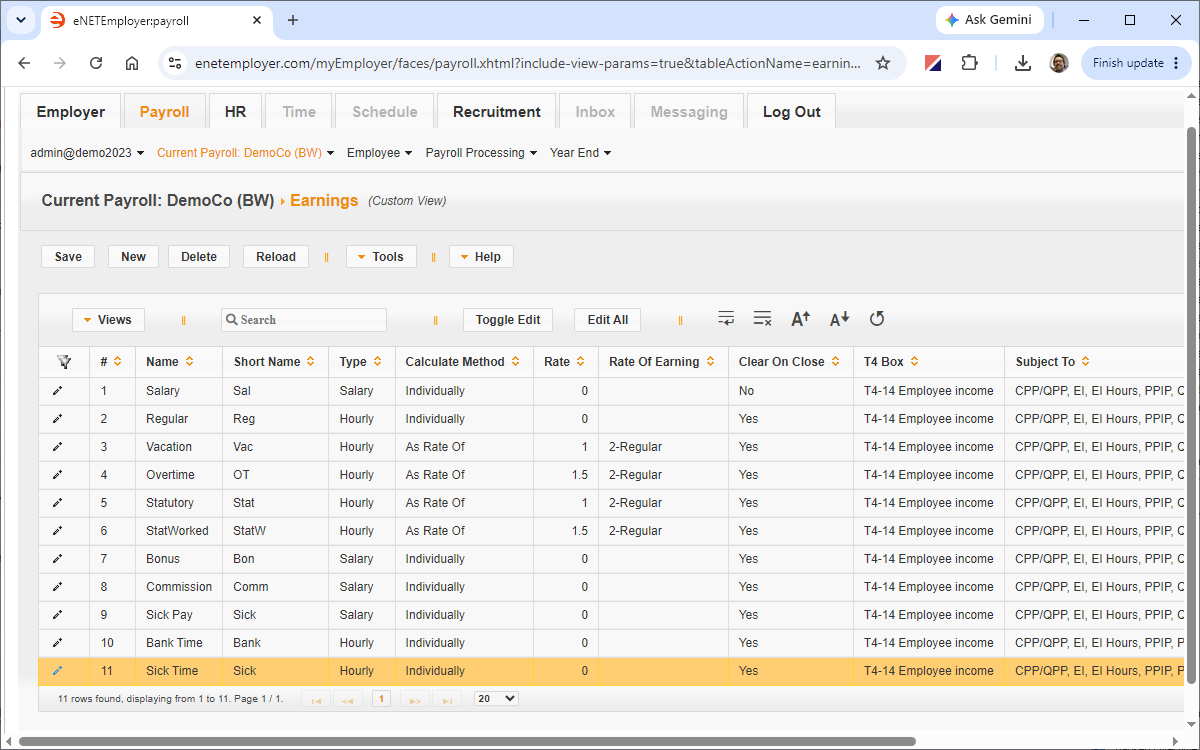 Fig. 10: The Sick Time earning will be used when withdrawals are made from the employee's banked sick hours.
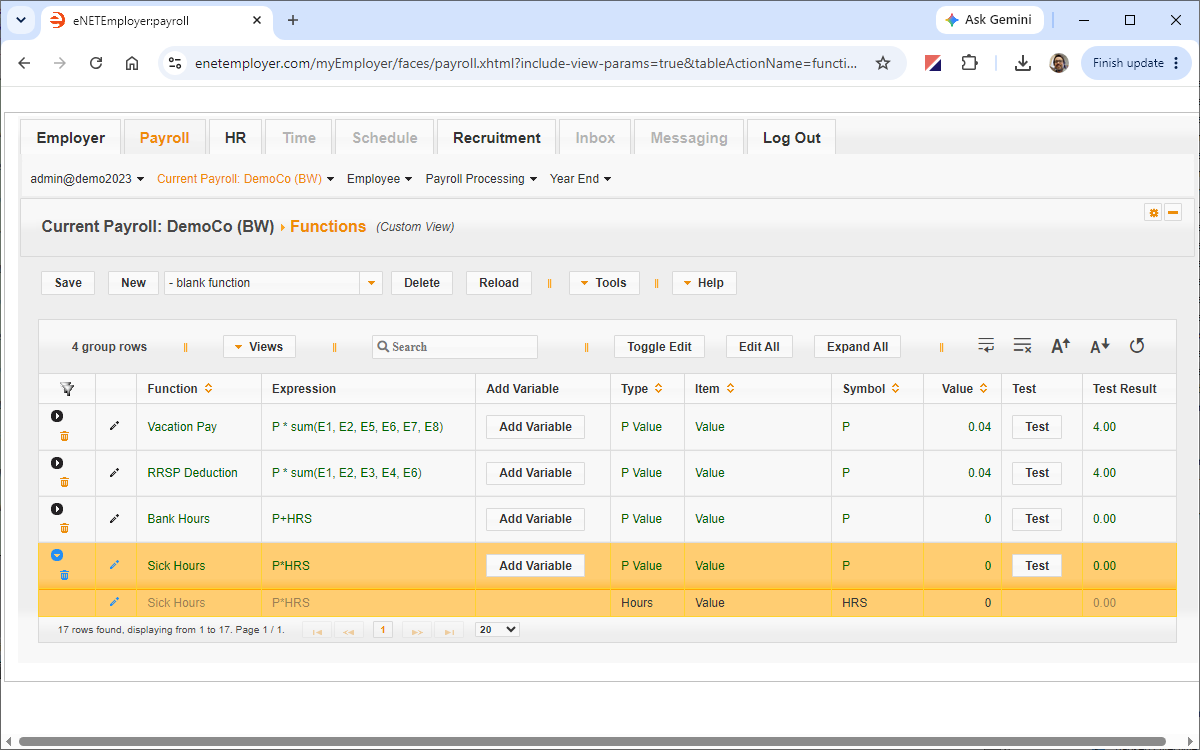 Fig. 11: The "HRS" setting instructs eNETEmployer to use Hours instead of Dollars when withdrawing from the Sick Time Accumulator.
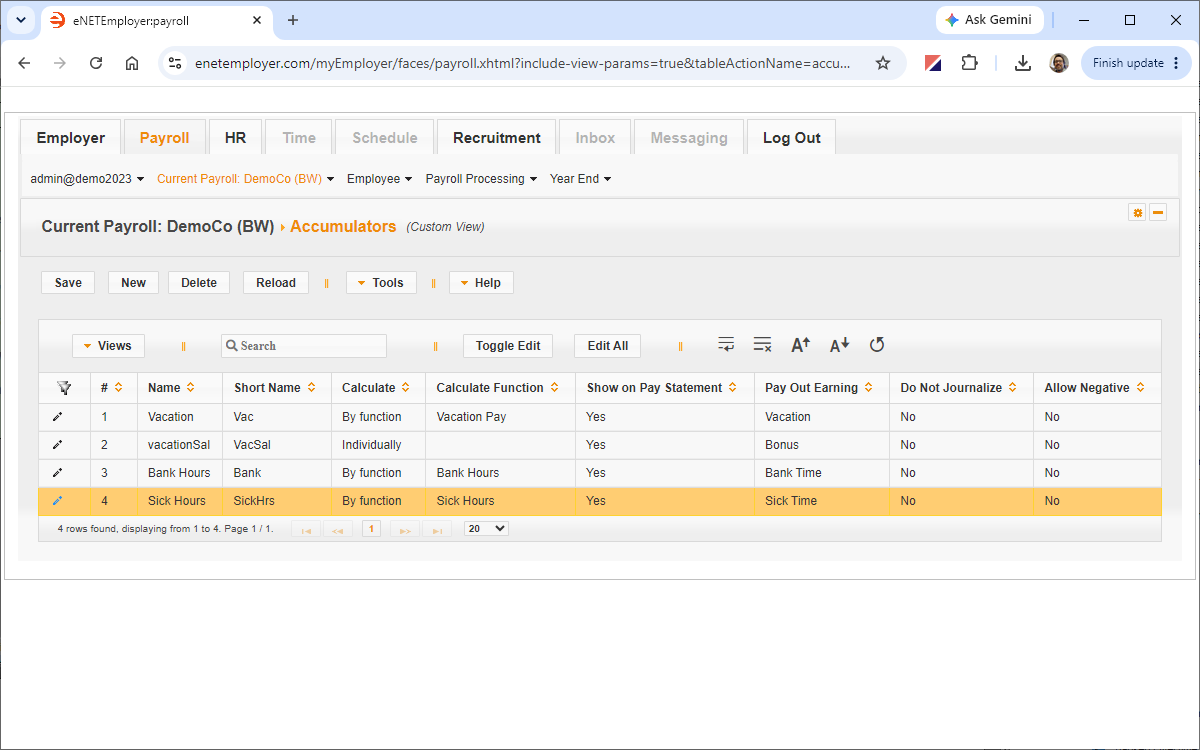 Fig. 12: The Sick Hours accumulator will pay out to the Sick Time earning.
Now you can assign the sick time earning and accumulator to the employee.
B: Assign the sick time earning and accumulator to the employee:
- Open the Employee - Earning Items screen, press the Add Earning button on the employee's row, and then choose the Sick Time earning.
- When the earning appears, move to the Rate cell and set the hourly rate for the earning. Typically, this will be the same value as the employee's Regular earning rate.
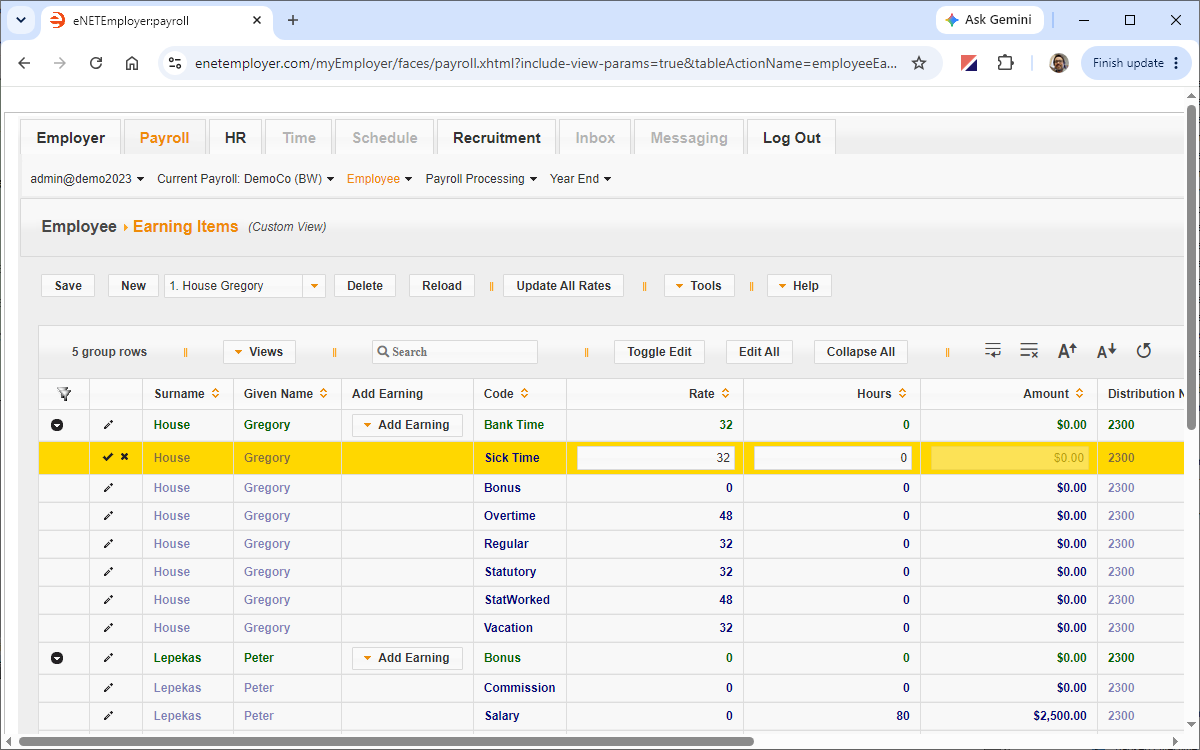
Example: In Fig. 13 below, we have added the payout earning that will be used when the employee requests time from their banked sick hours. - Open the Employee - Accumulator Items screen, press the Add Accumulator button on the employee's row, and then choose the Sick Hours accumulator.
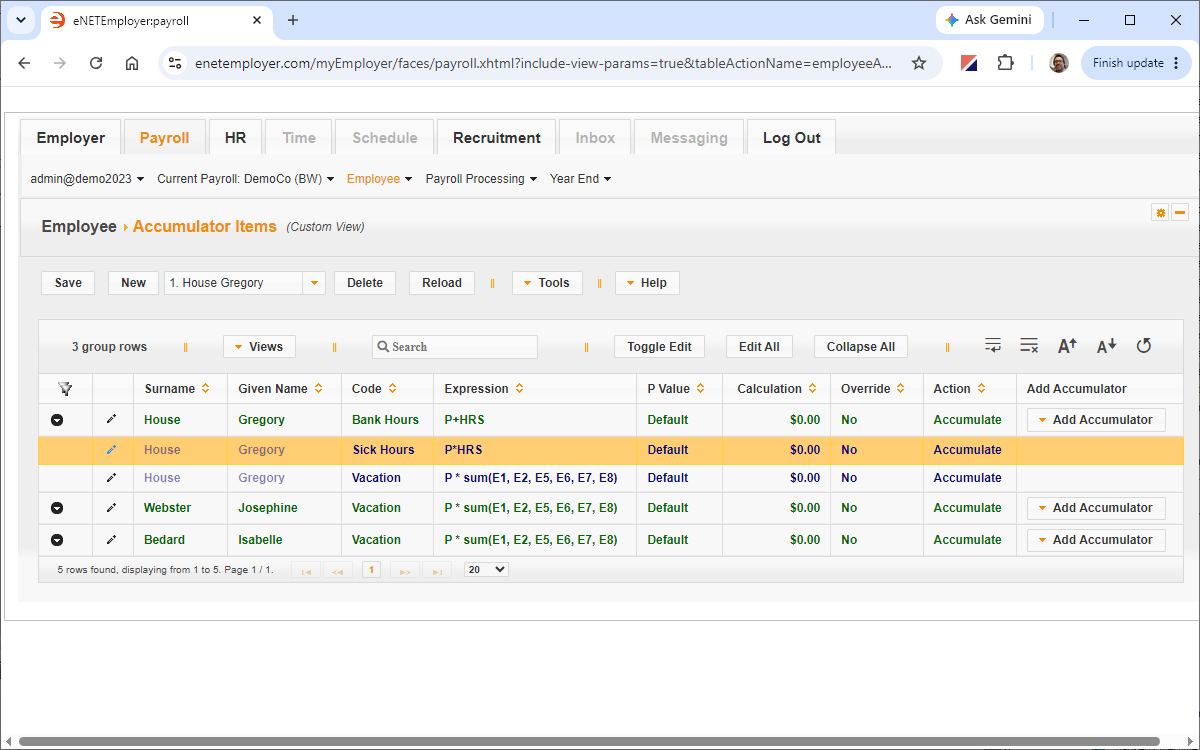
Example: In Fig. 14 below, we have added the accumulator that will accrue the employee's banked sick hours.
Now we can enter your pre-existing banked sick time so that it is ready to be paid out at the employee's request. Note: If you do not have any accrued amounts, you may skip this section and proceed to Step D below.
C: Add any pre-existing amounts to the sick time accumulator:
Dollar Sign ($) vs. Hourly Units All year-to-date screens in eNETEmployer show their values based on dollar amounts by default. However, since the Sick Time's function has its Type set to Hours, you must ignore the dollar sign for the Sick Hours accumulator and treat it as a simple hourly unit. For example, if you see a value of $16.50 in the Adjustment or Adjusted Amount cells, it refers to "16 and one-half hours", rather than $16.50. |
- Open the Employee - YTD Accumulators screen and double-click on the accumulator row for the employee whose banked sick time you wish to enter. Note: If you cannot see all of the rows for a given employee, use the Expand icon (the right-facing arrow located at the left side of each row) to expand all of the rows for the employee.
- Move to the Adjustment cell and enter a dollar amount for the employee's existing banked sick time. This amount will remain until a portion (or all) is paid out.
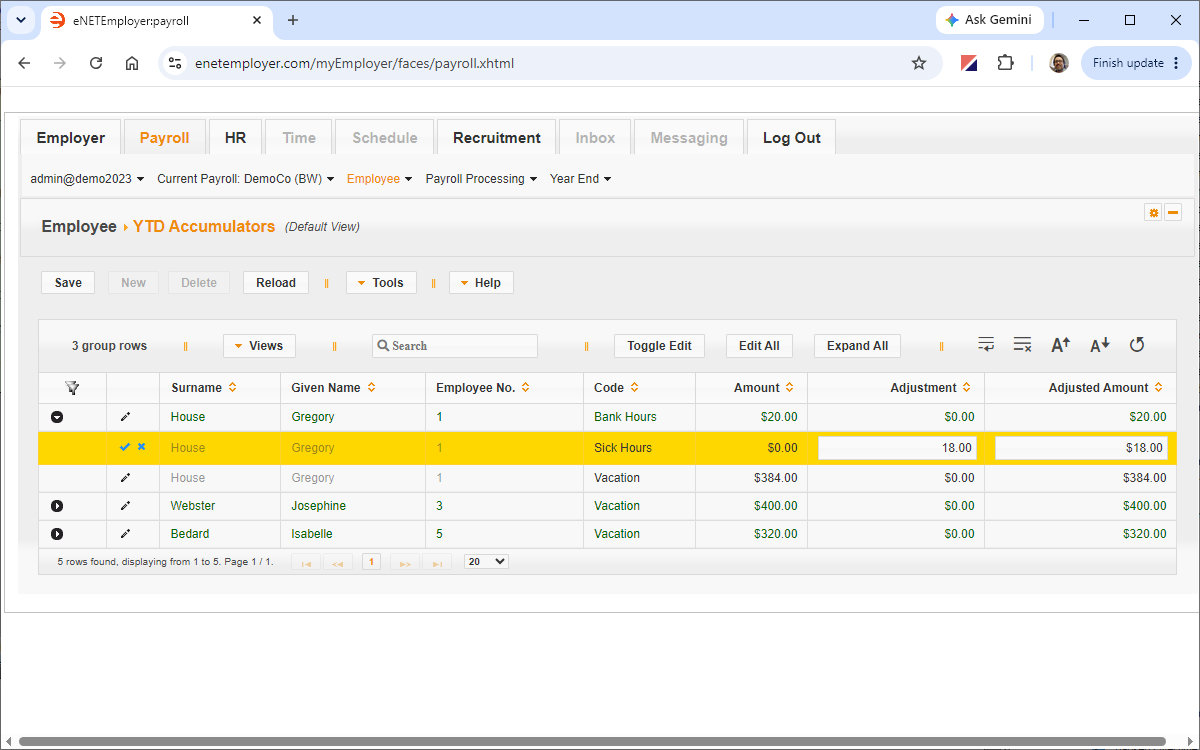
Example: In Fig. 15 below, we have expanded the accumulator rows for our sample employee, and have entered an existing banked sick time value of 18 hours.
When you are ready to pay out a portion (or all) of the employee's sick time, you can proceed to the final step below.
D: Pay out sick time:
- Open Employee - Earning Items screen, and then edit the Sick Time row for the given employee.
- Move to the Sick Hours cell, enter the number of hours that will be paid out for the period.
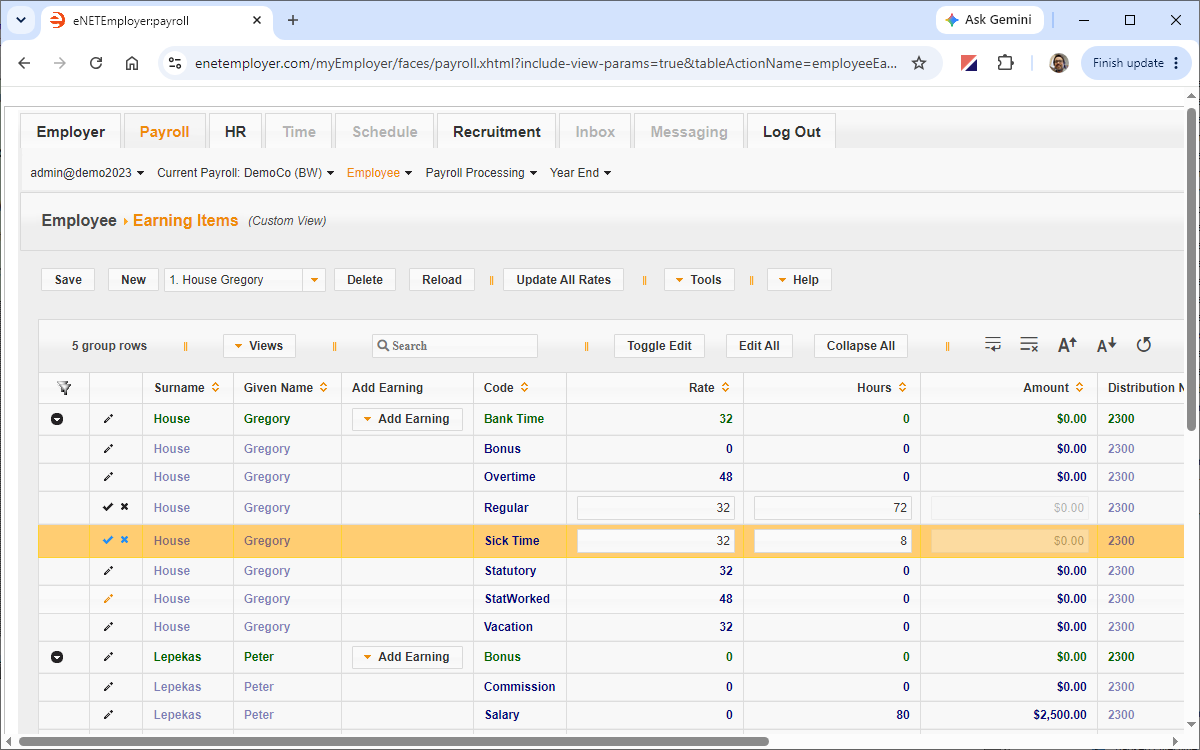
Example: In Fig. 16 below, we have entered 8 sick hours that will be paid out at $32.00 per hour.
- Save the row, and then calculate the payroll.
- The Pay Register report will show the paid amount on the Sick Time row.
- The left column of the Pay Register report will show a negative payout value for the Sick Time accumulator.
- The employee's pay stub will also show the payout and remaining amounts (if any).
- The employee's pay stub will also show the payout and remaining amounts (if any).
Example: In Fig. 17 below, our sample employee is paid $256.00 of their banked sick time (8 hours at $32.00 per hour), and the accumulator totals at the bottom left show the remaining banked hours (20.00 hours/units).
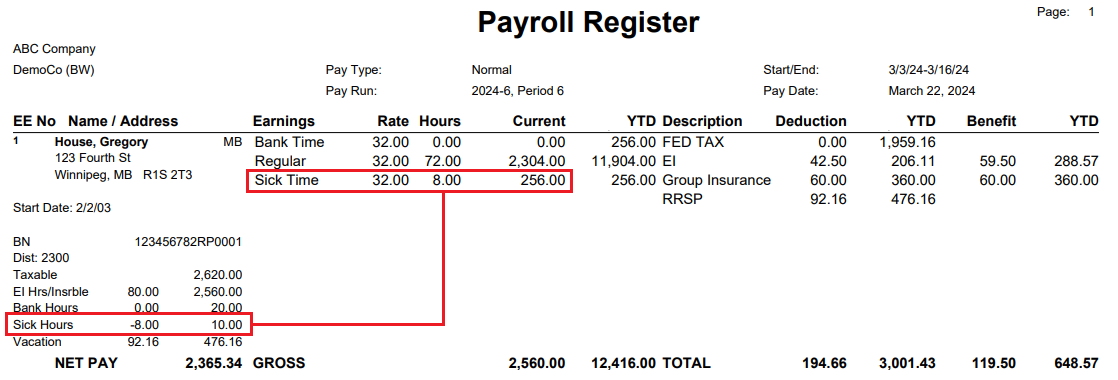 Fig. 17: The employee has 10.00 hours/units remaining in their Sick Hours accumulator.
This completes the lesson on how to accumulate and pay out sick time by hours.
See Also