Help Toolbar (select a button to browse other online help sections) Home Tutorials Resources Search Tabs & Menus Button Bar Table & Data Display |
Working with P Values
The P Value (a.k.a. Placeholder Value) feature allows you to assign a custom value that will override a single variable, instead of having to override the whole function and its expression. It can also be useful if you need to modify a function that is being used by many employees who have had the related expression overridden. P Values can be used for employee Deduction, Benefit, and Accumulator items.
For example, if you have assigned a 4% Vacation Pay function to all staff, but a particular employee is eligible for 6% vacation pay, you would normally need to override the function for that specific employee. However, if you later needed to change the original function for all employees, any overridden employees would not have the revised function applied. A P Value can negate this, because the associated Placeholder Value can be set at any time without the need to override the function.
P Values with Deduction and Benefits - Note that this tutorial focuses specifically on accumulators. If you need to use a P Value with an employee deduction or benefit, you can use the same principles as described below. |
This tutorial includes the following sections:
NOTE: Click on an image below to view it at full size.
Part 1: Editing the P Value for a Single Employee
In the first part of this lesson, we'll edit the P Value for a single employee only - the most common use of this feature. We'll start by reviewing our sample Vacation Pay Function to see how the default P Value is used.
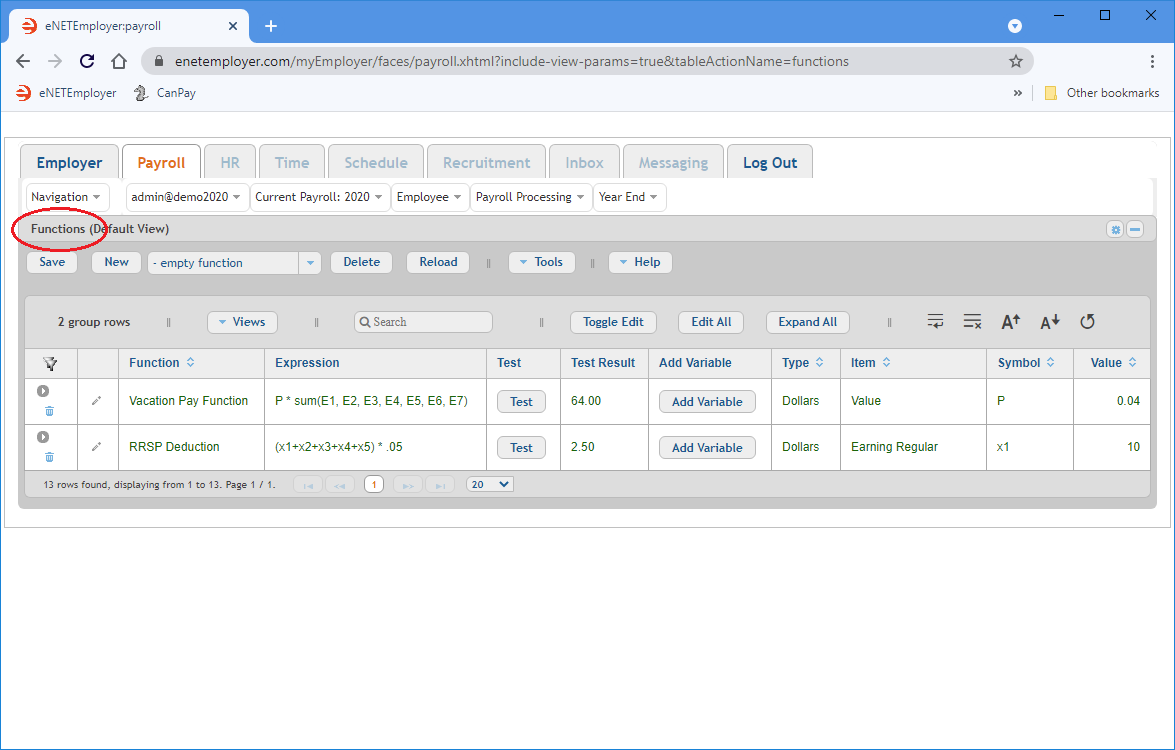
- From the Payroll tab, open the Current Payroll - Functions screen where you can define the formula for the function's calculation.
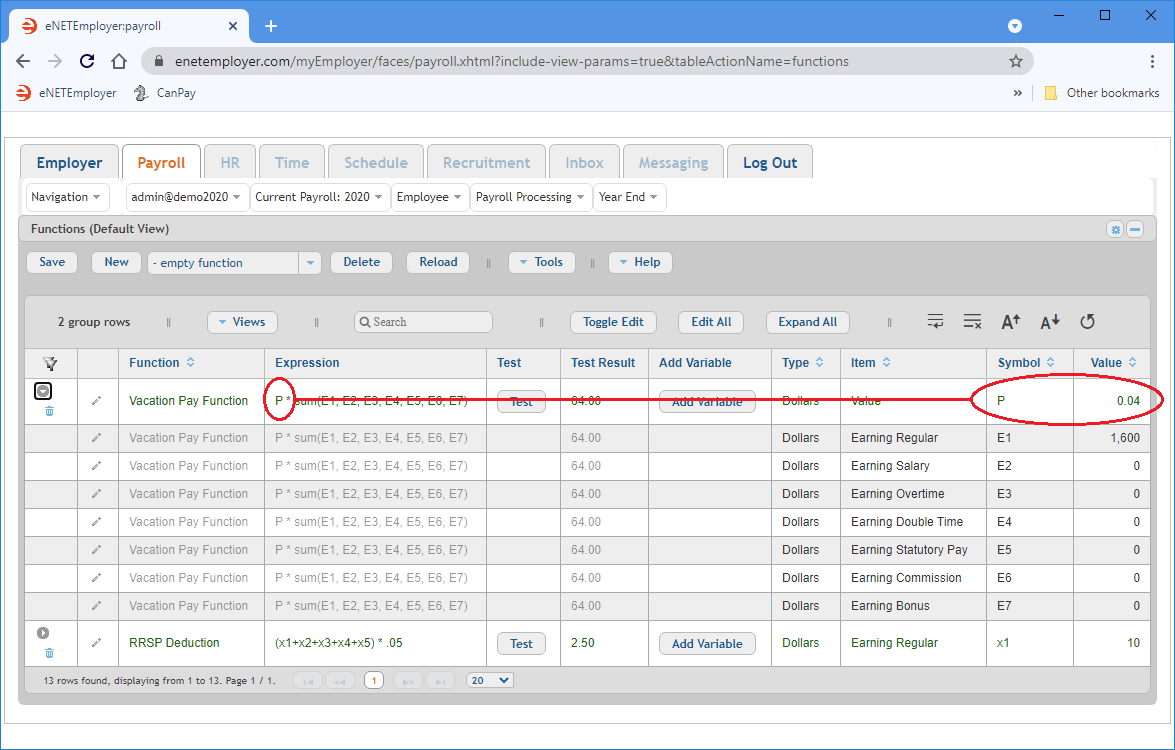
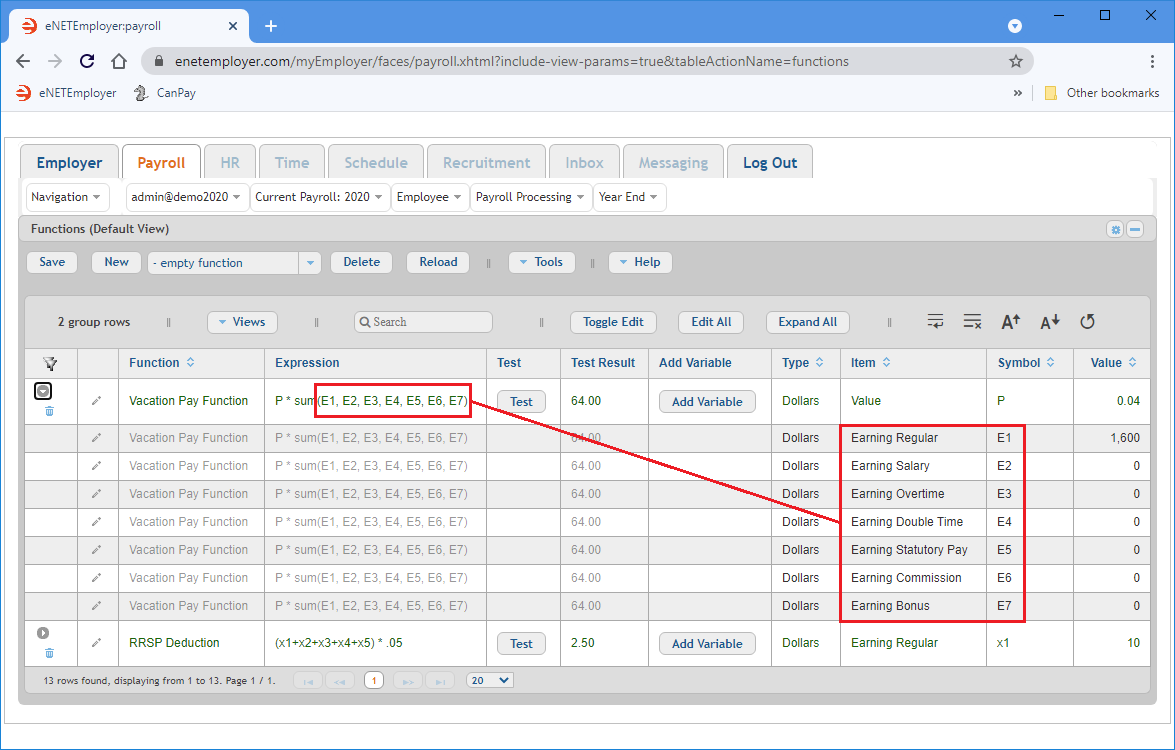
- Click on the Expand icon (the right-facing triangle) located at the left side of the Vacation function row. This expands a series of sub rows that shows each of the items that are associated with the current function. In the example below, we see that items E1 through E7 consist of 6 earning types that are setup in the payroll.
- Move to the top-right portion of the main row and you will see the assigned value that will be used for the "P" symbol in the expression. In our example, the 4% represents the typical starting vacation accrual amount for new employees in Canada. As we add new employees to our payroll, they will have this 4% vacation accumulator applied.
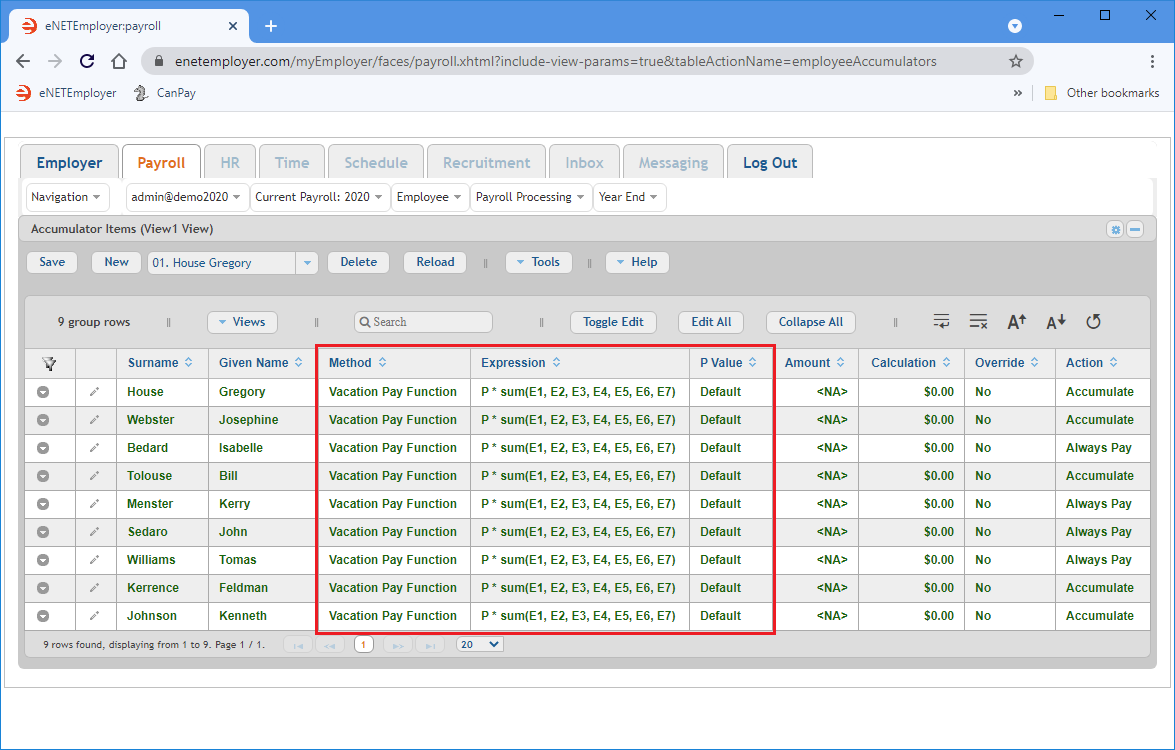
- From the Payroll tab, open the Employee - Accumulator Items screen where we see the accumulators that have been assigned to our payroll employees.
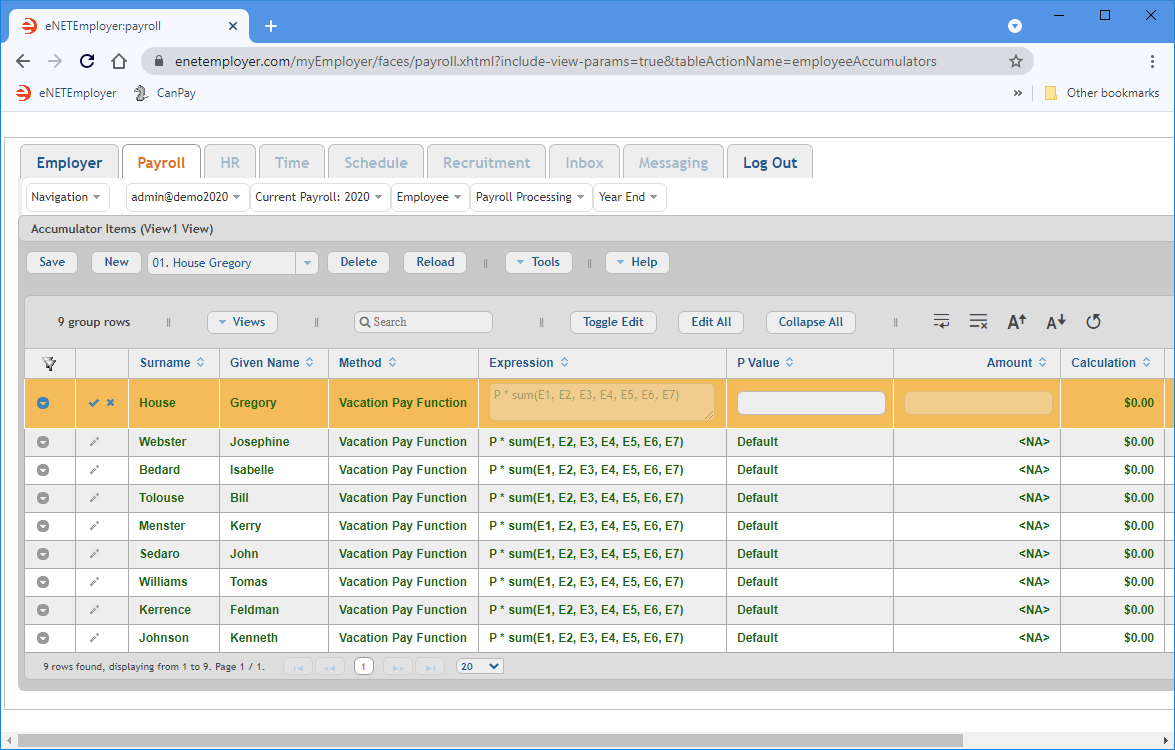
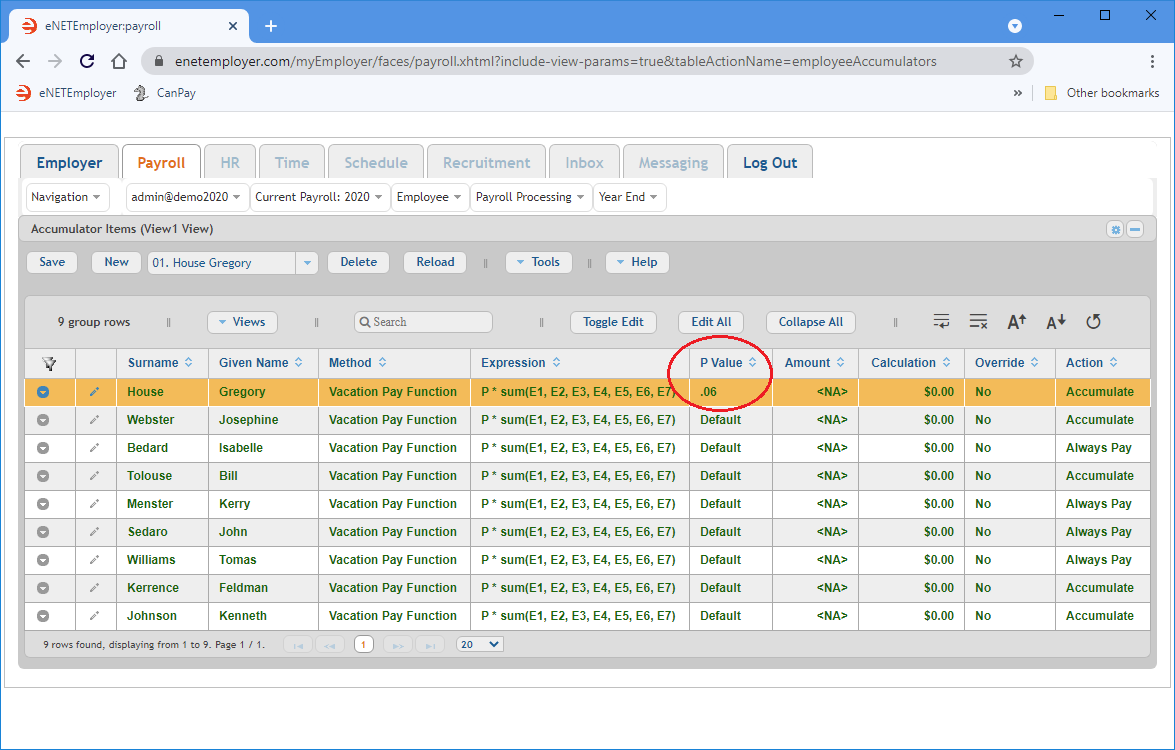
- Double-click on the row of an employee whose P Value you wish to edit. This changes the row to Edit Mode and activates the cells for editing. Note: You can select the Pencil icon located at the left side of the row to perform this same action.
Example: In Fig. 05 below, we chose the first employee in the list; Gregory House.
- Move to the P Value field, enter a new percentage rate, and then Save the row.
Example: In Fig. 06 below, we entered ".06". Gregory House will now accrue 6% vacation from this point forward.
- Repeat this procedure to modify the accrual values for other employees as needed.
In our example, the Vacation Pay Function was created by inserting the "Earnings Percent" pre-defined function. The resulting expression takes the value of "P" and multiply it by the sum of items E1 through E7. To view items E1 through E7, we must expand the sub rows for the function.
This single function covers all employee types whether they earn salary-based income or varying hourly income.
If an employee advancing to a 6% accrual (or any other amount), we can adjust their P Value on a per-employee basis via the Accumulator Items screen as follows:
Accumulator Items Help Screen...
The Method, Expression and P Value columns show that all of our employees are using the default P Value that will accrue 4% for their applicable earning types. We will now use the P Value feature to adjust the accrual amount for a single employee.
Adjusting a P Value vs. Overriding the Function - eNETEmployer functions are flexible. You can achieve the same result as the lesson above by leaving the P Value empty and instead checking the Override checkbox, and then changing the expression's "P" symbol to .06. The downside is that if you ever need to change the function at a later time, any employee who has been overridden will not receive those changes. For example, let's say we add a new "bonus" earning type to our function. Once we do so, all employees who use the function will automatically have the change applied and begin accruing vacation pay for any bonus earnings. If we had used the override method in our example above, Gregory's expression would not be updated with the new bonus earning type and he would continue to accrue vacation pay on his original earnings only (thus missing the additional bonus earning that was added to all of the other employees). |
Now that you know how to edit the P Value for a single employee, let's learn how to use this feature to change the values for all employees at once.
Part 2: Editing the P Value for all Employees:
- From the Payroll tab, open the Current Payroll - Functions screen.
- Double-click on the Vacation Pay Function row to activate Edit Mode.
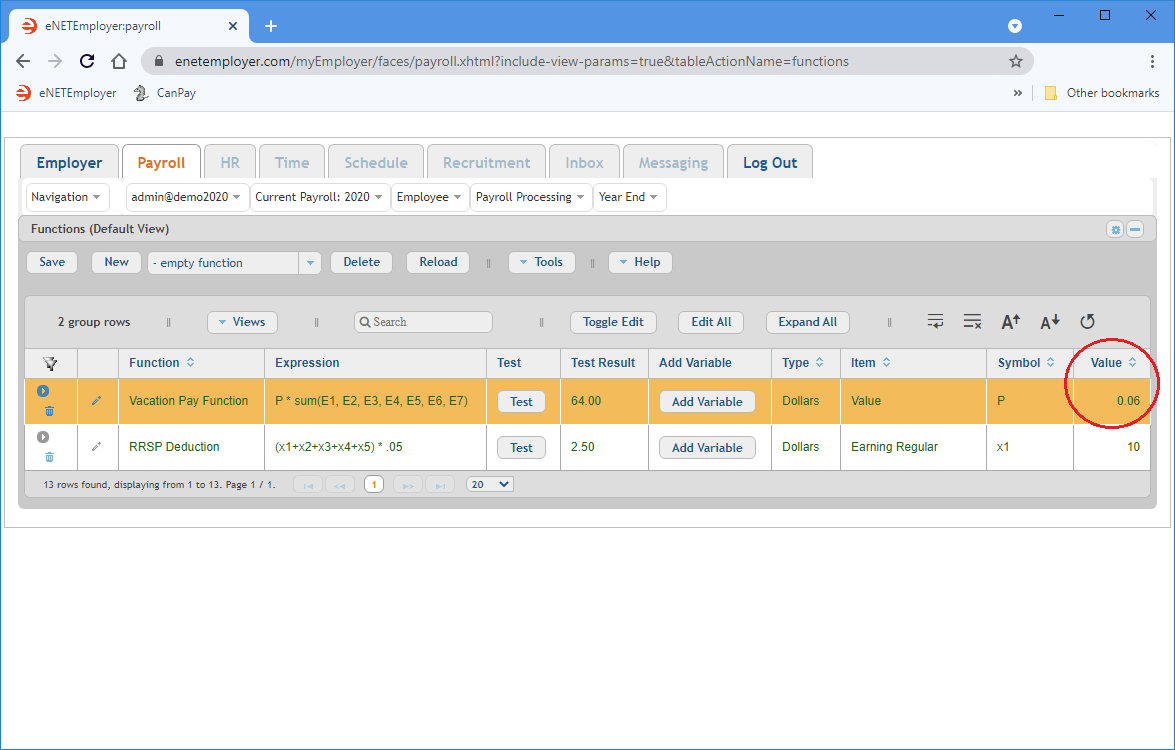
- Move to the P Value field and enter .06, and then Save the row.
Example: In Fig. 07 below, all employees who use this function will accrue 6% vacation from this point forward.
This completes the tutorial on using P Values.
See Also:
