Help Toolbar (select a button to browse other online help sections) Home Tutorials Resources Search Tabs & Menus Button Bar Table & Data Display |
Creating Payroll Functions
For this tutorial, we will show you how to create three common functions (Vacation Pay, RRSP Deductions, and a 30% Garnishment). During the lesson, you can substitute your own items, percentages and values to suit your specific payroll scenario. Once complete, you can assign these functions so that they will perform their respective calculations automatically.
NOTE: Click on the images below to view them at full size
Function #1 - Vacation Pay
Scenario: The ABC Company wishes to set up vacation pay for their employees based on 4% of their applicable earnings. In our example, the function must include all "vacationable" earning types for their province ("Hourly" types such as Regular, Overtime, Statutory, and "Salary" types such as Salary and Commissions, etc.) Our formula will sum the employee's earnings, and then multiply the result by .04 to determine the vacation amount. The resulting amount may be accrued or paid out each period.
We will begin by adding a pre-defined "Earnings Percent" function that is set to calculate a typical vacation pay amount of 4%.
- From the Payroll tab, open the Current Payroll - Functions screen where you can define the formula for the function's calculation.
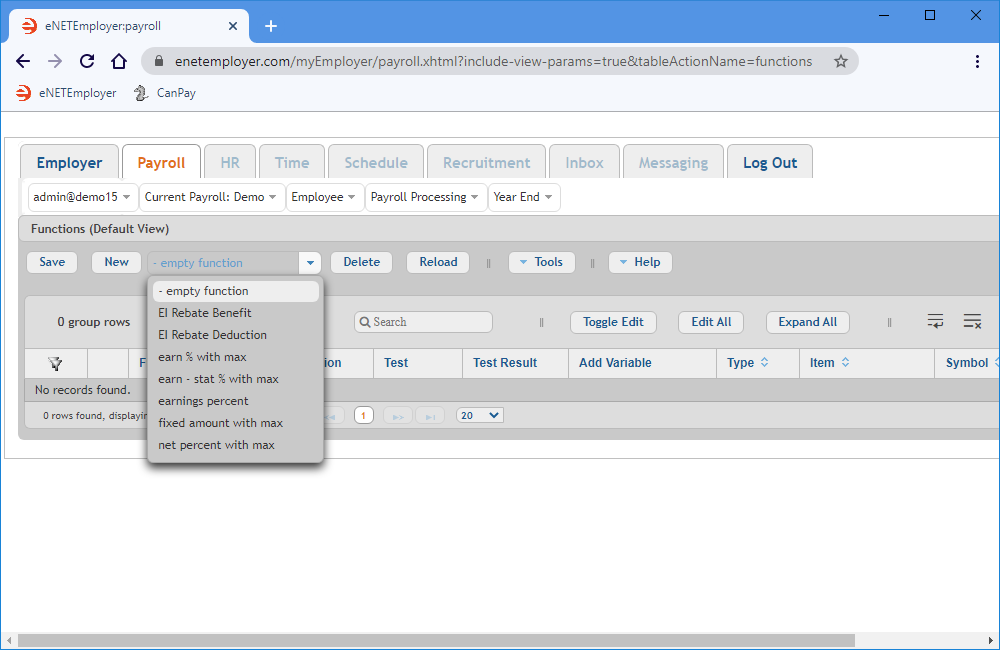
- Click on the drop-down list immediately to the right of the New button. This displays a list of pre-defined functions that you can apply to the current payroll.
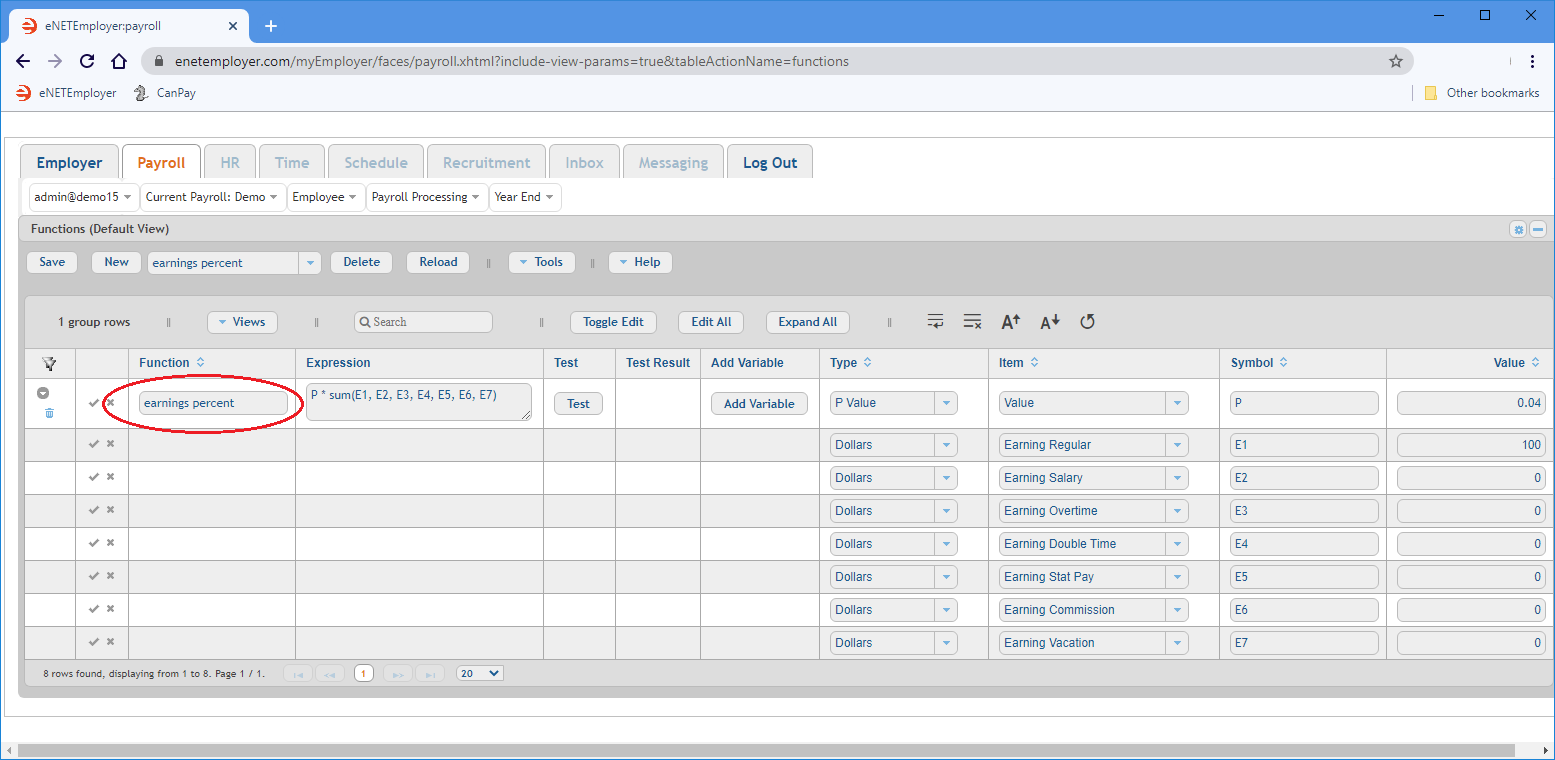
- Choose the Earnings Percent option from the drop-down list beside the New button, and then click the button to insert the pre-defined function into the table. In our example, the resulting Expression column shows: P * sum(E1, E2, E3, E4, E5, E6, E7). E1 through E7 are based on the earnings that exist in the payroll. Note also that a default symbol is created for every earning.
Numerous sub-rows also appear with their Variables, Symbols and corresponding Type designations automatically assigned.
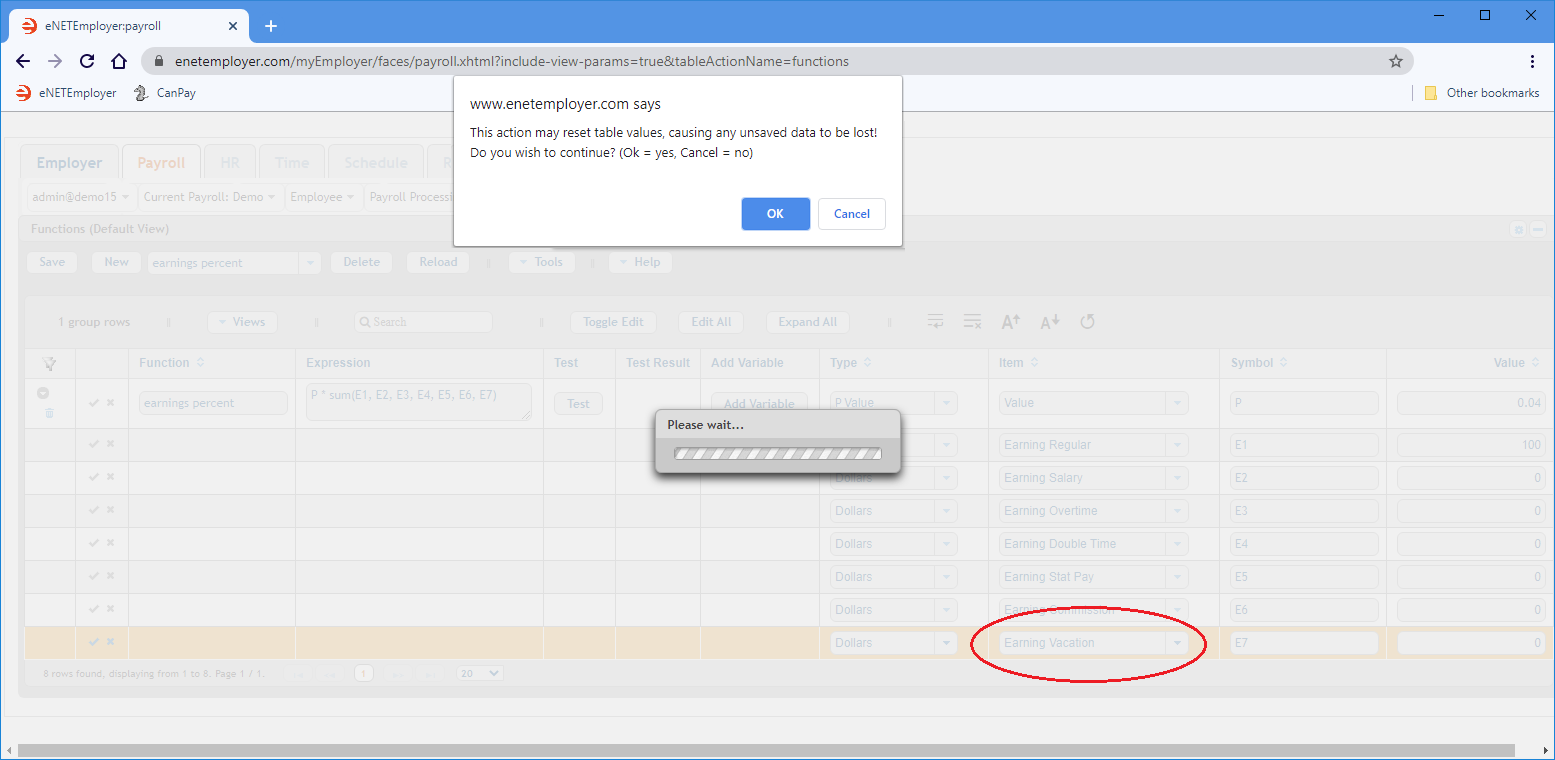
In our example province (Manitoba), all but one of the earnings shown in the Item column are subject to vacation pay. The Vacation Pay earning itself must now be removed from the formula (otherwise you would be calculating vacation pay on vacation pay). - Click on the Vacation Pay earning and press the Delete button, then choose Yes when you are prompted to delete. This displays another message warning that any unsaved data in the table may be lost (this message is normal, and appears because you are updating the screen without having yet saved the data after adding the new function).
- Choose OK to the pop up message. This updates the screen and your vacation earning is now removed from the function.
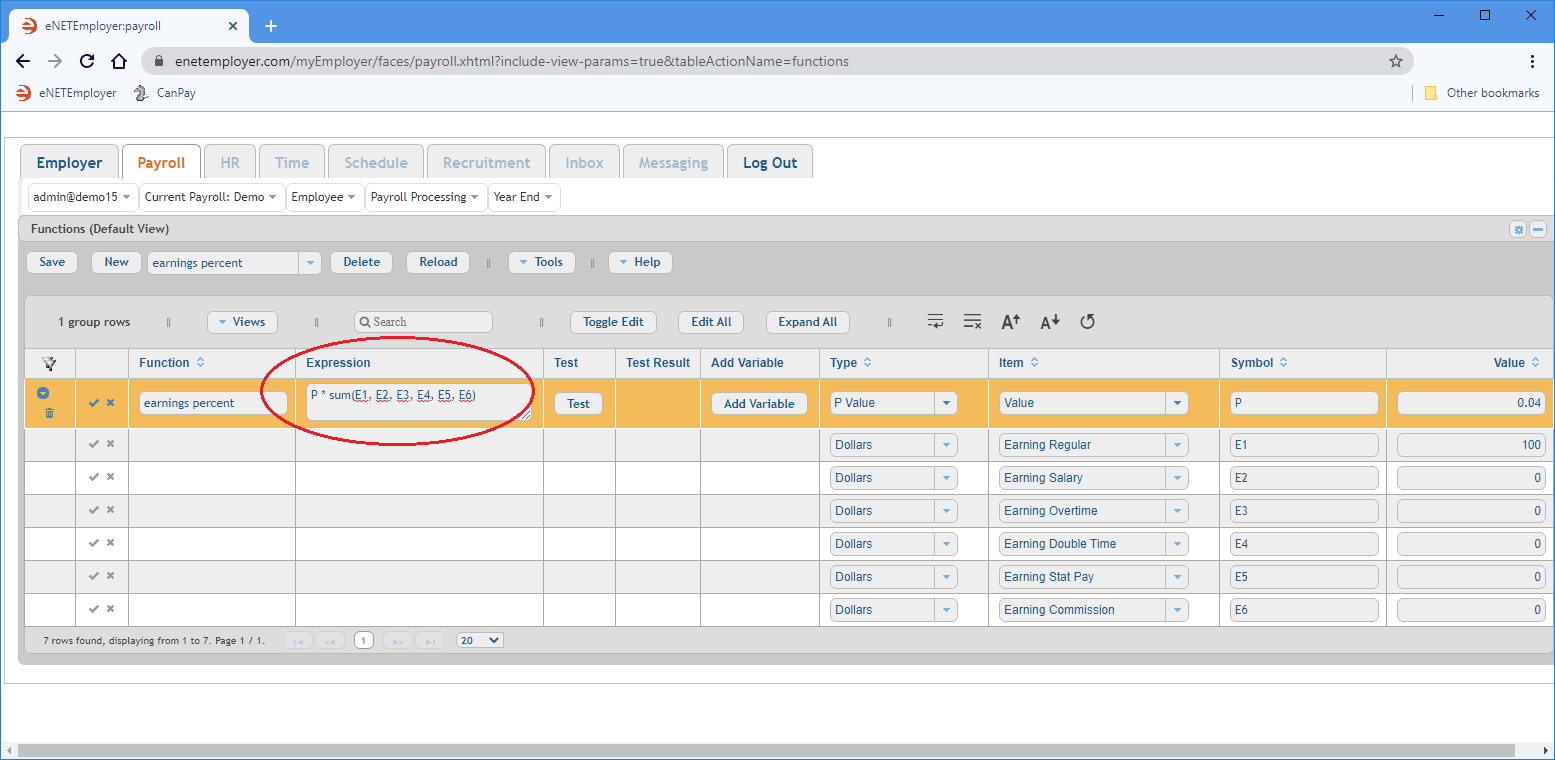
You must now adjust the expression to account for the earning that has been removed. This will involve removing the expression variable that represented the vacation earning. - Move to the Expression cell and delete the symbol that references the vacation earning that you just added.
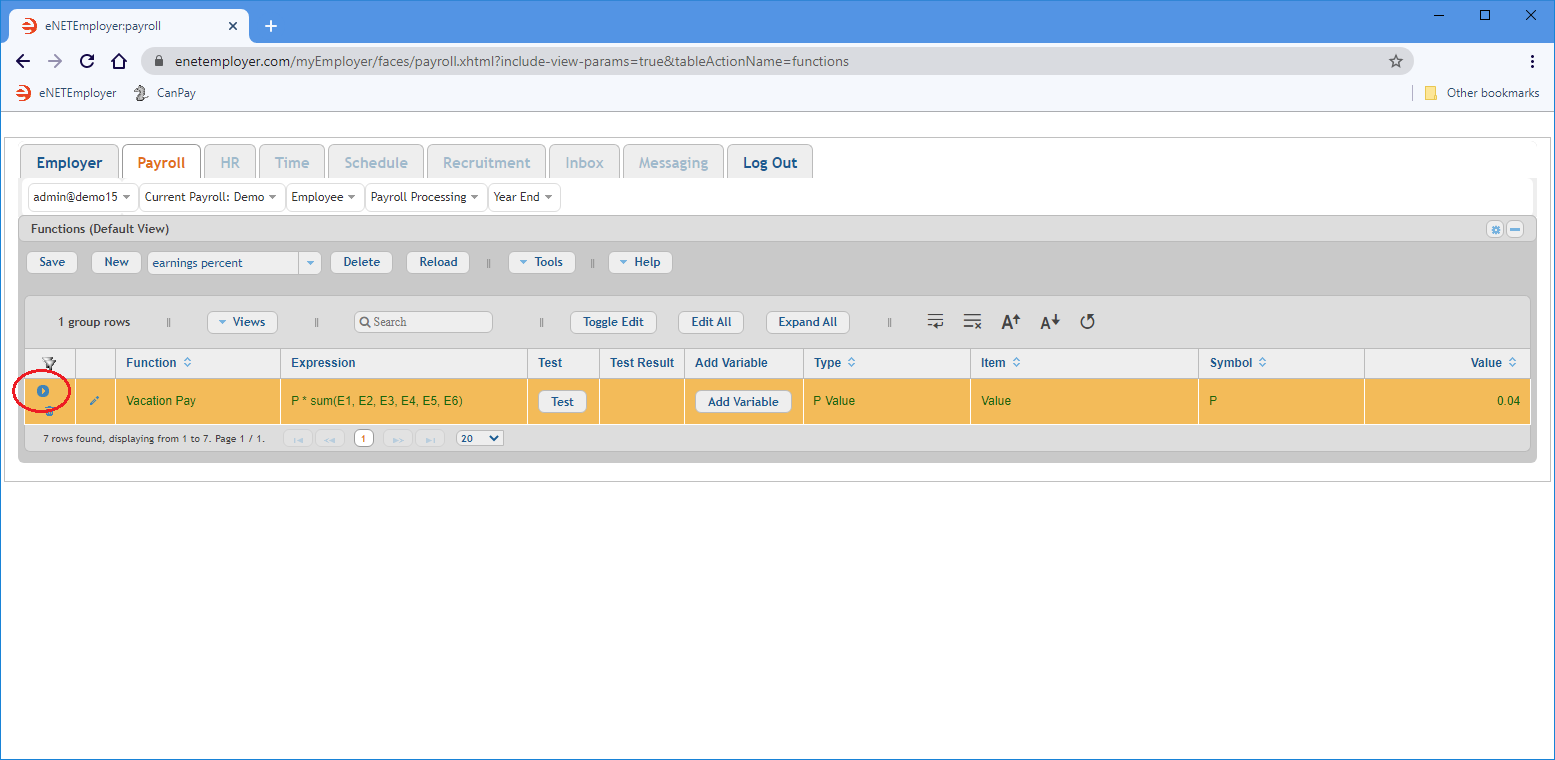
Example: In our example below, we have removed "E7" - the symbol that was originally assigned to the now-deleted earning.
a) The resulting expression, P * sum(E1, E2, E3, E4, E5, E6), instructs the program to multiply (by a factor of 4%) the sum of items E1 through E6.
b) The "P" symbol in the Expression column will use the value that is assigned in the Value column at the far right side of the row. This pre-defined function uses 4% as a starting value and corresponds to typical starting vacation percentage in Canada. Note: that the "P" symbol is arbitrary and can be substituted for a number, or even a word (refer to the Symbol cell's description found on the Functions screen's help page).
c) The corresponding amounts for each income type (shown in the Item column) will be used when the payroll is calculated. Note: This function supports both Hourly and Salary employees by including their respective earning types.
d) The numbers in the Value cells are arbitrary and represent test values only. As mentioned in the previous point, the program will use actual payroll values in place of these test values when the payroll is calculated. - Move to the Function cell and enter a name for your function.
- Choose the Save button for the main row, then click the Collapse icon so that the sub-rows become hidden.
Example: In Fig. 05 below, we have entered "Vacation Pay" as the function name.
- Select the Test button to try out the new function. If you used our sample data during this lesson, the test result should read 4.00 (i.e. 4% of $100 of regular earnings). If the words Invalid Expression appear, please review the variables above and adjust them as required to achieve a valid result.
This completes the vacation pay function.
Further Steps Needed: Now that the vacation function is added, you would complete the process by creating a payroll accumulator that references this function when calculating each employee's vacation time. After the accumulator is created, you would apply it to each employee. This process is described in the Creating Payroll Accumulators tutorial.
Creating a Vacation Pay Function ManuallyThe previous section showed you how to add a vacation pay function using a pre-defined function. If you want to add it manually, you can do so as follows:
Note: The preceding manual example is provided to illustrate how you can achieve your required calculation as long as you can write its related expression. This function would not be optimal if you were assigning it to multiple employees with differing accrual percentages (e.g. 4% vs. 6%), because you would need to adjust the percentage manually for each employee. The pre-defined function we created at the beginning of this lesson is preferred, since the P-Value can be set on a per-employee basis (while the master function remains unchanged). |
Function #2 - RRSP Deduction
Our second sample function will support our employees' RRSP Deduction plan. It will be tied to a Deduction record (the Deduction portion will be discussed later in this tutorial). Rather than use a pre-defined function, we will enter the expression manually and define the items as needed. The resulting function will take the sum of each employee's Regular earnings, and then multiply the amount by 5% to arrive at the contribution amount for each pay period.
- From the Payroll tab, open the Current Payroll - Functions screen.
- When the Functions screen appears, click on the drop-down list immediately to the right of the New button, choose the Empty Function option, and then select the New button. This action inserts a blank new function row in the table, with its cells ready for editing.
We must now add the various payroll items to the function and enter its mathematical formula into the Expression cell. - After the new row appears, select the Add Variable button three times to add three sub-rows. Note: Each time you choose the Add Variable button, an additional argument is added to the Expression cell. As mentioned earlier, the default symbols (x1, x2, etc.) can be modified as needed both in the Expression cell and the Symbol cells (but they must match exactly).
- We will enter the data for our sample function as shown in the following table (or substitute your own data as needed):
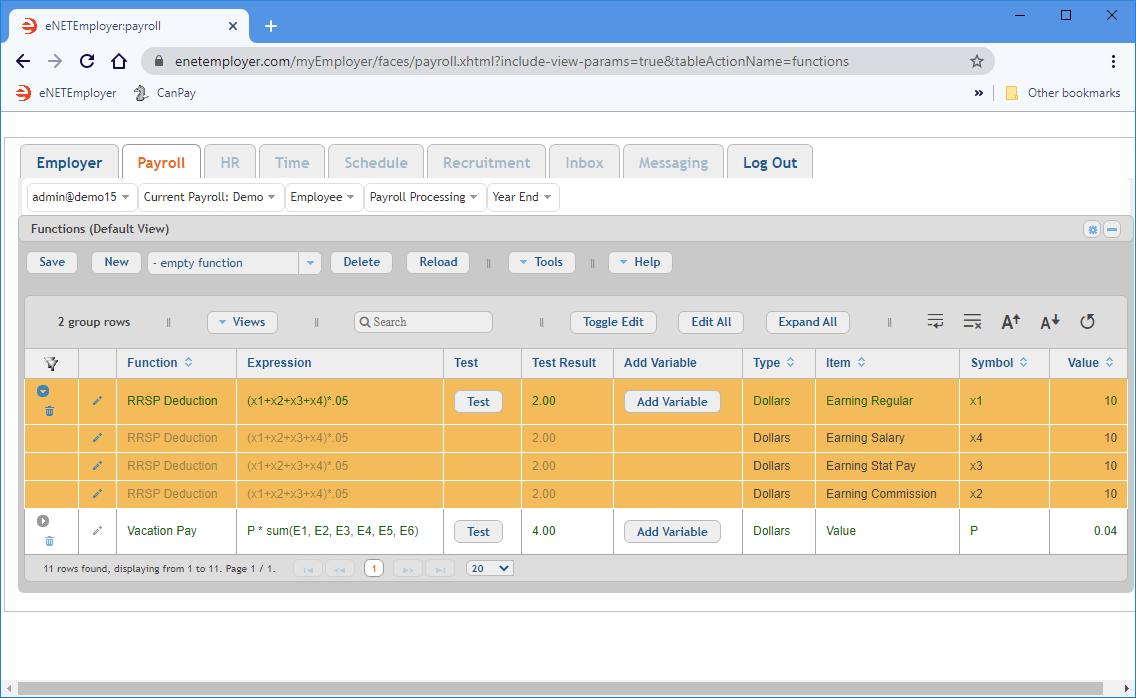
Function Expression Type Item Symbol Value RRSP Deduction (x1+x2+x3+x4)*.05 Dollars Earning Regular x1 1600 Dollars Earning Salary x2 2000 Dollars Earning Statutory Pay x3 160 Dollars Earning Commission x4 40 a) The arguments in the Expression column, (A+B+C+D)*.05., instruct the program to sum the values of A through D and then multiply the result by 5%. This represents the amount that our sample company will provide for RRSP contributions on behalf of each employee.
b) The corresponding amounts for each income type (shown in the Item column) will be used when the payroll is calculated. Note: This function supports both Hourly and Salary employee types by including their respective earning types.
c) The numbers in the Value cells are arbitrary and represent test values only. As mentioned in the previous point, the program will use actual payroll values in place of these test values when the payroll is calculated. - Save the rows, then select the Test button to try out the new function.
Example: If you used our sample data for your function, the test result should read 190.00 (i.e. 5% of the sum of the employee "test" earnings).
Further Steps Needed: Now that the RRSP deduction function is added, you would complete the process by creating a payroll deduction and assigning this function so that it would calculate each employee's contribution amounts. After the deduction is created, you would apply it to each employee who is part of the RRSP deduction plan. This process is described in the Creating Payroll Deductions tutorial.
Function #3 - Wage Garnishment
We will complete this tutorial by creating a third function for an employee Garnishment. The garnish will be setup at 30% per pay period with an annual cap of $4000. As with the first function in this lesson, we will use a pre-defined function where the expression will be created for you automatically.
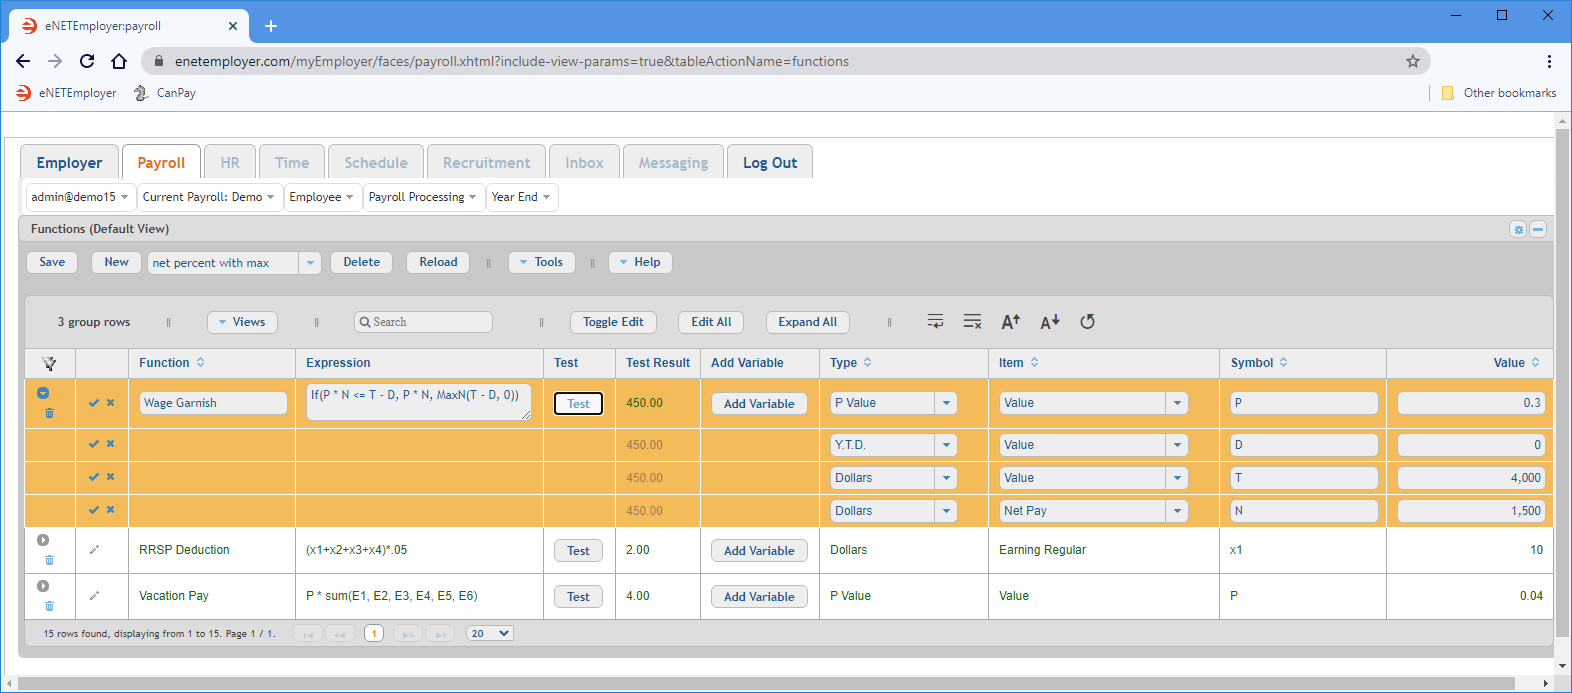
- Choose the Net Percent with Max option from the drop-down list beside the New button, and then click the button to insert the pre-defined function into the table. The Expression column shows the resulting expression as: If(P * N <= T - D, P * N, MaxN(T - D, 0)). Four sub-rows appear with their Variables, Symbols and corresponding Type designations automatically applied.
The numbers shown in the Values cells will now need to be edited to support your desired calculations. - We will enter the data for our sample function as follows (substitute your own data as needed):
Function Expression Type Item Symbol Value Wage Garnish If(P * N <= T - D, P * N, MaxN(T - D, 0)) Dollars Value P 0.30 Y.T.D. Value D 0 Dollars Value T 4000 Dollars Net Pay N 1500 a) The 0.30 value for the "P" symbol represents the 30% garnish amount. Since the P symbol is designated as a Dollars type, it will be calculated based on the specific percentage you enter in the Value cell (as opposed to the Vacation Pay function you created earlier, that would base its values on the "actual" calculated income amounts as defined in their respective Item cells).
b) The "D" symbol's value can be left at 0 (zero) since the row is designated as the Y.T.D. type. Thus, it will be calculated using the employee's year-to-date values. Note: Since we are setting this up as a new function, leaving the value at zero will instruct the program to use the employee's current year-to-date values in the calculation.
c) The value for the "T" symbol is changed to 4000 to represent the $4000 capped dollar amount for the garnish. Since the T symbol's Item is set to Value, it will be calculated based on the 4000 value you entered.
d) The "N" Symbol row is changed to $1500 to represent a typical wage amount for testing purposes only. This test value is used for validation purposes only and will have no effect since the N symbol will be calculated based on the employee's current Net Pay amount for each period. - Save the rows, then select the Test button to validate the new function.
Example: If you used our sample data for your function, the test result should read 450.00.
Note: The expression, If(P * N <= T - D, P * N, MaxN(T - D, 0)), is based on an If (condition, A, B) function - meaning that if condition A is true, do A - if it is not true, do B. If percentage (P) (in this case 30% multiplied by Net Pay (N) ) is less than or equal to the Total Maximum Amount (T) (in this case $4000) subtracted by Y.T.D. already deducted (D) (in this case 0.00 because we are just starting to setup the function), then it will deduct the whole amount. If it is not true, it will perform option B and only deduct what is left to be paid. |
Follow Up Steps: Now that the Garnish function is added, you would complete the process by creating a payroll deduction that will calculate each employee's garnish amounts. After the deduction is created, you would apply it to each employee who is to have their wages garnished. This process is described in the Creating Payroll Deductions tutorial.
This completes the tutorial on creating payroll functions.
Note: If you are working through the payroll setup process in order, you will need to continue through the Payroll menu to finish entering the data that is required for your particular payroll.
See Also:
- Payroll Functions help topic
- Working with P Values
- Creating payroll deductions
- Creating payroll benefits
- Creating payroll accumulators
