Help Toolbar (select a button to browse other online help sections) Home Tutorials Resources Search Tabs & Menus Button Bar Table & Data Display |
Creating Employee Pay Statements
eNETEmployer allows you to create pay statements for each of your employees. Also known as pay stubs, the employee pay statement provides details for an employee on their earnings and deductions for each pay period. Pay statements must conform to each province's legislation with respect to the information that is included on the pay statement.
eNETEmployer allows you to customize the information that appears on the pay statement - this can help to ensure that you pay employees accurately, on time and in compliance with legislative requirements.
NOTE: Click on an image below to view it at full size.
To Create Employee Pay Statements:
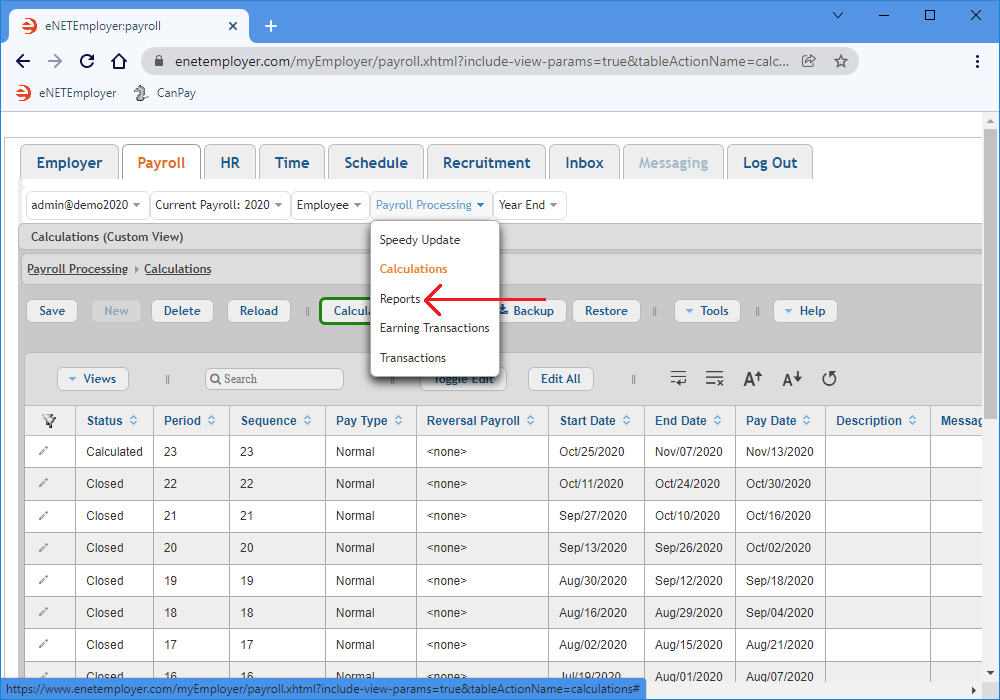
- Open the Payroll module and select the Payroll Processing menu to view the available options.
- Choose the Reports option from the menu. This opens the Payroll Processing - Reports screen where you can work with all aspects of program reporting including viewing, printing, and exporting.
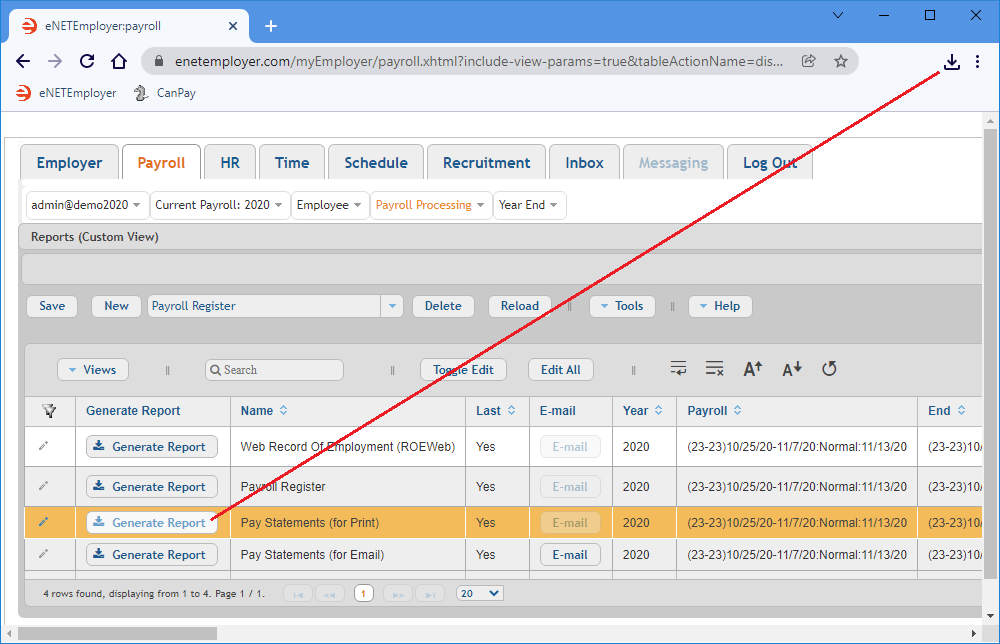
- Choose the Generate Report button from the Pay Statements report row to create the statements as a .PDF document. Depending on your browser settings, the resulting document will either be stored in your Downloads folder or you may be presented with a window that will prompt you where to save the file. In most browsers, the document can be viewed via a link that appears at the top-right of your browser.
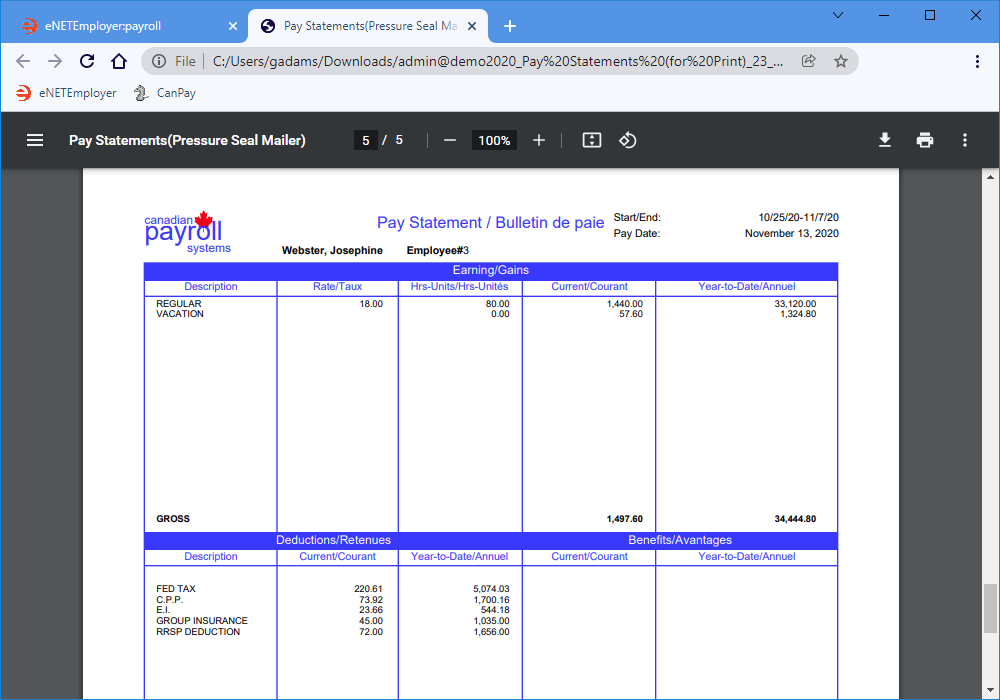
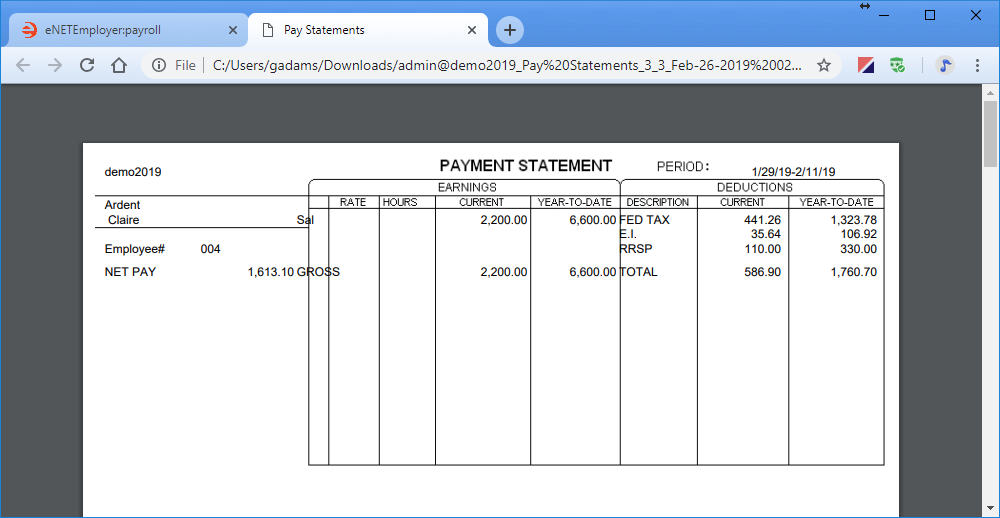
- Click the Download link to access the file, or navigate to your Downloads folder and open the document using your preferred PDF viewer. The report shows each employee's current pay information along with their year-to-date, Federal Tax, CPP, and EI amounts. As you scroll through the PDF document, you will see that each employee has been paid accordingly - both Salary and Hourly types.
- Use your browser's Print option to generate paper copies for distribution for your employees if desired.
- When you have finished reviewing your pay statements, close the report and return to eNETEmployer.
Note: If you do not see a Pay Statements report row in the table, please skip forward to the To Add a Customizable Pay Statements Report section below before proceeding.
To Add a Customizable Pay Statements Report:
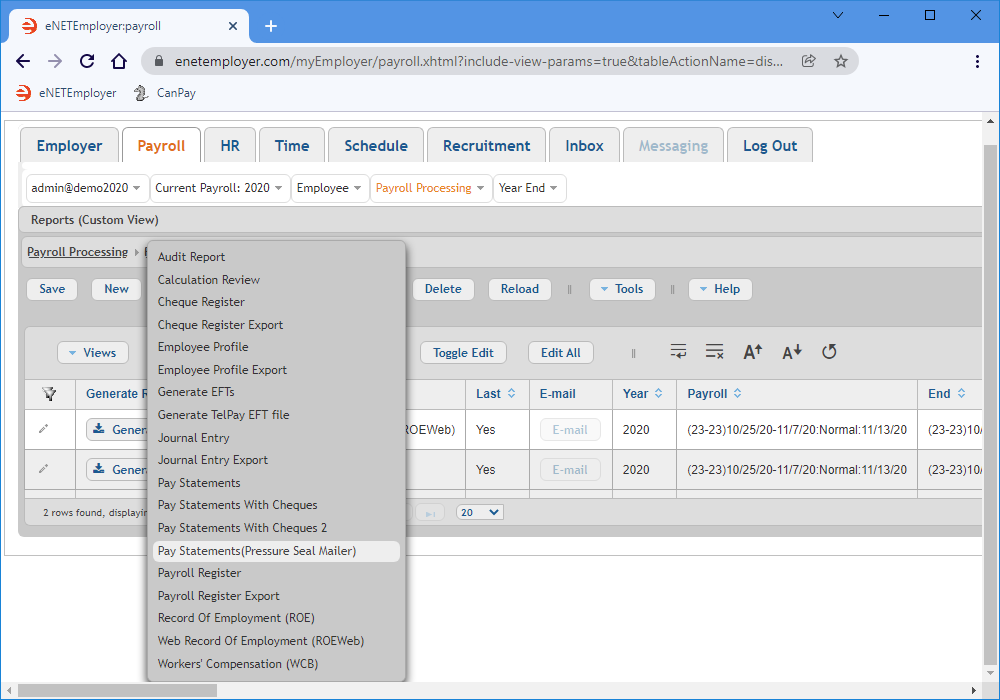
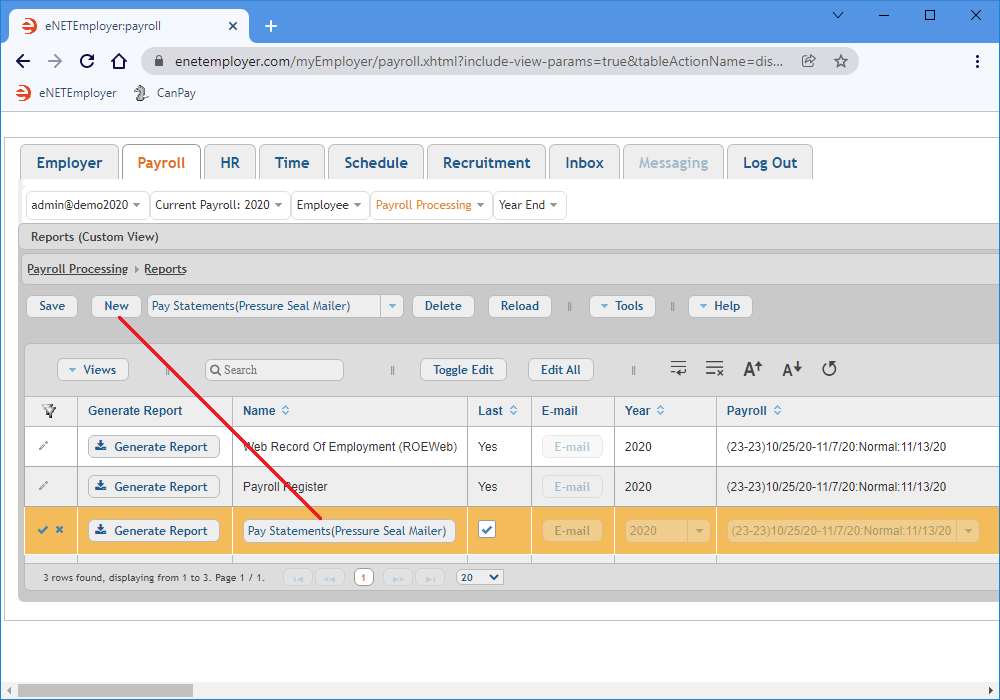
- From the Payroll Processing - Reports screen, click on the downward arrow that appears to the right of the New button. This displays a menu with a number of common report types.
- Choose the Pay Statements (Pressure Seal Mailer) option from the drop-down list, and then choose the New button. This action inserts a new report row into the table with its cells ready for editing. The Pressure Seal Mailer type is a common statement format that can be folded into 3 panels for inserting into a windowed envelope.
- Email Statements - check this box to allow you to email pay statements to your employees.
- SIN, Birth Date - check these boxes to include these details on the employee's pay statement.
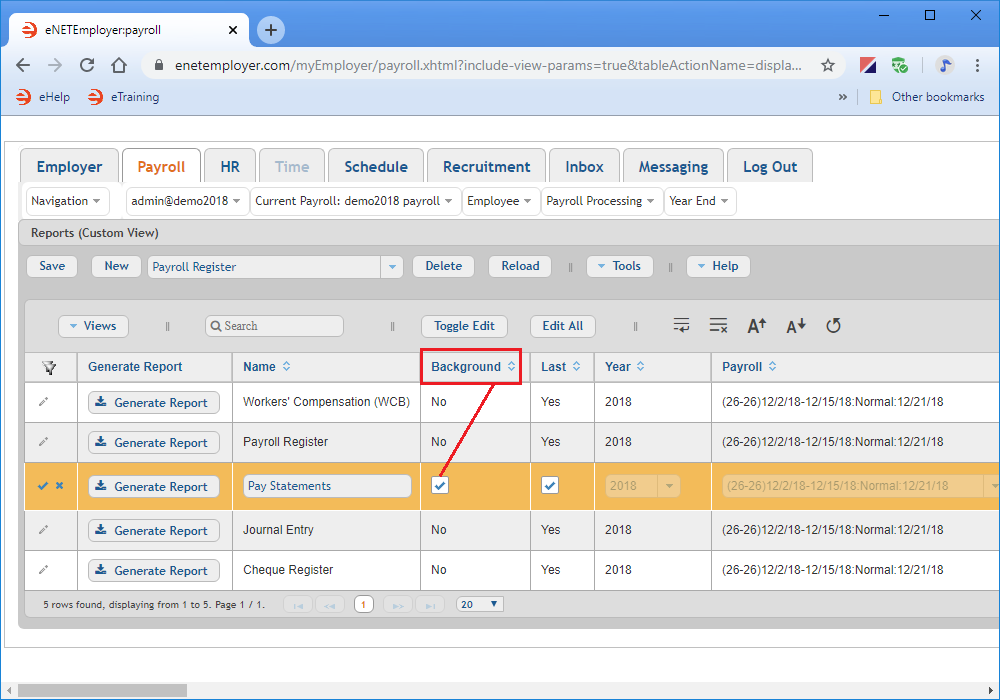
- Background- check this box to include a background with outlines and borders (useful if you are not using pre-printed stock statements in your printer).
- Employee - use this option to specify the employees that should be included when the report is created.
- Scroll to the Background column and place a check in the cell.
Example: In Fig. 06 below, the Background option appears in column 4 because we have use the Customized View option to rearrange our columns.
- After you have activated the Background option, Save the report row. This change will now be stored for the next time that we create this report.
- Choose the Generate Report button each time you wish to create the employee pay statements.
Customizable Logo - Now that you have added the Pressure Seal Mailer report, you can customize it by adding a logo that will appear at the top and bottom of the statement. To learn more about this feature, view the Adding a Logo to your Pay Statements tutorial.
Scrolling through the available options for the Pay Statements report, you are allowed to modify such details as:
For this tutorial, we will include a pre-formatted background on the report in order to facilitate easier viewing of the statement details.
To Add a Plain Pay Statements Report:
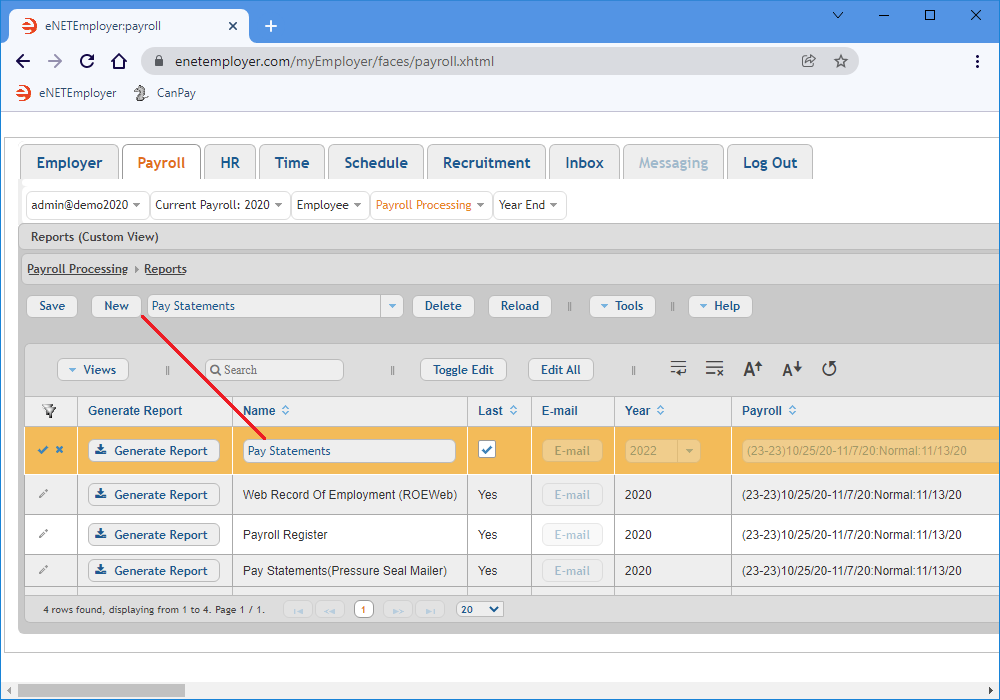
- From the Payroll Processing - Reports screen, click on the downward arrow that appears to the right of the New button and then choose the Pay Statements option.
- Choose the New button to insert the new report row into the table and then choose the Save button at the left side of the row.
- Choose the Generate Report button to create the "plainer" style of pay statement (see Fig. 08 below).
Interim Watermark - If you have not yet closed your payroll, the word "Interim" will appear as a watermark in the background of your report. This watermark will be removed once you close the payroll and regenerate the report.
This completes the tutorial on how to create employee pay statements. If you wish to learn how to send your pay statements to each employee via email, view the Emailing Employee Pay Statements tutorial.
See Also
- Reports Overview
- Payroll Reports
