Help Toolbar (select a button to browse other online help sections) Home Tutorials Resources Search Tabs & Menus Button Bar Table & Data Display |
Creating Payroll Benefits
For this tutorial, we will work with two basic benefit types; a Group Insurance and an RRSP benefit. Rather than creating them from scratch we will pick up from where we left off in the Deductions tutorial. The Group Insurance benefit (and its corresponding deduction) will be discussed along with the tax settings for the RRSP benefit. Once created, the program will use these items in conjunction with their associated function (these functions are discussed in the Functions tutorial).
There are two parts to this tutorial:
- Part A) Group Insurance - This section will show you how to create a common group insurance deduction where the amount is calculated based on a factor of each employee's income.
- Part B) RRSP Deduction - This section will show you how to create an RRSP deduction where only the employee makes contributions.
Automatic Deductions and Benefits - In many situations, both the deduction and benefit are related. Therefore when you create a benefit in the Current Payroll - Benefits screen, a corresponding deduction is also created in the Current Payroll - Deductions screen (and vice versa). You have the option of utilizing the benefit only, the deduction only, or both. eNETEmployer will allocate these costs to all the areas/departments in which the employee works. Further, certain types of deductions are associated with benefit programs such as health plans, life insurance plans, and other benefit plans. These are typically referred to as "benefit deductions". Other deductions that are not generally associated with benefits (union dues, parking fees, savings bonds, etc.), are referred to as "general deductions". |
Note: If you decide to create the following benefits from scratch, you should also review/complete the Deductions tutorial so that your benefits and related deductions (if applicable) will be linked correctly. This is a necessary step because each time you add a Benefit, a corresponding Deduction is created (but you do have the option of utilizing the corresponding deduction or not).
If you are creating a benefit item from scratch, then you can simply use the New button to insert a new row for each benefit and use the instructions below as a guideline.
NOTE: Click on the images below to view them at full size
Benefit #1 - Group Insurance Benefit:
We will begin by linking a benefit to the deduction that was setup for our employees' Group Insurance (as discussed in the Deductions tutorial). The employer will pay one half of the premiums, and the employee will pay the remaining portion.
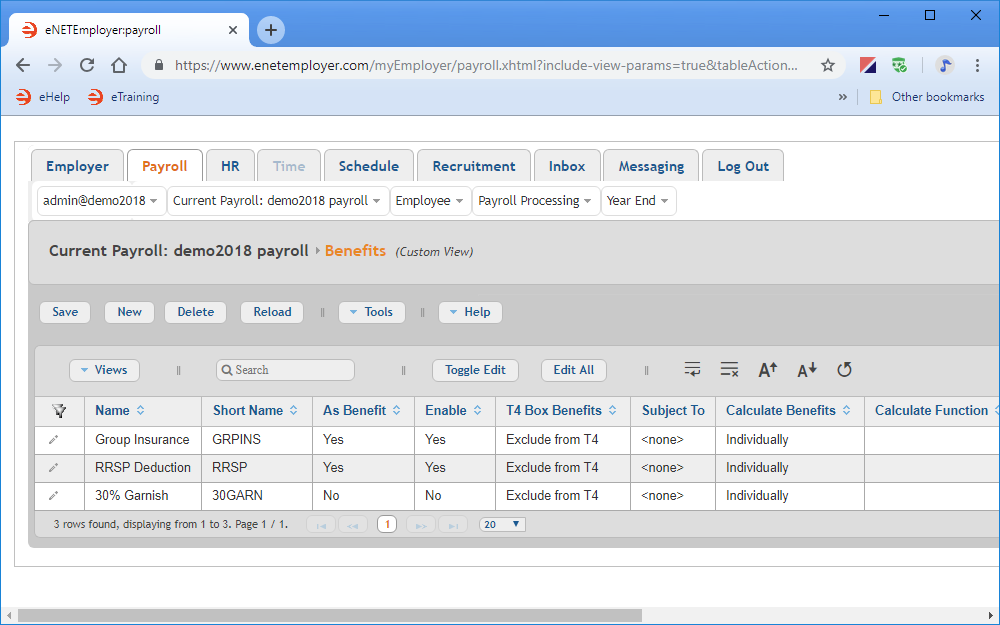
- From the Payroll tab, open the Current Payroll - Benefits screen where you can work with your employee benefit records.
- As mentioned earlier, if you are creating your benefit from scratch, then simply select the New button to insert a blank benefit row into the table. If you completed the Deductions tutorial earlier, then you will see several benefit rows that correspond to the deductions that were already created.
- Edit the various cells as they relate to your payroll's benefit item (press <F1> to use the Online Help system if you need to look up a definition for the various cells).
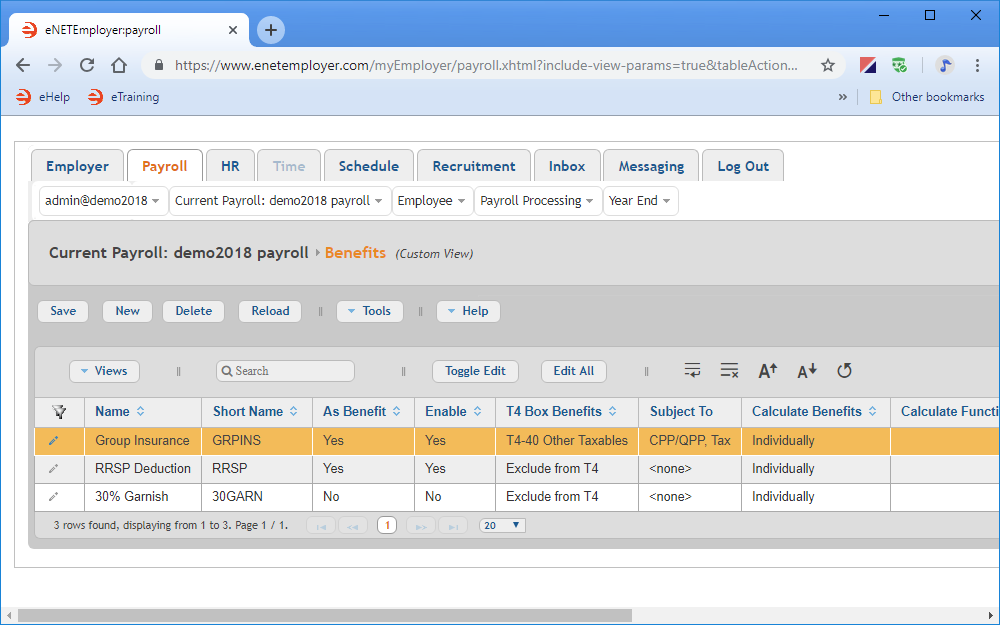
Example: In our example below, we have entered the required data for our Group Insurance benefit, leaving a number of cells with the default values for this tutorial.
Name As Benefit T4 Box Benefits Subject To Calculate Benefits Calculate Function Group Insurance Yes T4-40 Other Taxables Tax, CPP/QPP By Function Group Insurance - Some considerations about this sample benefit:
- We have chosen Yes in the As Benefit cell because 50% of the Group Insurance premiums will be paid by the employer (and are therefore classified as a taxable benefit). You can deactivate this option on a per-benefit basis if needed, such as when eNETEmployer adds a matching benefit item, but you do not wish it to be used in any calculations (remember that matching benefits are created automatically when you create a deduction).
- Using the T4 Box Benefits cell, we have assigned the benefit to T4-40 Other Taxables so that it will appear on each employee's T4.
- Using the Subject To cell, we have assigned Tax and CPP/QPP for tax treatment purposes.
- Since this benefit will be calculated based on an associated Function, we need to ensure that the function is selected in the Calculate Function cell. In our example, we have selected the Group Insurance function (which was created in the Functions tutorial).
- Once your data is complete, select the Save icon (the check mark icon at the left side of the row). This accepts the changes and the Edit Mode icons are removed to indicate that the entire row has been saved. You can also choose the Save button from the Button Bar above the table.
Since we are building on the Deductions tutorial, we will need to adjust two of the sample benefits (Group Insurance and RRSP Deduction) so that they are assigned to the correct function. The third sample benefit in our tutorial (a 30% Garnish), will remain unused since it does not apply.

This completes the settings for the first sample benefit. Now we will proceed to the second benefit.
Benefit #2 - RRSP Benefit:
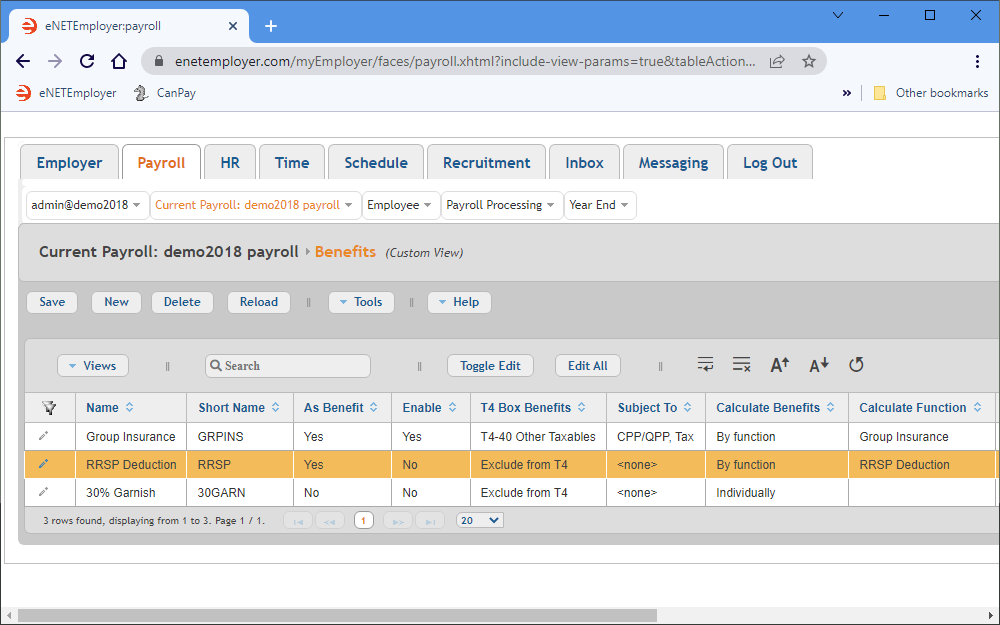
For our RRSP Deduction, we must alter the default settings since the employee's portion will not be classified as a benefit. We also need to ensure that the benefit is assigned to the correct function.
- If you are creating your RRSP benefit from scratch, then simply select the New button to insert a blank benefit row into the table. If you completed the Deductions tutorial earlier, then you will see the RRSP Deduction benefit row that corresponds to the RRSP Deduction that was already created.
- Edit the various cells as they relate to your company's benefit portion for the RRSP deduction (use our values as a guideline, substituting your own values as needed). If you are following the tutorial, you can use the values shown in the table below (and leave the remaining cells with the default values).
- Save the row information when you are complete.
Name As Benefit Enable Subject To RRSP Deduction No No <none> - Some considerations about this sample RRSP benefit:
- We have removed the check from the Enable box since the RRSP deductions are not matched by the employer (there are no tax implications).
- Since the Enable box is deactivated - and this benefit is "turned off" - none of the other options need to be set.
This completes the tutorial on how to create payroll benefits.
Note: If you created the benefits shown in this tutorial (or a custom benefit of your own), you should also review and/or complete the companion Deductions tutorial so that your deductions and related benefits will be linked correctly (if necessary).
See Also

