Help Toolbar (select a button to browse other online help sections) Home Tutorials Resources Search Tabs & Menus Button Bar Table & Data Display |
Entering Employee Payment Settings
For this tutorial, we will define the payment information for 5 sample employees. Each employee requires a number of settings that relate to how their payments are allocated within the payroll and any bank accounts that the employee will use for EFT purposes.
Before you begin: This tutorial assumes that you have already added a number of employees to your payroll. If you have not yet added your employees, you will not be able to edit their settings. Note: Employees cannot be added from this screen - you must do so in the Setup Employee screen. |
NOTE: Click on the images below to view them at full size
To enter employee payment information:
- From the Payroll tab, open the Employee - Pay Parameters screen. This screen is used to define settings that relate to how employee payments are allocated within the payroll and any bank accounts that the employee will use for EFT purposes. You can use the various features to add and define settings for new employees or to review or change settings for existing employees.
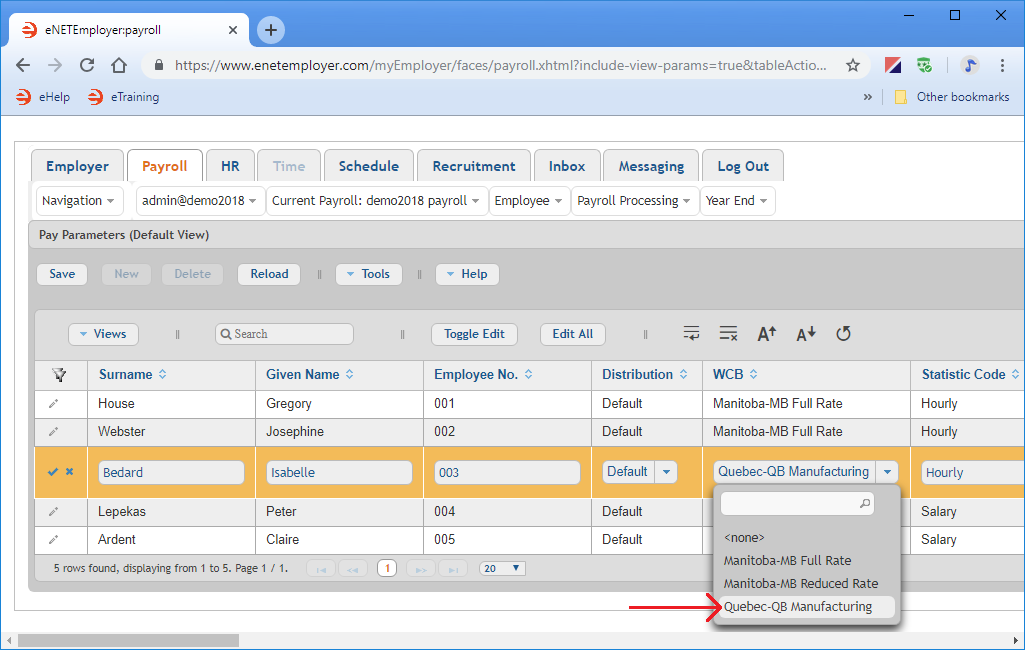
- Double-click on the employee's row that you wish to edit. This activates Edit Mode so that you make changes to the cells.
Example: In Fig. 01 below, we have edited the WCB cell for Isabelle so that we can choose the rate that corresponds to the province in which she works.
- Continue editing the data for each cell as needed for the remaining employees in your payroll (press <F1> to use the Online Help system if you need to look up a definition for the various cells).
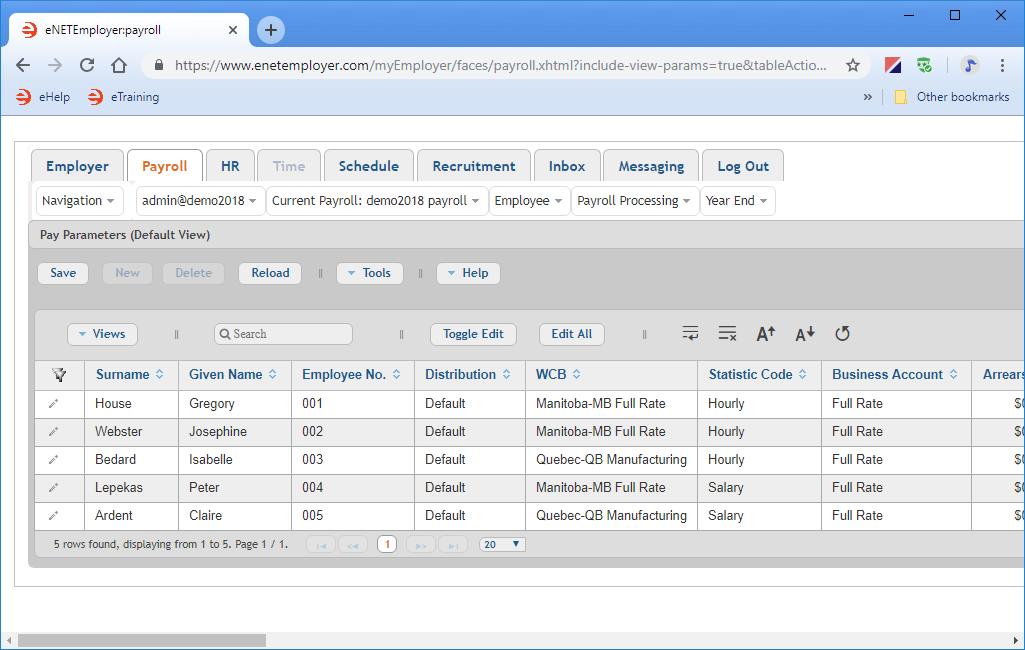
Example: In our example below, we have entered the payment information for each of the five sample employees and have left a number of cells with the default values. Note: We have included bank information for several employees so that we can discuss the EFT (Electronic Funds Transfer) feature in a later tutorial. You will notice that one employee has two bank accounts that will receive funds via the EFT process. Also, one employee does not have a bank account defined and will need to be paid via a manual printed cheque.
Employee WCB Statistic Code Business Account Primary
Bank Account EnablePrimary
Bank Account NamePrimary
Bank
Account
Transit...Primary
Bank
Max
AmountSecondary Bank
Account
EnableSecondary Bank
Account
NameSecondary
Bank
Account
Transit...Secondary
Bank
Max
AmountGregory House Manitoba-Rate Hourly Full Rate Yes Scotia Bank 55555-333-12121212 $1000 Yes Credit Union 55555-333-12345678910 0.00 Josephine Webster Manitoba-Rate Hourly Full Rate Yes GNR Credit Union 55555-333-12121212- - No - - - Isabelle Bedard Quebec-Rate Hourly Full Rate No - - - No - - - Peter Lepekas Manitoba-Rate Salary Full Rate Yes TD Bank 12345-123-12121212 - No - - - Claire Ardent Quebec-Rate Salary Full Rate Yes RBC 12345-123-12121212 - No - - - - When you have finished entering your data, save the information for all of the rows.
This completes the tutorial on setting employee payment parameters.
Note: If you are working through the payroll setup process in order, you will need to continue through the Employee menu to finish entering the data that is required for each new payroll employee.
Note: If you are working through the Quick Start Guide in order (or have completed the tutorials on adding employees - manually or with an employee template), the five employees that you created earlier will appear in the table along with a number of blank status-related cells that need to be defined. As with other screens, you can enter the required data one row at a time, or you can activate Edit Mode for all of the rows at once and use the <Tab> key on your keyboard to enter the data in a more efficient manner. We will use the single-row method method for this tutorial.
See Also:
- Setup Employee help page (Payroll tab)
- Adding Employees Using an Employee Template
- Adding Employees Manually
- Deleting an Employee
- Creating an ROE
Other Employee Settings:
- Employee address settings
- Employee's status settings (terminations, leaves, etc.)
- Employee payment settings
- Employee tax settings
- Employee bank accounts
- Employee earnings
- Employee deduction and benefit Items
- Employee accumulator items
- Working with an employee's YTD earnings
- Working with an employee's YTD deductions and benefits
- Working with an employee's YTD accumulators
- Importing employees from another payroll

