Help Toolbar (select a button to browse other online help sections) Home Tutorials Resources Search Tabs & Menus Button Bar Table & Data Display |
Working with T4As
As part of the year-end procedure, eNETEmployer allows you to create T4As for your employees and for submission to the CRA. You may also find it necessary to change a box number assignment for a pension, retiring allowance, annuity or other income. eNETEmployer offers this functionality by allowing you to edit the values for each item as they relate to the T4A process.
There are four parts in this tutorial:
- Part A - Generate the T4As - Generating a T4A for each employee is mandatory to complete the year end process. This part of the tutorial will show you how to generate the T4As automatically.
- Part B - Review the T4A Data - This step will show you how to view each employee's T4A data.
- Part C - Edit the T4A Data - This third step is only necessary if you need to make changes to a box assignment.
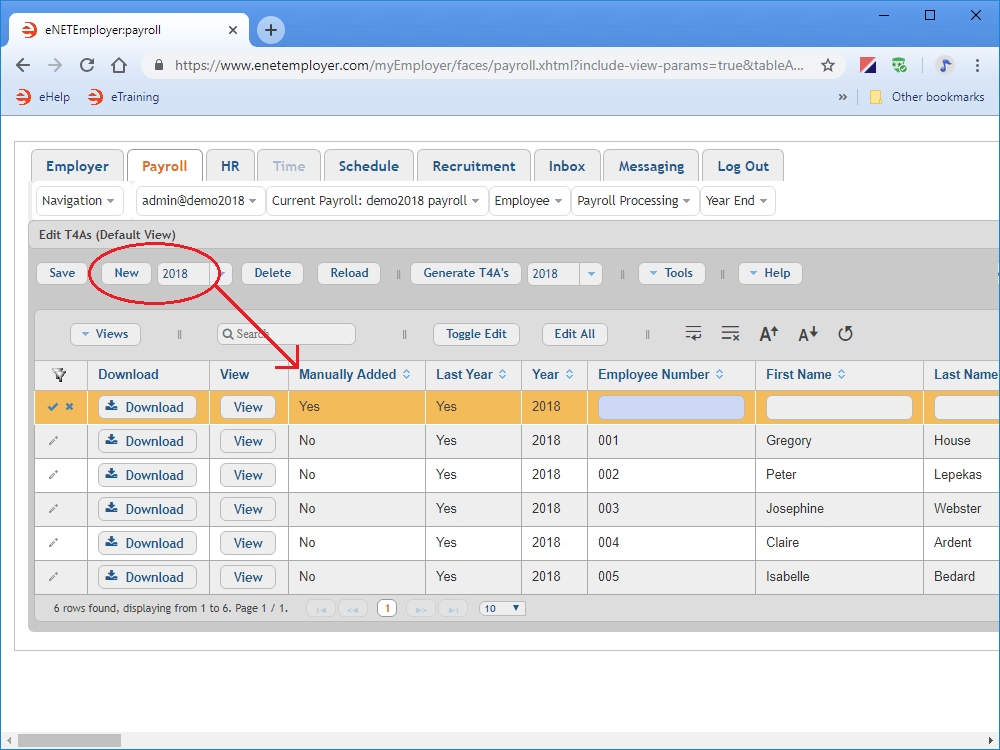
- Part D - Manually add a T4A - This step is necessary when a given employee has not already had a T4A generated for them during the year end process, or if you need to add another T4A over and above their existing form.
NOTE: Click on the images below to view them at full size
Part A) To generate your employee T4As:
- From the Payroll tab, open the Year End - Edit T4As screen where you can view and edit each employee's T4A.
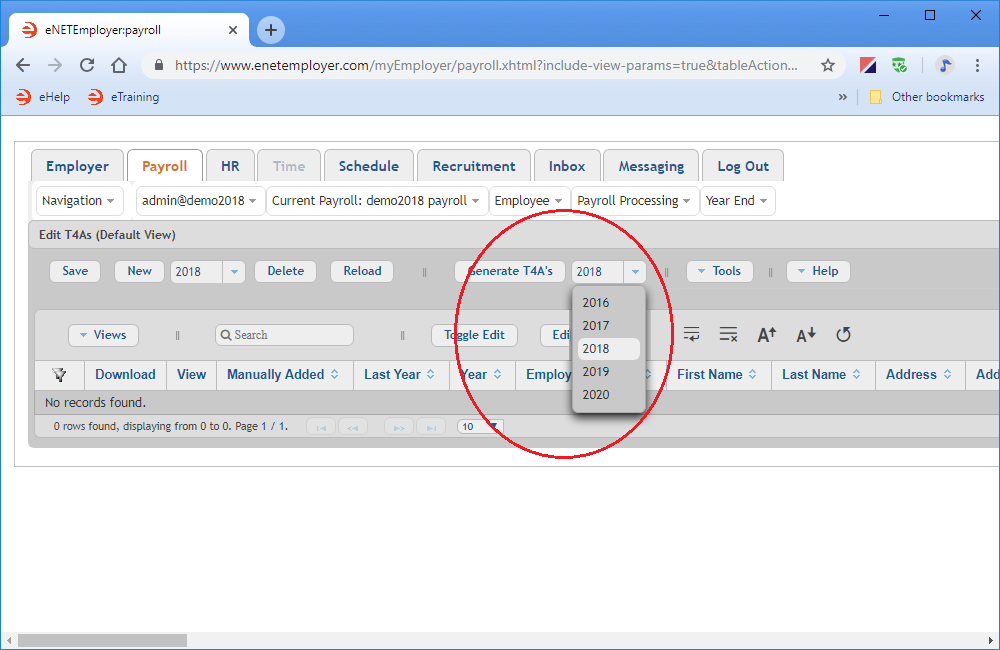
- Click on the drop-down list beside the Generate T4As button and then select the year for which the T4As will be generated.
Example: In Fig. 01 below, we will choose the year 2018.
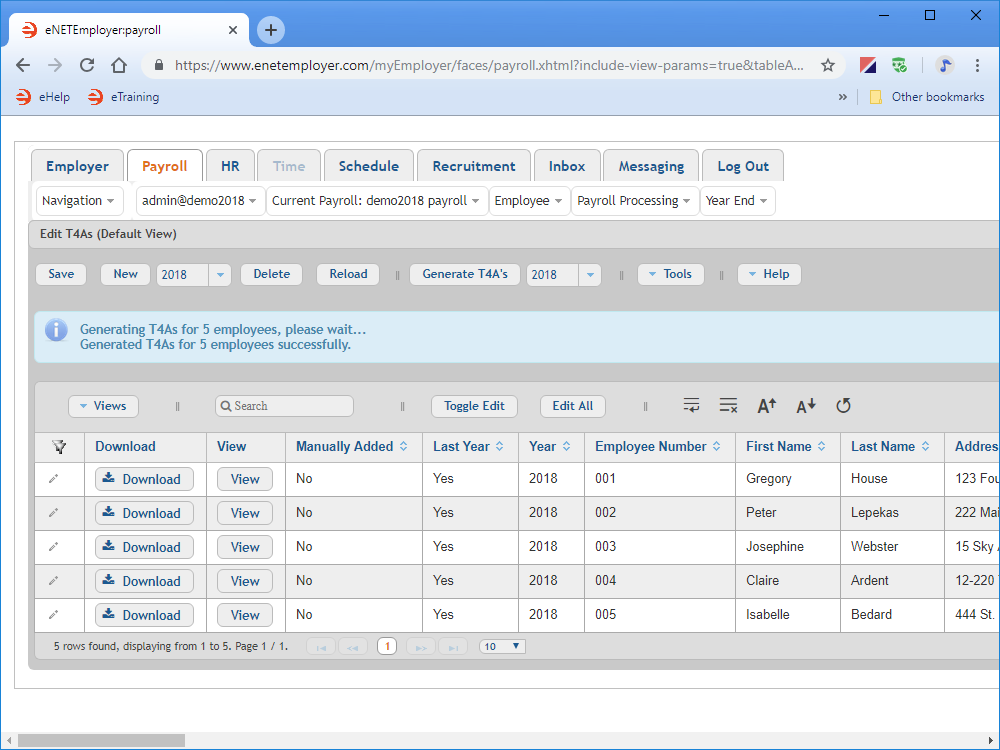
- Once you have chosen the year, select the Generate T4As button. This creates the T4As for each employee and a message will appear indicating the number of employees that were processed and the number of T4As that were successfully generated.
Example: In Fig. 02 below, we see that 5 employees now have their T4As ready for review.
This completes the section on generating your employee T4As. Now you can proceed to the next section that discusses how to review each employee's T4A data.
Part B) To review your employee T4As:
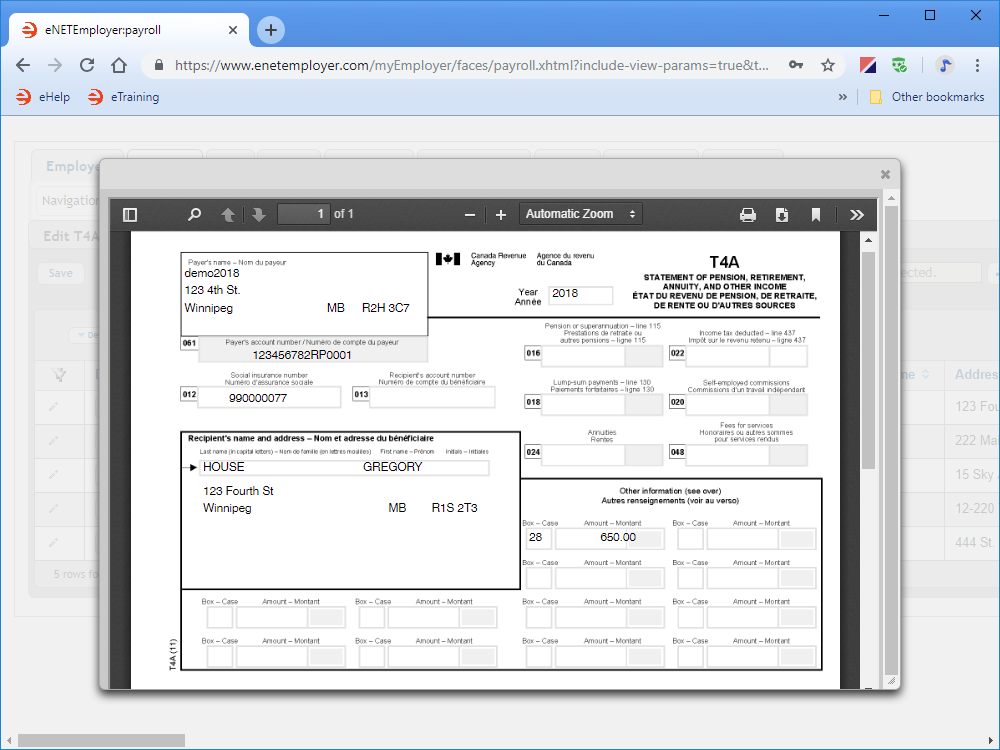
- In the Edit T4As screen, click on the View button for an employee whose T4A you wish to view. This displays the employee's T4A data in a pop-up window.
Example: In Fig. 03 below, we chose the first employee in the list; Gregory House.
- Use the Automatic Zoom option if you wish to make the details larger. You can also use the double arrow at the top right of the pop-up window to access a series of useful viewing tools.
- When you are finished reviewing the data, choose the Close button (the "X") from the top right of the window.
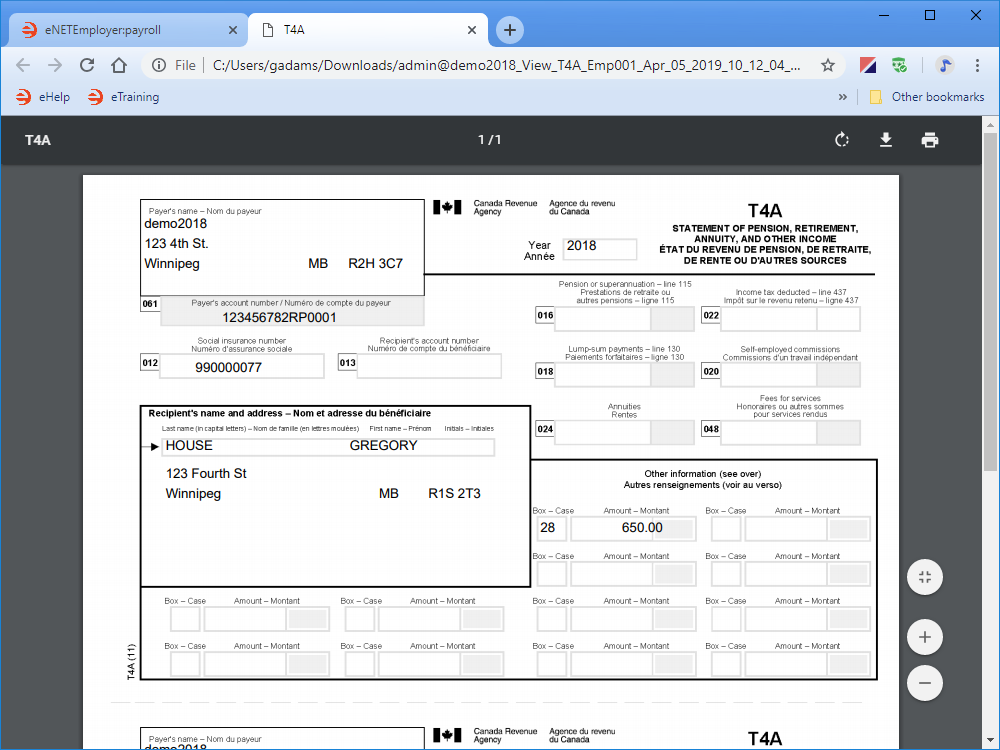
You can also review the T4A as a PDF file that can be downloaded, printed, or emailed to the employee.
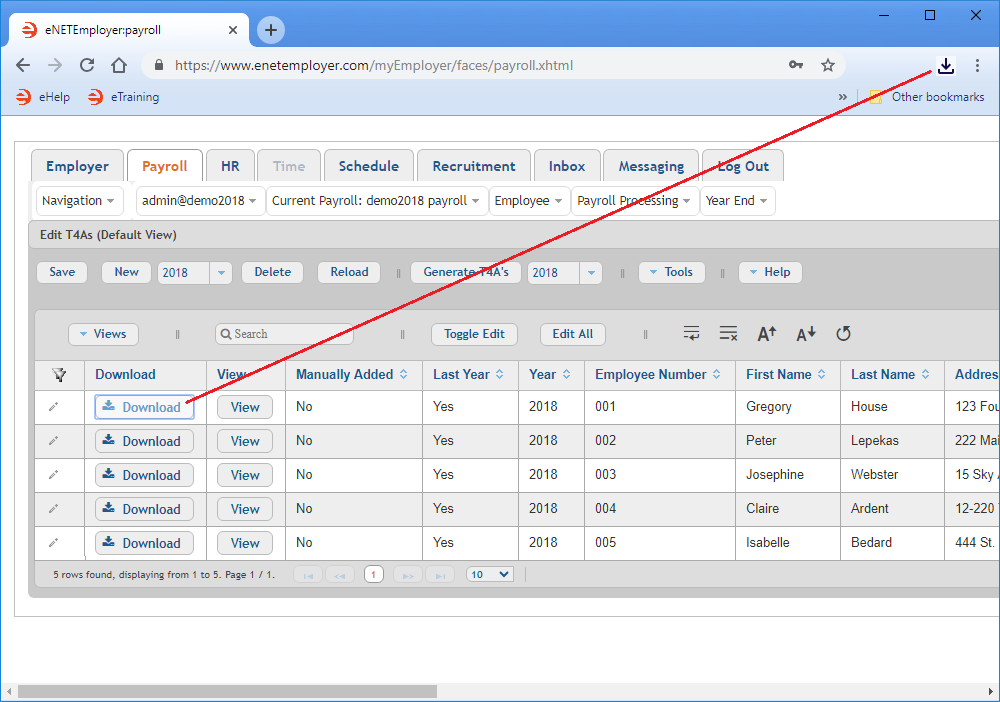
- Choose the Download button to save the T4A report as a .PDF document. Depending on your browser settings, the resulting document will either be stored in your Downloads folder or you may be presented with a window that will prompt you where to save the file. In most browsers, the document can be viewed via a link that appears at the top-right of your browser.
- Click the Download link to access the file, or navigate to your Downloads folder and open the document using your preferred PDF viewer. When the T4A appears on the screen, you can scroll through the document and review the employee's data in detail.
Example: In Fig. 05 below, we can review the employee's T4A totals in detail. - When you have finished reviewing the employee's T4A, close the report and return to eNETEmployer.
This completes the section on generating your employee T4As. Now you can proceed to the next section that discusses how to review each employee's T4A data.
Part C) To edit an employee's T4A:
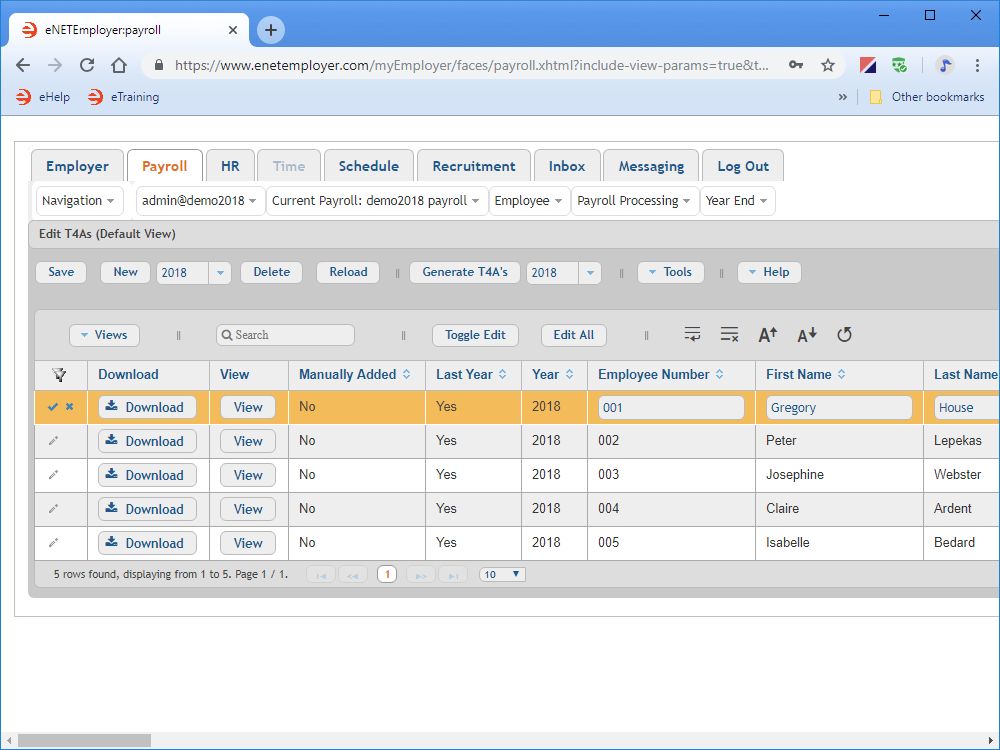
- Double-click on the row of an employee whose T4A you wish to edit. This changes the row to Edit Mode and activates the cells for editing. Note: You can select the Pencil icon located at the left side of the row to perform this same action.
Example: In Fig. 06 below, we chose the first employee in the list; Gregory House.
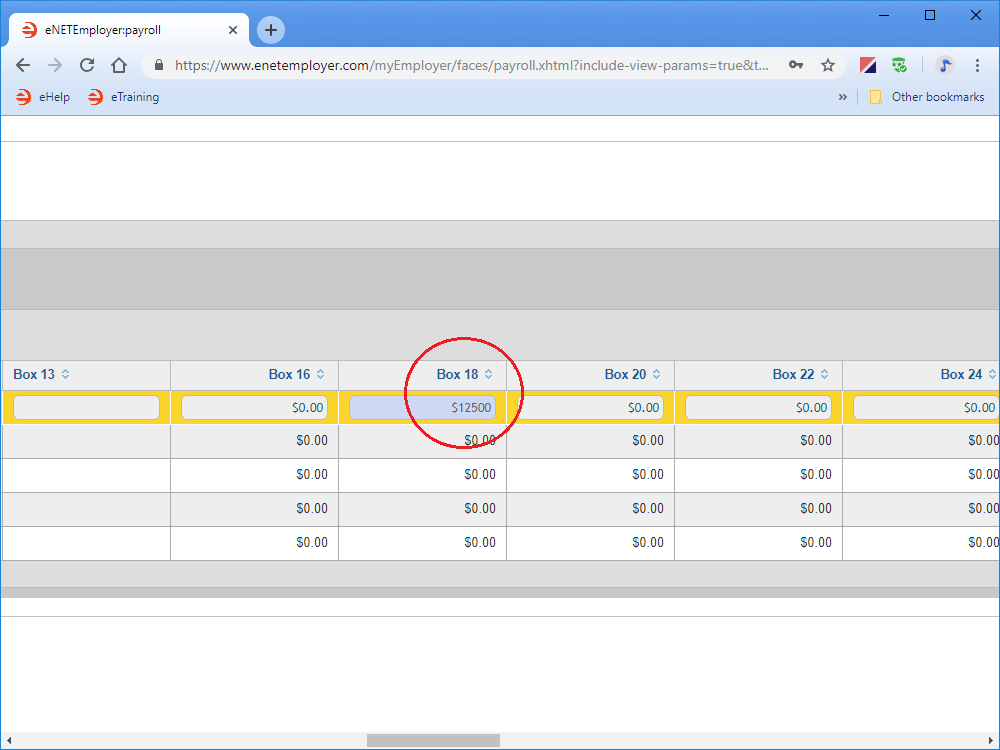
- Move to the desired cell or box number and make your changes as needed.
Example: In Fig. 07 below, we edited Box 18 to add a $12,500 amount for the taxable portion of the employee's payment from their DPSP.
- Repeat the preceding step for any other employee(s) whose T4A data required editing.
- Once your edits are complete, select the Save icon (the check mark icon at the left side of the row). This accepts the changes and the Edit Mode icons are removed to indicate that the row changes have been saved. You can also choose the Save button from the Button Bar above the table.
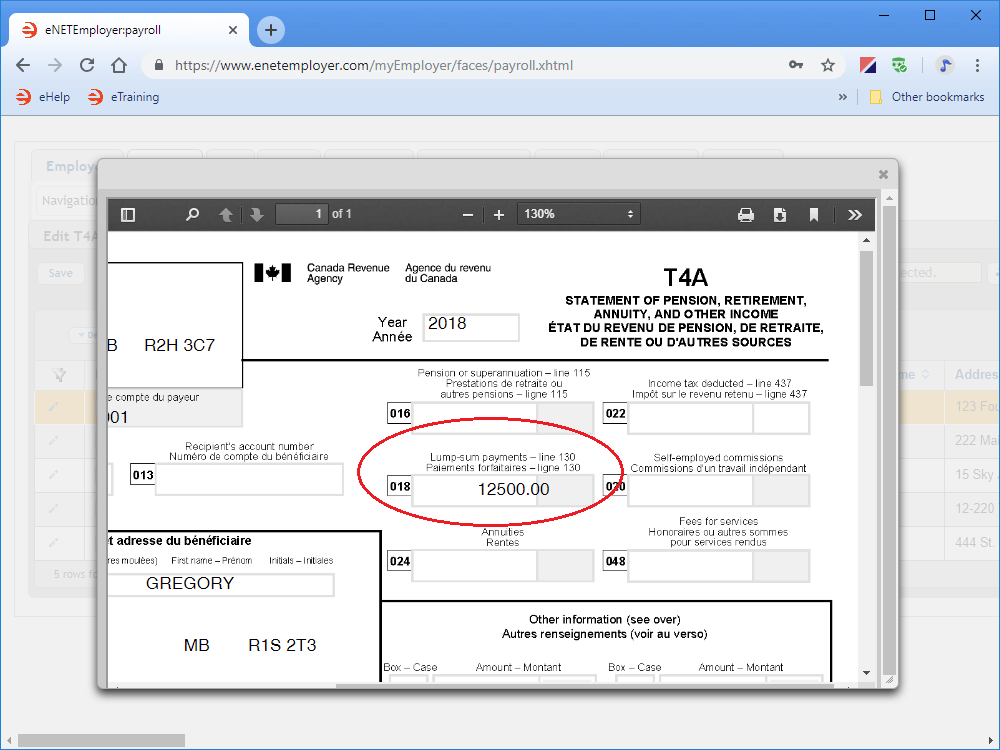
- To review the employee's revised T4A, click on the View button for the employee. The revised T4A shows the changes that you made.
Example: In Fig. 08 below, Box 20 has been changed to reflect the additional $12,500 amount.
- When you are finished reviewing the data, choose the Close button (the "X") from the top right of the window.
Part D) To Manually Add a T4A:
- Ensure that desired tax year is shown in the drop-down list beside the New button, and then select the New button. This adds a T4A row to the table and its cells appear ready for editing.
- Edit the cells as needed for your employee's T4A form, and then Save the changes when you are complete.
Example: In Fig 09 below, we have manually added a T4A for one employee. Notice how the Manually Added column reads "Yes" to indicate that it was added manually.
This completes the tutorial on generating and editing your employee T4As.
Note: If you wish to continue with the year end process, please refer to the links below.
See Also
- Year-End Overview
- Employee T4s
- Edit T4s help page
- Generate your employee T4s
- Review your employee T4s
- Edit your employee T4s
- Add a T4 manually
- Employee T4As
- Edit T4As help page
- Generate your employee T4As
- Review your employee T4As
- Edit your employee T4As
- Add a T4A manually
- T4/T4A Reports
- Magnetic Media Filing
