Quickstart Menu (choose a topic to visit a section of the guide)Help Home | Step 1: Create Account Step 2: Company Setup Step 3: Payroll Setup Step 4: Add Employees Step 5: Process Payroll |
Quick Start Guide Progress: 10%

Step 2: Enter Your Company Details
eNETEmployer needs to store some details about your company in order to function. This include such items as your business name and address, and your contact/admin persons. Use the instructions below to learn how to set up your company details.
2a - Sign in to the program:
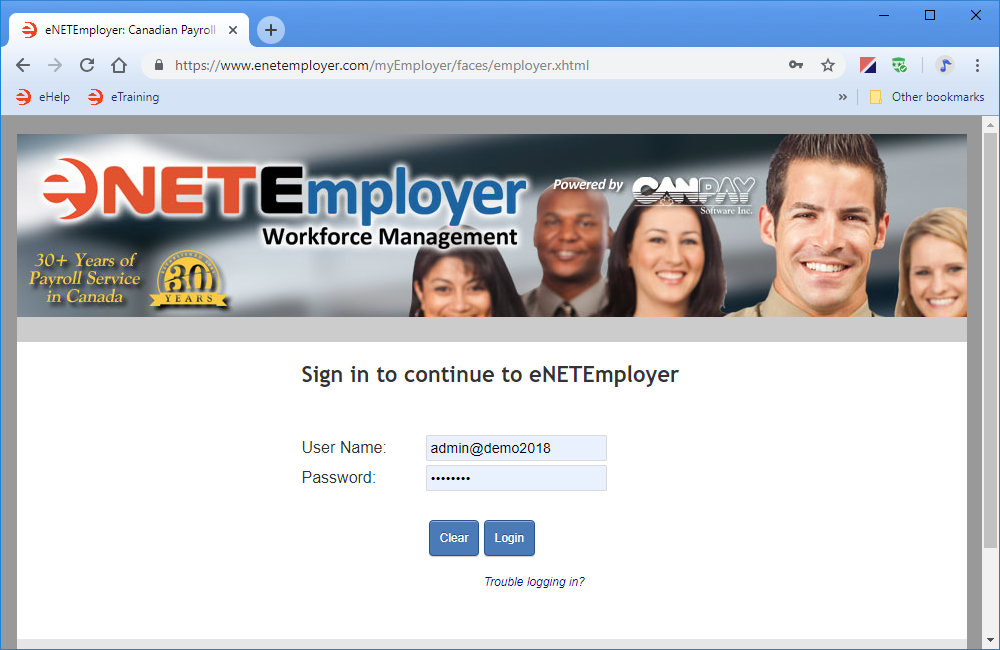
- Sign In to the eNETEmployer website using the credentials that were provided to you when you signed up for the service.
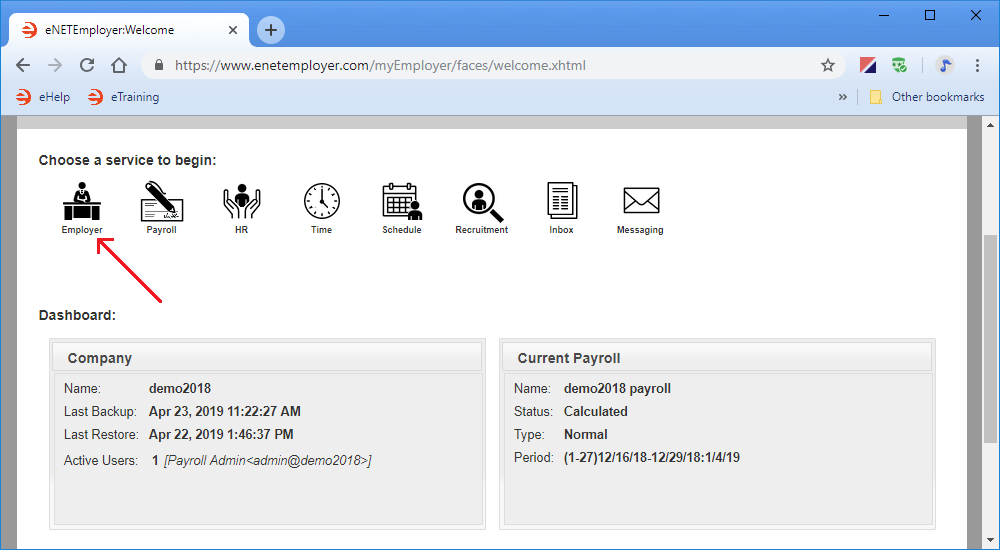
- When the Dashboard screen appears, choose the Employer icon.
This opens the Employer tab where you must define a series of company-related settings.
If this is your very first time logging in to the program, you will need to change your password. If you are taking over the management of the payroll from someone else, it is a good idea to change your password as well. Proceed to the next step to learn how to change your password.
2B - Define a secure password for your user account:
For security purposes, the program requires that you enter a new password that is different than the default one that was provided to you when your account was setup.
Note: The Password and Options screens are included in all program tabs. Therefore, any changes made in these to screens will be shared across all program tabs.
The following tutorial will show you how to enter address information for your employees.
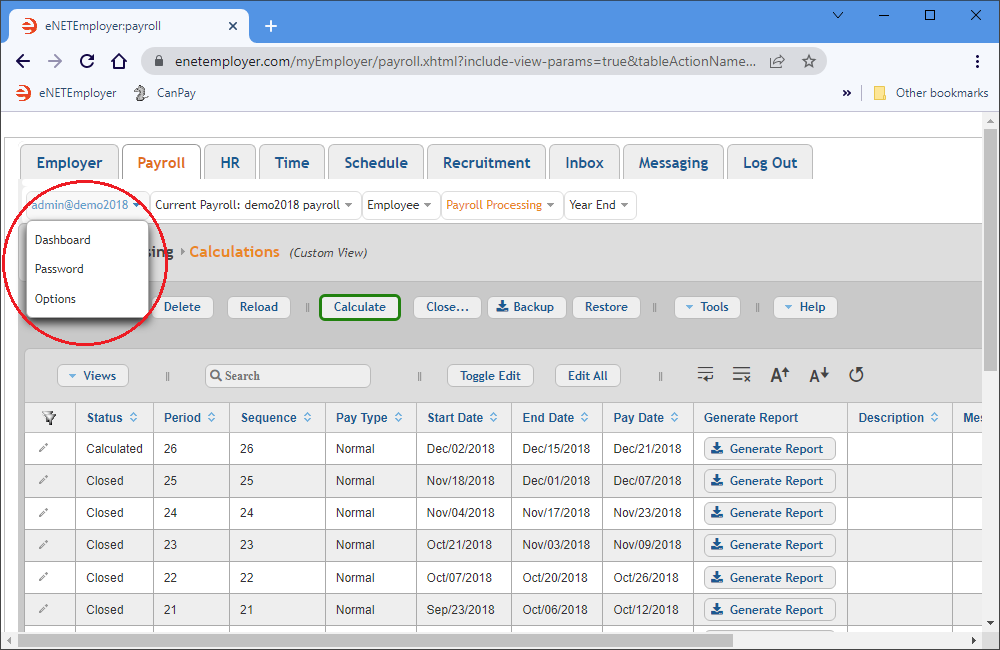
From the Employer tab, open theUser - Password screen where you can enter your new password.
Show Me How...
Example: In Fig. 03 below, we see the Password menu command under the User menu.
This completes the password information for your company and payroll. You are now ready to setup various options for the current user.
2C - Define Your User Options:
Each eNETEmployer user has control over a number of settings that can be tailored to their workflow. Users may change their preferred language, set their email address, and modify the settings for other useful features.
Note: The Password and Options screens are included in all program tabs. Therefore, any changes made in these to screens will be shared across all program tabs.
The following tutorial will show you how to set various options for the current user.
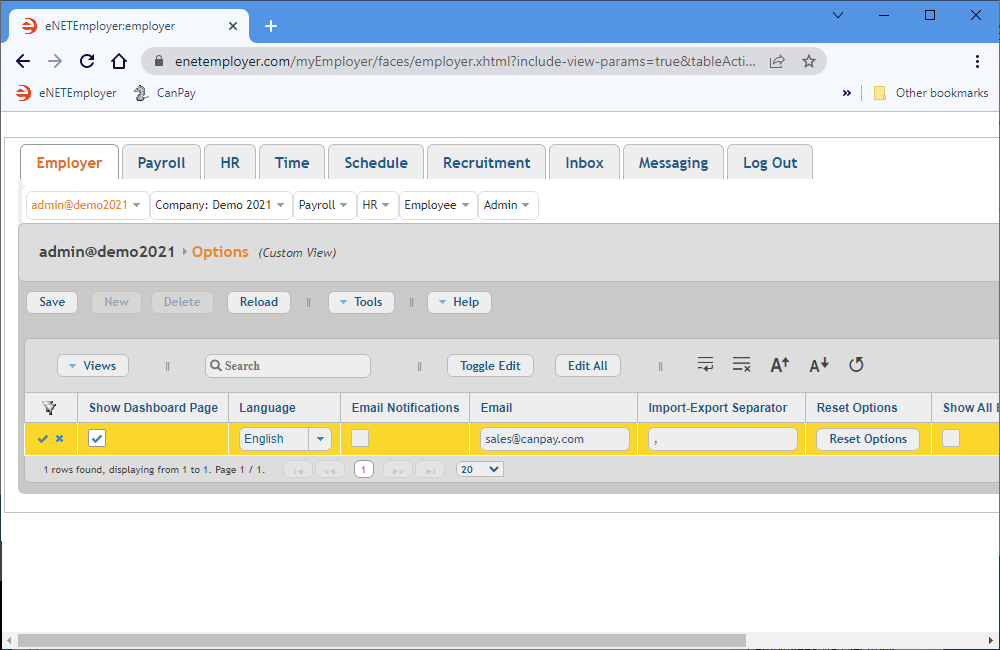
From the Employer tab, open the User - Options screen where you can define settings that will affect the current user's interaction with eNETEmployer.
Show Me How...
Example: In Fig. 04 below, we see a row of user options in Edit Mode.
This completes the options for the payroll. You are now ready to setup your payroll's name and address information.
2D - Define Your Company's Name and Address Information:
eNETEmployer requires address information for your company for general correspondence purposes. Some of the information will already be populated by eNETEmployer Services when your company signed up for the service, and this information can be modified as needed by the subscribers during their use of the eNETEmployer service.
Note: The Name and Address and Contacts screens are included in both the Employer and Payroll tabs. Although these two screen share the same name and similar information, the Employer tab refers to information at a "company" level, where the Payroll tab refers to information as it relates to each individual payroll.
The following tutorial will show you how to enter address information for your company.
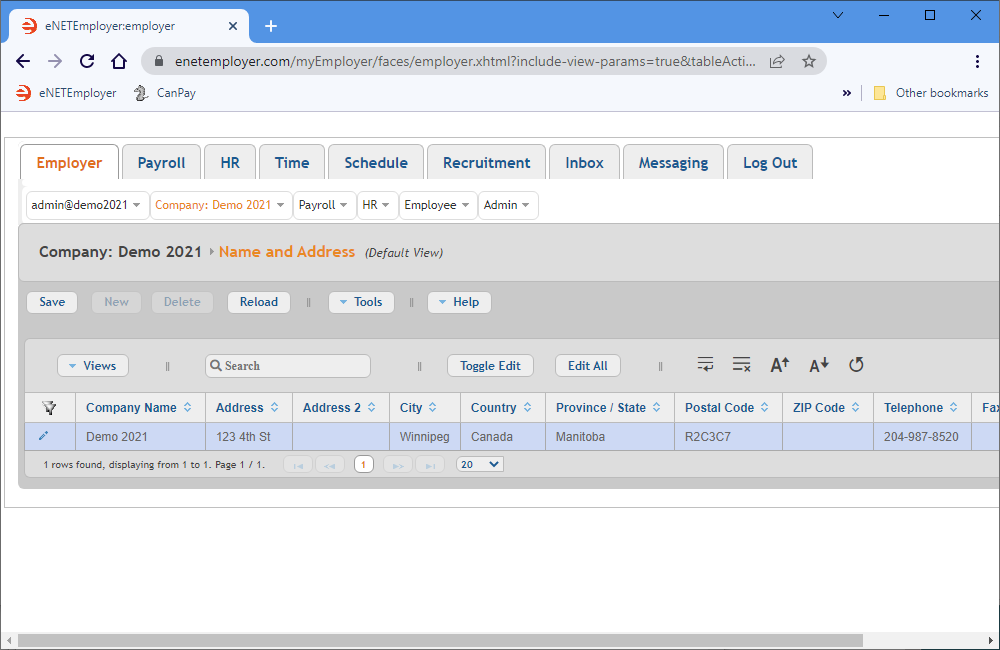
From the Employer tab, open the Company - Name & Address screen where you can define the address settings for your company.
Show Me How...
Example: In Fig. 05 below, we have entered the address information for our sample company.
This completes your "company"-related name and address information. You are now ready to setup your company's contact information.
2E - Define Your Company's Contact Information:
eNETEmployer requires information for personnel in your organization who may be contacted for general correspondence of if we have any questions or concerns regarding your payroll.
Note: The Name and Address and Contacts screens are included in both the Employer and Payroll tabs. Although these two screen share the same name and similar information, the Employer tab refers to information at a "company" level, where the Payroll tab refers to information as it relates to each individual payroll.
The following tutorial will show you how to enter contact information for your company.
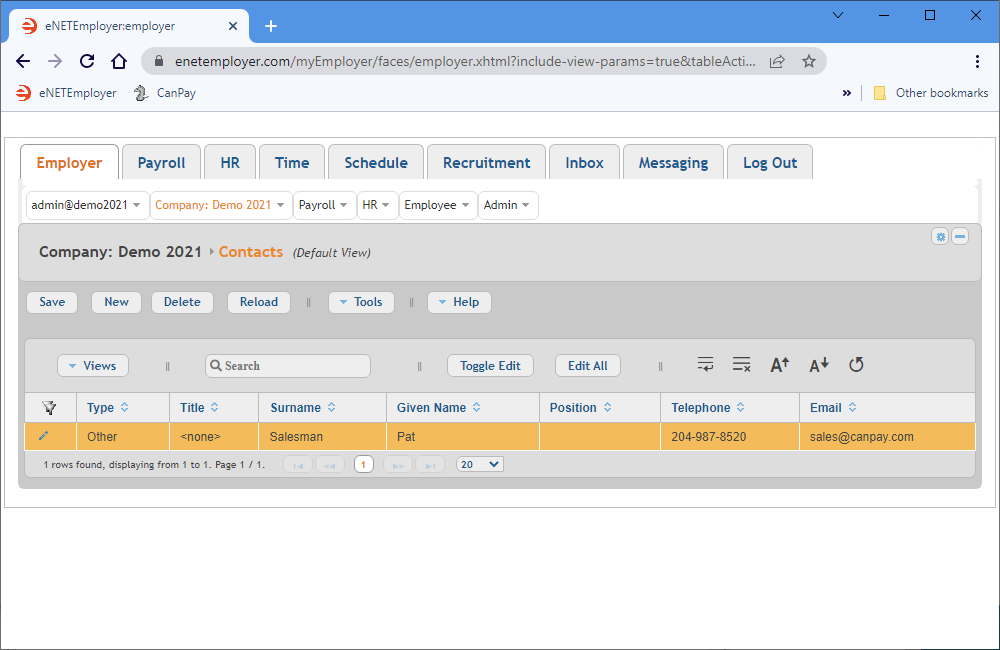
From the Employer tab, open the Company - Contacts screen where you can define the address settings for your company.
Show Me How...
Example: In Fig. 06 below, we have entered the contact information for our sample company.
This completes the "company"-related contact information for your company. You are now ready to setup your payroll's Location information, if required.
2F - Define Your Company's Location Information:
The following step is optional - This step is not required to perform the payroll procedure. If your company has only one physical location, or if you do not wish to use the Locations feature, you can skip this step.
If your company has more than one physical location, you can enter the address and other pertinent details for administrative, reporting or HR purposes.
The following tutorial will show you how to enter location information for your company.
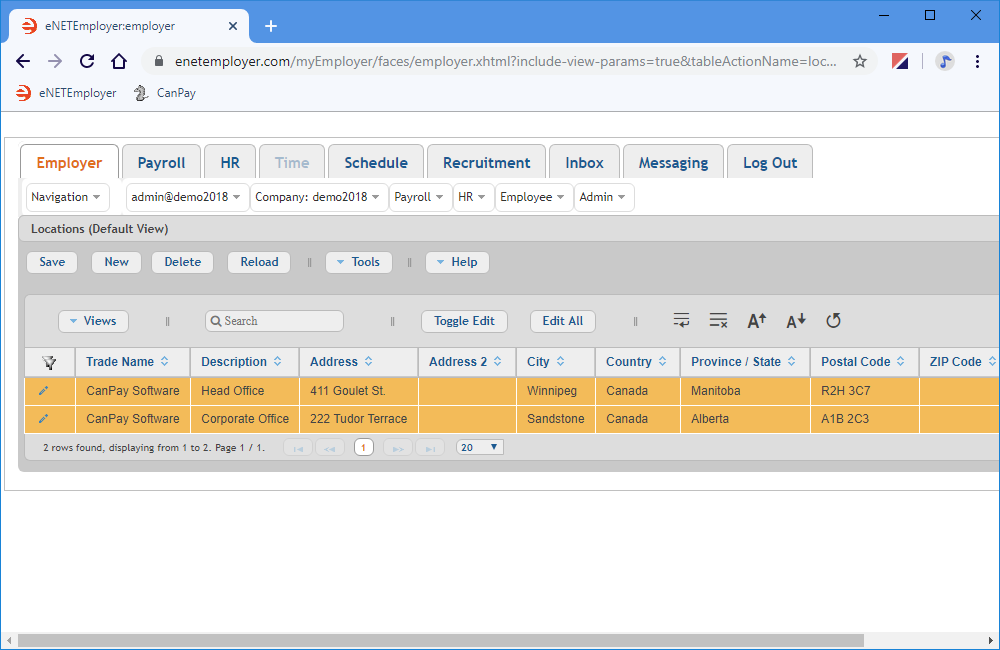
From the Employer tab, open the Company - Locations screen where you can define the settings for different physical and geographical locations of your company.
Show Me How...
Example: In Fig. 07 below, we have entered the information for two company locations.
This completes the company location information. You are now ready to setup your company's Division information, if required.
2G - Define Your Company's Division Information:
The following step is optional - This step is not required to perform the payroll procedure. If your company has only one operating division, or if you do not wish to use the Divisions feature, you can skip this step.
If your company is made up of more than one distinct operating part, you can define the details for each for administrative and reporting purposes.
The following tutorial will show you how to enter division information for your company.
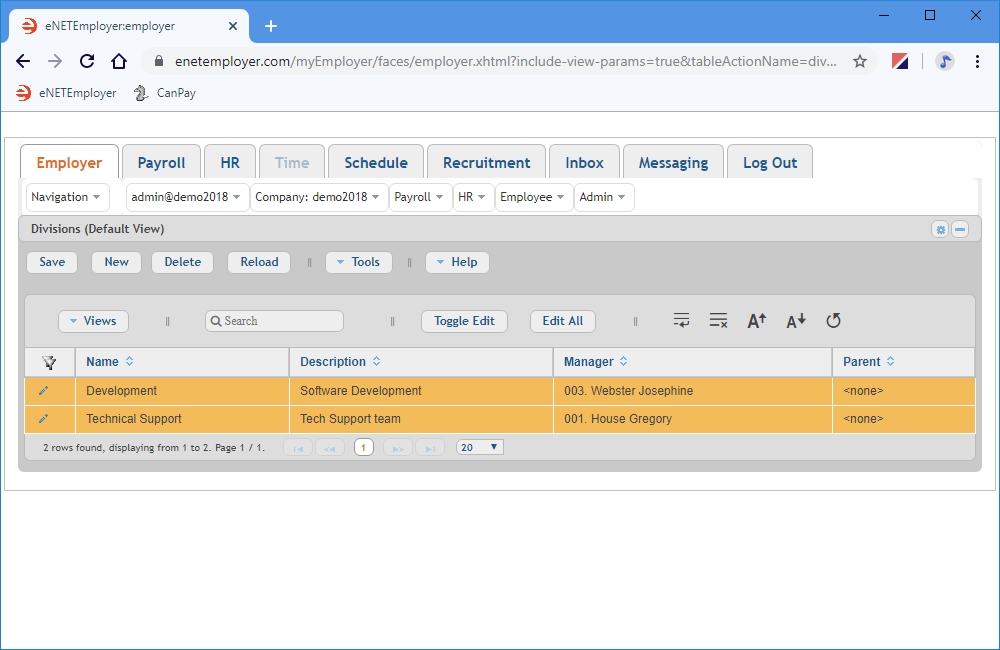
From the Employer tab, open the Company - Divisions screen where you can define the basic operating structure for different divisions in your company.
Show Me How...
Example: In Fig. 08 below, we have entered the information for two operating divisions in our sample company.
This completes the division information for the payroll. You are now ready to setupinformation for a secondary payroll.
2H - Define Your Company's Secondary Payroll Information:
The following step is optional - This step should only be used if you have multiple payrolls! When you sign up with eNETEmployer Services, your initial account is provided with the first payroll setup and ready to use. The following step should only be used if you are creating a new payroll, over and above your original payroll.
All new payrolls require a number of basic settings before they can be enabled and ready for use. This includes the payroll's name (which will appear in various program areas) and whether the payroll is applicable for calculating and reporting.
The following tutorial will show you how to enter a second payroll under your eNETEmployer account.
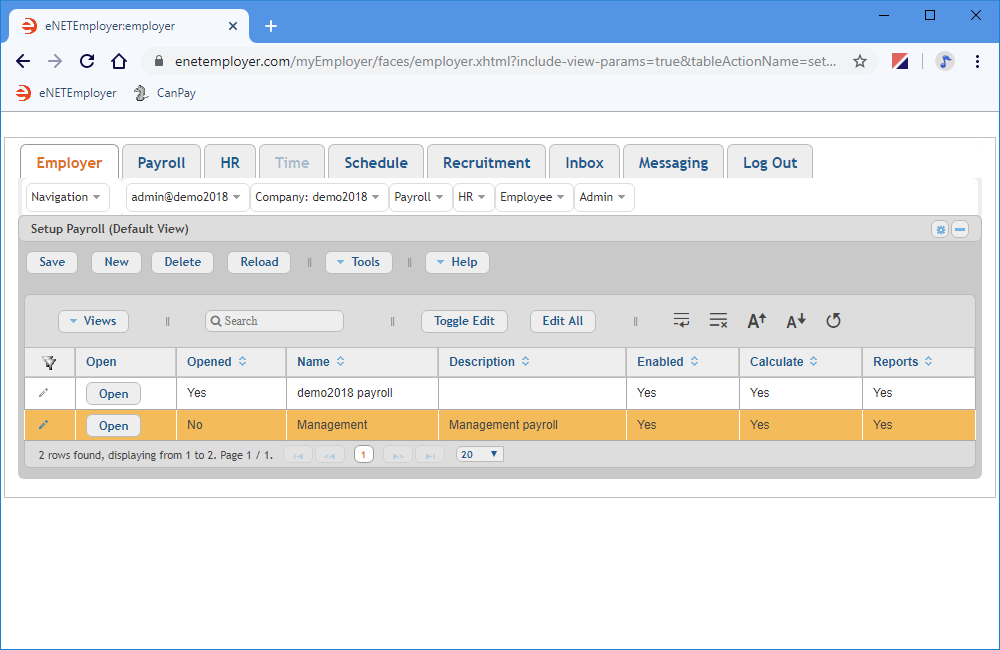
From the Employer tab, open the Payroll - Setup Payroll screen. The table will contain the initial payroll that was created when you first signed up for the payroll service.
Show Me How...
Example: In Fig. 09 below, our second payroll has been added and is ready to have its detailed information populated in the Payroll tab.
This completes the payroll information. You are now ready to setup your payroll's custom status information, if required.
2I - Define Your Company's Custom Payroll Status Information:
The following step is optional - This step is not required to perform the payroll procedure. If the program's default statuses' suit your needs, you can skip this step.
All employees are assigned at least one Status setting in the payroll. For active employees, the status is entitled "Active" - for terminated employees, the status is entitled "Terminated". If eNETEmployer's pre-defined status names do not adequately represent your employee's current state of employment, you can create your own custom status.
The following tutorial will show you how to create a "custom" status.
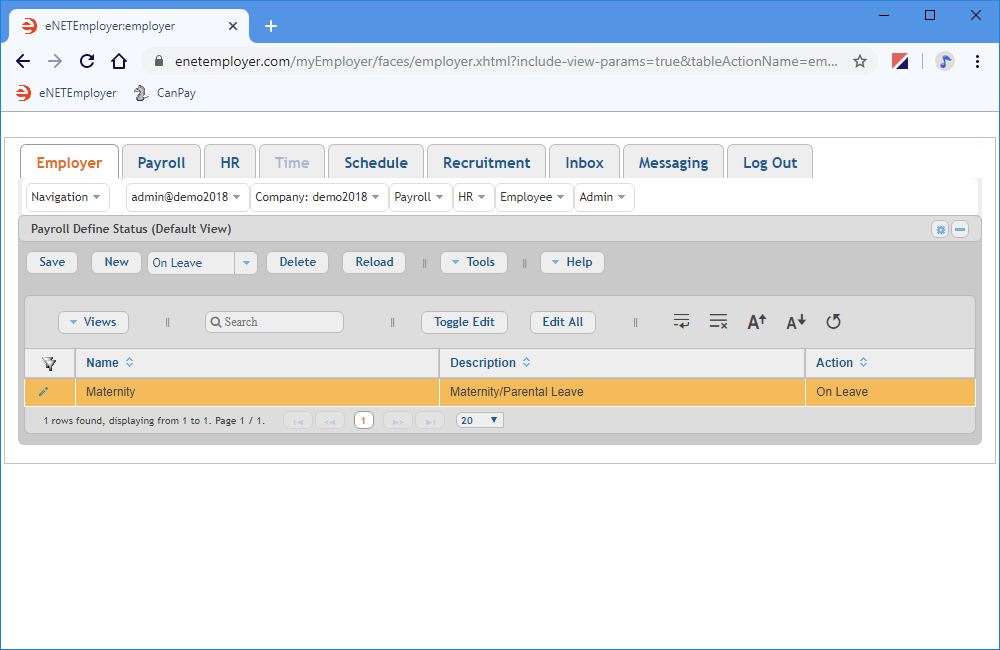
From the Employer tab, open the Payroll - Payroll Define Status screen that is used to create custom employee Status indicators, over and above eNETEmployer's pre-defined Statuses.
Show Me How...
Example: In Fig. 10 below, we have created a custom status entitled "Maternity Leave". If an employee is assigned this custom status, they will be treated with the same settings that are applied to employees who use the pre-set "On Leave" status. Please refer to the Payroll tabs's Employee - Pay Parameters help page for more information on pre-set employee status indicators.
This completes the custom status information for the payroll. You are now ready to setup your calculation information.
2J - Define Your Company's Payroll Calculation Information:
The following step is optional - This screen should only be used if you want to calculate multiple payrolls! If you have only one company payroll, then you should use the Payroll tab's Payroll Processing - Calculations screen. The following step should only be used if you have multiple payrolls and you wish to calculate them all in one step.
All new payrolls require a number of important settings before they can calculated. This includes the payroll type, along with a start, end and pay date.
The following tutorial will show you how to enter the calculation information for your initial payroll, and also for multiple payrolls.
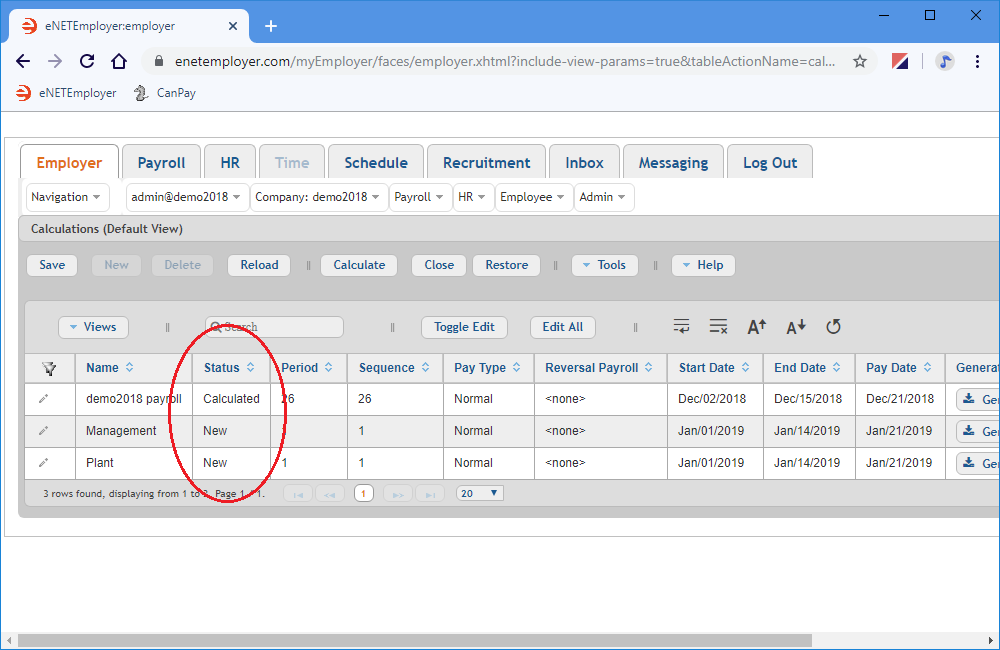
From the Employer tab, open the Payroll - Calculations screen along with one or more payroll rows in the table.
Show Me How...
Example: In Fig. 11 below, we see an existing payroll at Sequence 27 along with two new payrolls that are just being added (starting at Sequence #1).
This completes the first section of payroll information.
Step 2 is Complete!
This completes the basic company and employer-related settings and the initial payroll setup. There are other menus and options in the Employer tab, but they are not pertinent to this basic lesson. To view detailed descriptions of this topic and many others, open the Online Help by pressing <F1> on any program screen, and then browse the various topics using the Help Index at the top. You can also view video tutorials of these functions by visiting our YouTube channel at www.youtube.com/canpay-payroll-services.
You are now ready to move to the next step:
Go to Step 3: Setup Your Payroll Details
Quick Start Guide Progress: 30%

