Quickstart Menu (choose a topic to visit a section of the guide)Help Home | Step 1: Create Account Step 2: Company Setup Step 3: Payroll Setup Step 4: Add Employees Step 5: Process Payroll |
Quick Start Guide Progress: 60%

Step 4: Add Your Employees
eNETEmployer requires a number of details about each employee that you wish to add to the payroll. This includes such items as their address, bank accounts, tax information, earnings, year-to-date values and more. Use the instructions below to learn how to add your employee and to setup their details.
NOTE: Click on the images below to view them at full size
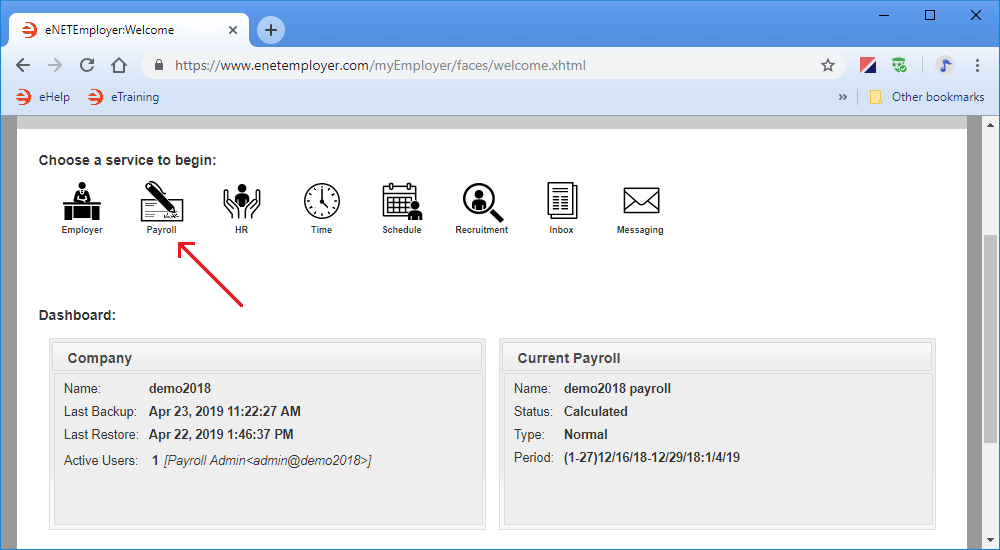
4A - Sign In and Open the Payroll Service:
- Sign in to eNETEmployer and choose the Payroll icon from the Dashboard screen.
4B - Add Employees along with their Pertinent Information:
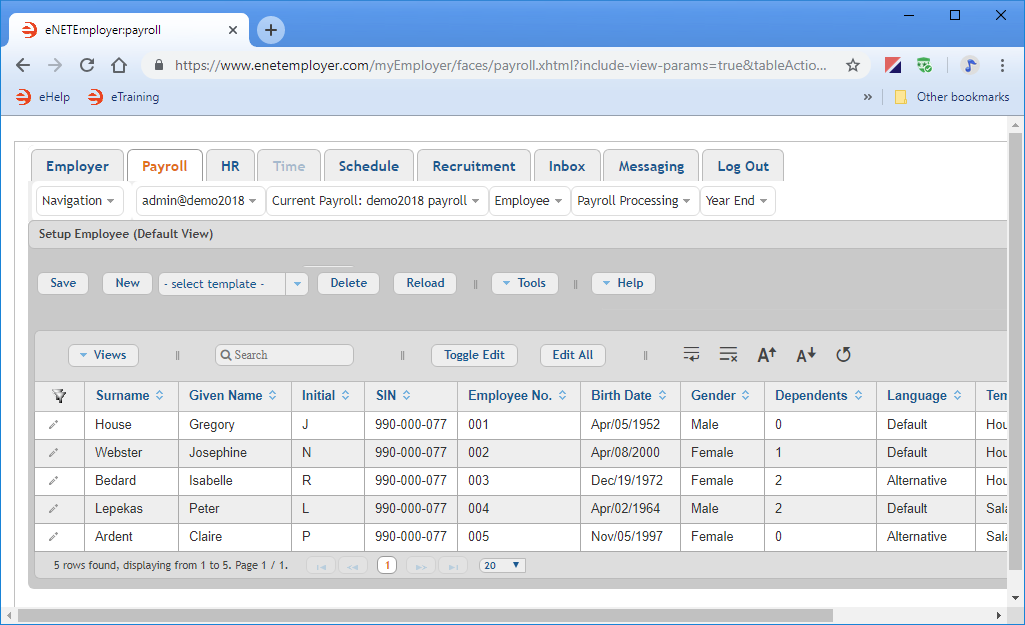
Each payroll requires completed information for all of the employees who are to be included in the calculation. Much of the initial information can be entered in the Employee - Setup Employee screen.
There are two methods you can use to add new employees to your payroll:
- Employee Template: This is the preferred method, and involves using a pre-defined "template" that contains multiple settings that can be applied to a new employee in a single step. If you are working through the Quick Start Guide in order (or if you have completed the Adding Employees Using an Employee Template tutorial), then you may have already created your employee template.
- Manually: This method involves adding employees one at a time, and completing the details for each individual.
The following tutorials show you how to enter employees using both the Employee Template method (the preferred method), and the Manual method.
Show Me How using the Employee Template method... Show Me How using the Manual method...
Example: In Fig. 02 below, we have added 5 employees to the payroll.
This completes the initial setup information for each employee in the payroll. Note: If you have completed each of the cells in this screen, you can skip the next 5 steps (because the related information will already have been entered).
4C - Define an Employee's Address:
You can skip this step if you have already entered the employee's address-related information in the Employee - Setup Employee screen as shown in Step 4B above.
eNETEmployer requires address information for each employee in order to produce accurate reports, EFTs, ROEs and T4s.
The following tutorial will show you how to enter address information for your employees.
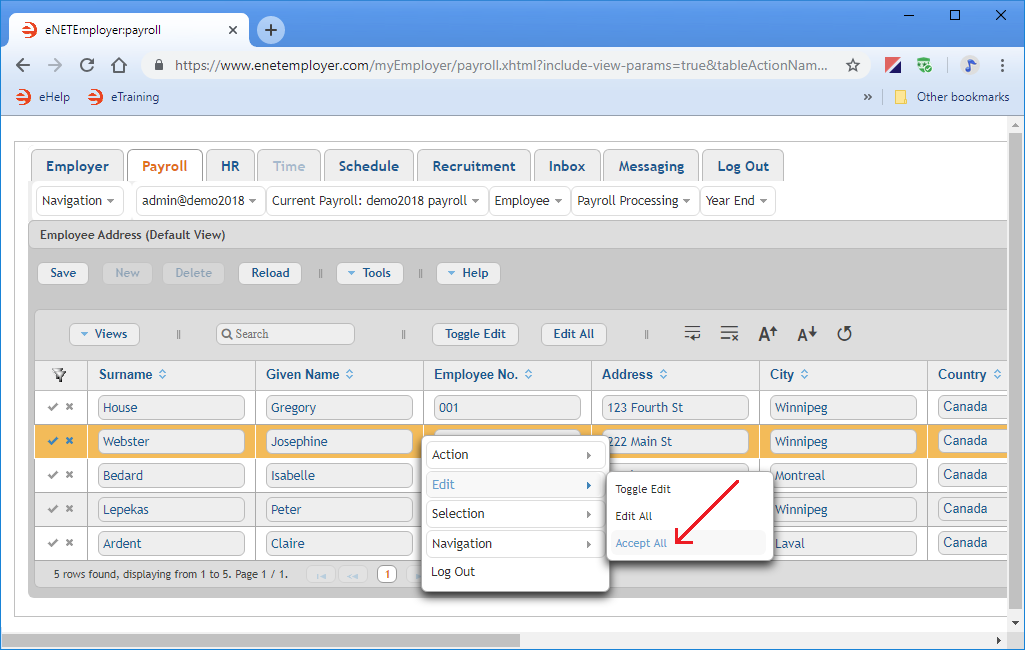
From the Payroll tab, open the Employee - Employee Address screen where you can define the address settings for each employee in the payroll.
Show Me How...
Example: In Fig. 03 below, we have added 5 employees to the payroll.
This completes the address information for the employees.
4D - Define an Employee's Payroll Status:
You can skip this step if you have already entered the employee's status-related information in the Employee - Setup Employee screen as shown in Step 4B above.
eNETEmployer requires start dates, termination dates, rehire dates and other status-related information for each employee in your payroll.
The following tutorial will show you how to enter status information for your employees.
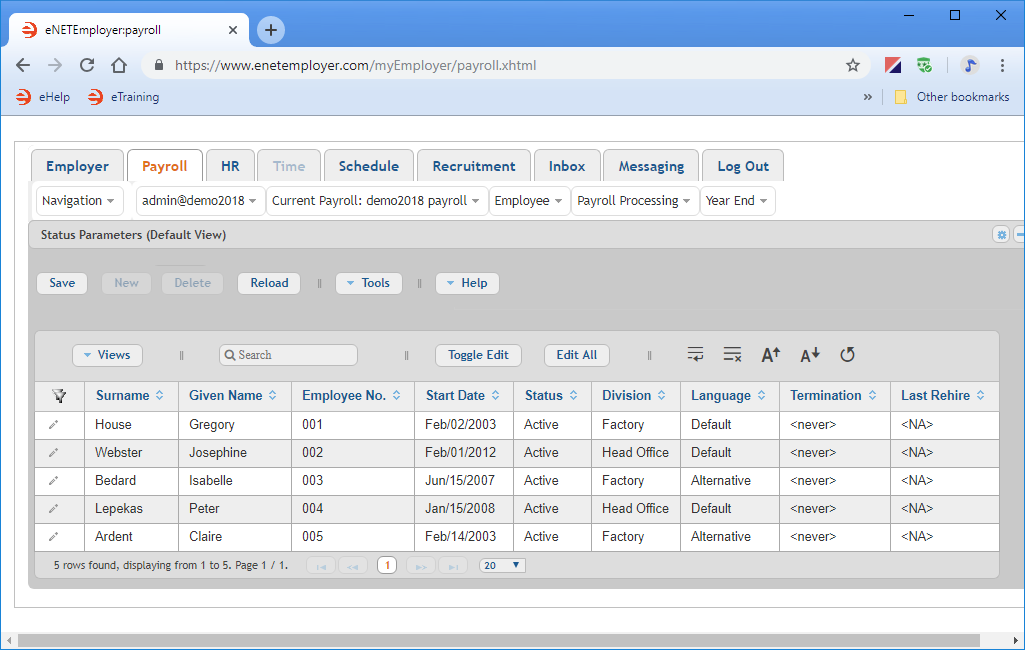
From the Payroll tab, open the Employee - Status Parameters screen where you can define each employee's status-related settings.
Example: In Fig. 04 below, we have completed the payroll status information for five sample employees.
This completes the payroll status information for the employees.
4E - Define an Employee's Payment Information:
You can skip this step if you have already entered the employee's payment-related information in the Employee - Setup Employee screen as shown in Step 4B above.
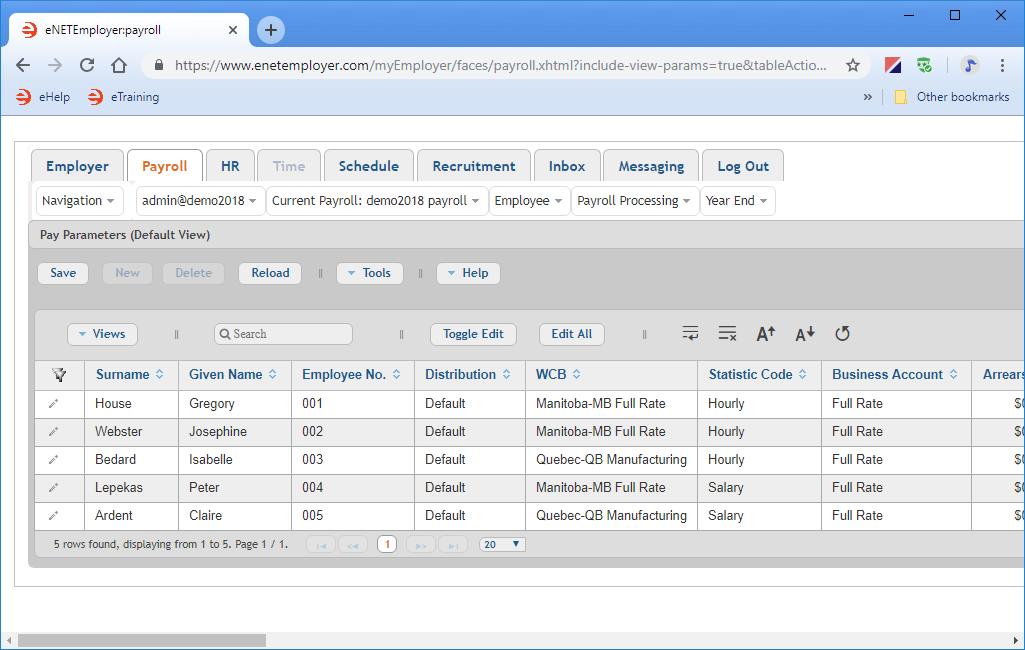
eNETEmployer requires WCB rates, CRA business accounts, banking information and other pay-related information in order to process each employee's pay accurately.
The following tutorial will show you how to enter payment information for your employees.
From the Payroll tab, open the Employee - Pay Parameters screen where you can define each employee's payment-related settings.
Example: In Fig. 05 below, we have completed the payment information for five sample employees.
This completes the payment information for the employees.
4F - Define an Employee's Tax Information:
You can skip this step if you have already entered the employee's tax-related information in the Employee - Setup Employee screen as shown in Step 4B above.
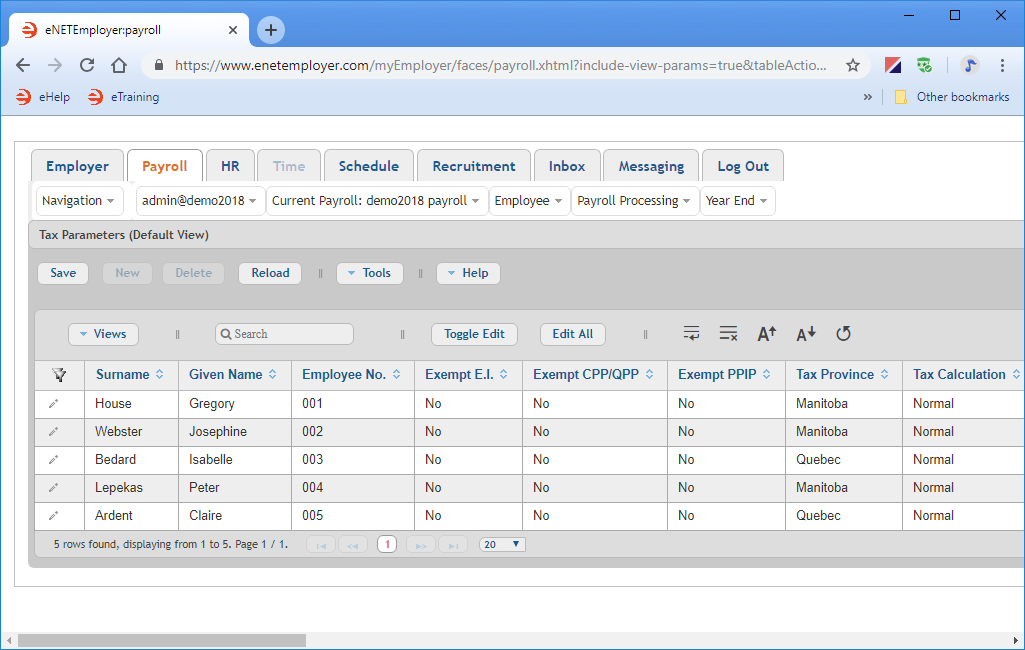
In order to process each employee's pay accurately, eNETEmployer requires information about each employee's involvement in CPP, EI, TD1 claim amounts, province of employment, and other tax-related information.
The following tutorial will show you how to enter tax information for your employees.
From the Payroll tab, open the Employee - Tax Parameters screen where you can define each employee's payment-related settings.
Example: In Fig. 06 below, we have completed the payment information for five sample employees.
This completes the tax information for the employees.
4G - Define an Employee's Bank Account Information: (Optional):
The following step is optional - If you do not pay your employees via Electronic Funds Transfer (EFT) / Direct Deposit, you can skip this step.
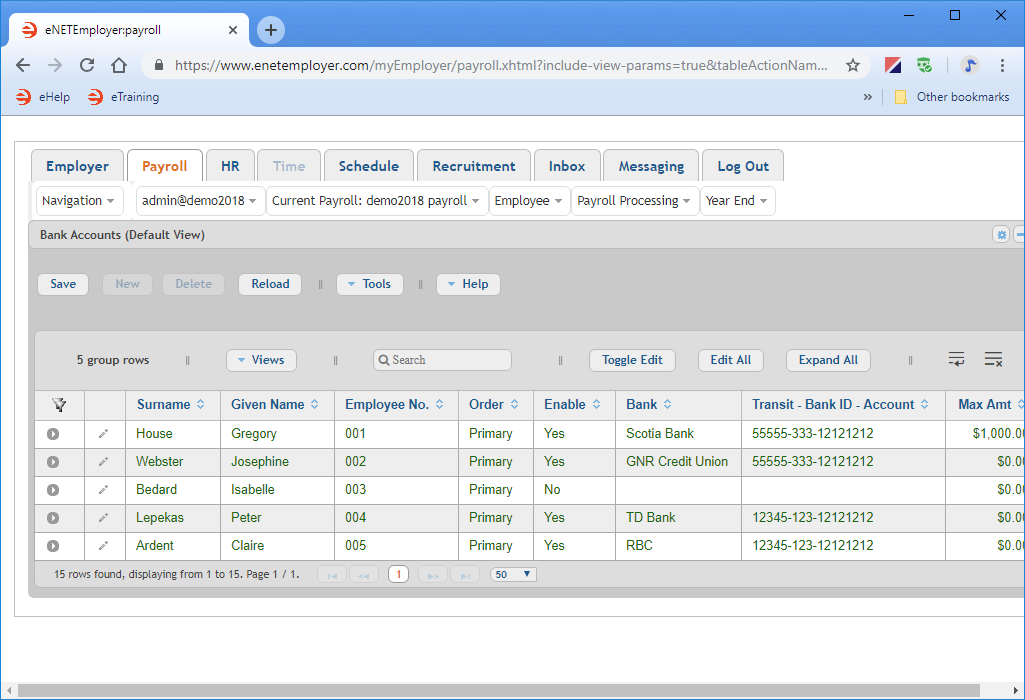
eNETEmployer requires each employee's bank account information if they are to be paid using the program's EFT (Electronic Funds Transfer) feature.
The following tutorial will show you how to enter bank account information for your employees.
From the Payroll tab, open the Employee - Bank Accounts screen where you can define each employee's bank account settings.
Example: In Fig. 07 below, we have completed the banking information for five sample employees.
This completes the bank account information for the employees.
4H - Assign Earnings to an Employee:
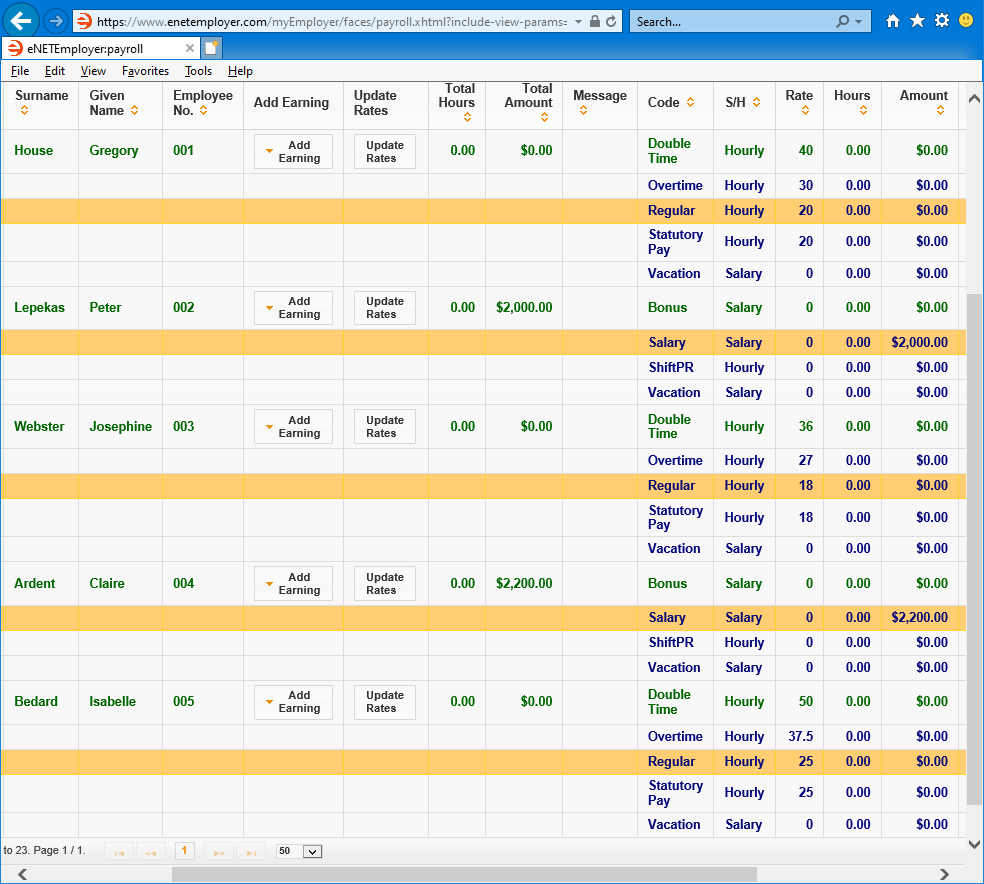
Each employee must be assigned the appropriate earning type(s) in order to have their pay calculated each period. This includes varying wage types for Hourly-based employees, and static wage types for Salary-based employees.
The following tutorial will show you how to assign earnings to your employees.
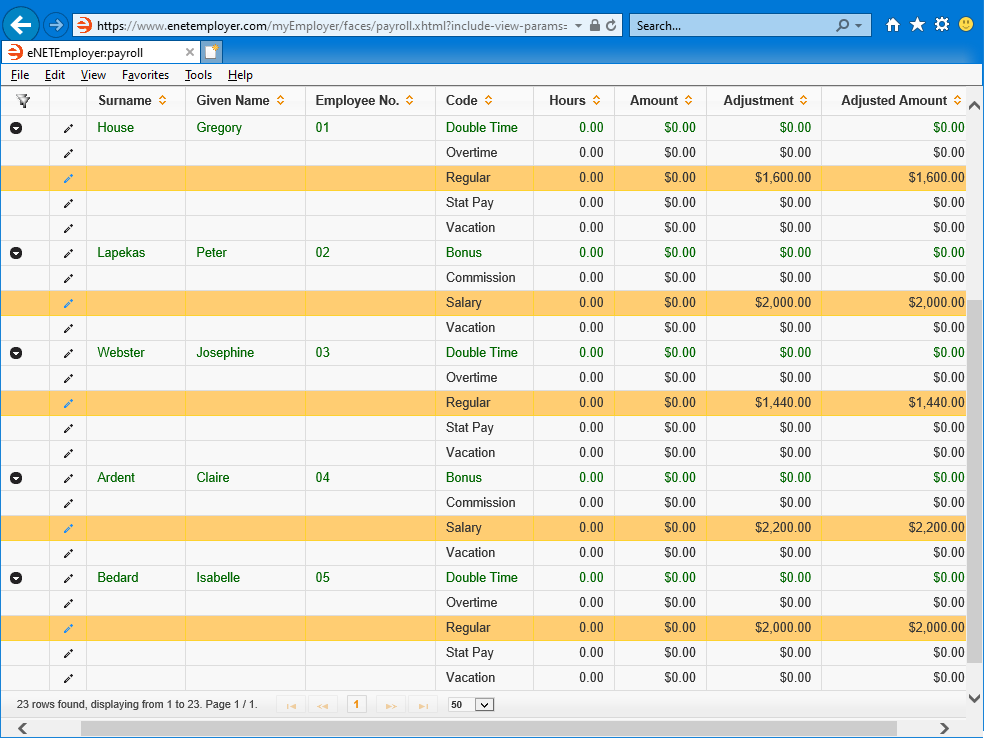
From the Payroll tab, open the Employee - Earning Items screen where you can define the records that control the wages for each employee.
Show Me How using the Employee Template method... Show Me How using the Manual method...
Example: In Fig. 08 below, we have assigned different types of earnings to our five sample employees.
This completes the earning items for the employees. You are now ready to review or edit each employee's deductions and benefits.
4I - Assign Deductions and Benefits to an Employee:
eNETEmployer automatically calculates statutory deductions such as federal and provincial tax, CPP and EI (though any or all of these items can be overridden if needed). However, if your employees have additional deductions or benefits, they must be entered so that they can be included in the payroll calculation.
The following tutorial will show you how to assign non-statutory deductions and benefits to your employees.
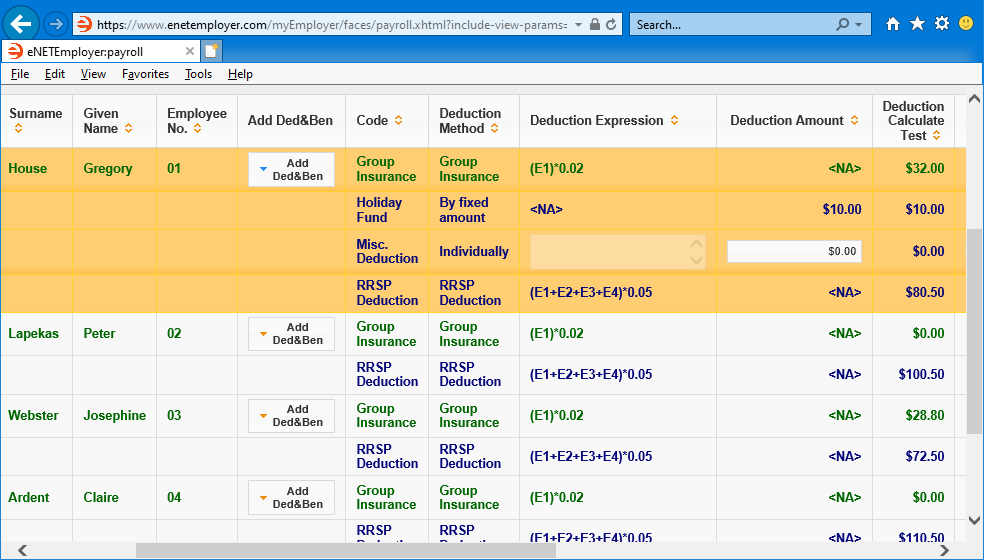
From the Payroll tab, open the Employee - Ded&Ben Items screen where you can define non-statutory deductions (and their related Benefit items when applicable), for each employee.
Show Me How using the Employee Template method... Show Me How using the Manual method...
Example: In Fig. 09 below, we have assigned a series of Deductions and Benefits to each of our five sample employees. Employee number 001 has been assigned two Function-based deductions (like each of the other employees), plus one Fixed Amount deduction and one Individual deduction.
This completes the deduction and benefit items for the employees. You are now ready to review each employee's accumulators.
4J - Assign Accumulators to an Employee:
Each employee may be assigned accumulator items that will accrue/collect amounts that can be used in various payroll calculations. The most common accumulator type is for vacation pay.
The following tutorial will show you how to assign accumulators to your employees.
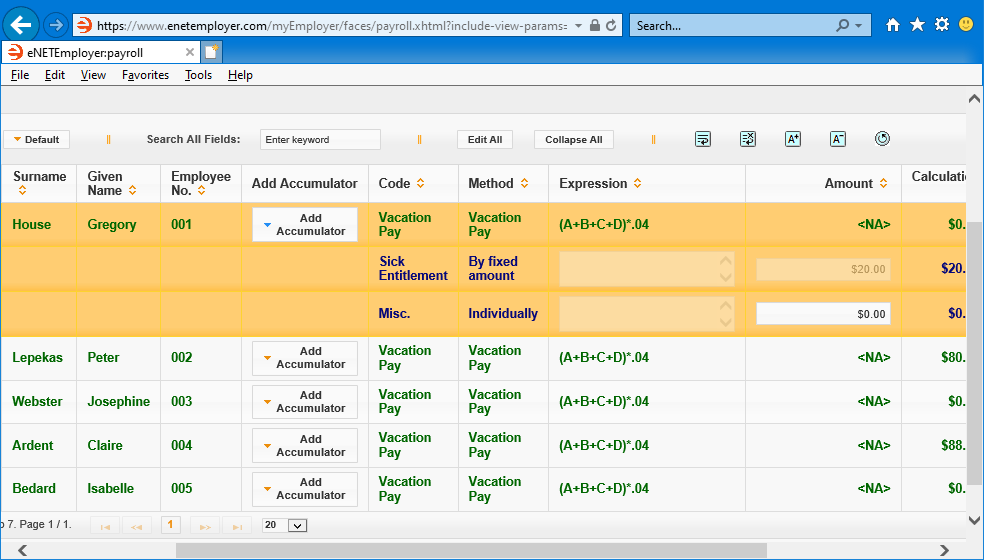
From the Payroll tab, open the Employee - Accumulator Items screen where you can define non-statutory deductions (and their related Benefit items when applicable), for each employee.
Show Me How using the Employee Template method... Show Me How using the Manual method...
Example: In Fig. 10 below, we have assigned a vacation accumulator to each of our sample employees. This will accrue 4% of their wages, based on the function that is linked to the accumulator (the function was discussed earlier in the Creating Payroll Functions tutorial).
This completes the accumulator items for the employees.
4K - Define an Employee's Year-to-Date Earning Information (Optional):
This step is optional, but values may be required under some circumstances:
-
If your business is switching payroll providers - If you are moving to eNETEmployer part-way through the year (and your employees have already received wages for one or more pay periods), then you will need to enter each employee's current year-to-date values in this screen. This is required so that the year-end values will balance accordingly (Federal Tax, CPP contributions, EI Insurable Hours, etc.) The one exception would be if you are starting your payroll as of January 1st - in this case, there would typically be zero earnings accrued for the first of the year (though there may be some year-to-date Accumulator values that have been accrued for Vacation Pay that has not yet been paid to your employees - these accumulated values would need to be entered.
-
If your year-end values require editing - All earnings, deductions/benefits, accumulators, and statutory items accrue year-to-date values over the year. These values represent the total of all monies or hours that were paid to, or accrued by those items for the current year. Although most payroll situations will typically use these values as the "final" amounts for year-end purposes, you may encounter a situation where you need to adjust the amounts manually. This screen allows you to view and modify year-to-date earning values for your employees.
As mentioned in the note above, you will need to enter each employee's current year-to-date values if you are moving to eNETEmployer part-way through the year and have paid wages to your employees. Similarly, if you need to make manual adjustments to any of eNETEmployer's calculated payroll amounts, you can do so using the Employee - YTD Earnings screen.
The following tutorial will show you how to enter year-to-date earning information for your employees.
From the Payroll tab, open the Employee - YTD Earnings screen where you enter these values.
Example: In Fig. 11 below, we have edited the year-to-date earning values for each of our five sample employees to reflect their payroll that has begun part-way through January (i.e. they have already been paid for one complete pay period).
This completes the year-to-date earning values for the employees.
4L - Define an Employee's Year-to-Date Deduction & Benefit Information (Optional):
This step is optional, but values may be required under some circumstances:
-
If your business is switching payroll providers - If you are moving to eNETEmployer part-way through the year (and your employees have already received wages for one or more pay periods), then you will need to enter each employee's current year-to-date values in this screen. This is required so that the year-end values will balance accordingly (Federal Tax, CPP contributions, EI Insurable Hours, etc.)
-
If your year-end values require editing- All earnings, deductions/benefits, accumulators, and statutory items accrue year-to-date values over the year. These values represent the total of all monies or hours that were paid to, or accrued by those items for the current year. Although most payroll situations will typically use these values as the "final" amounts for year-end purposes, you may encounter a situation where you need to adjust the amounts manually.
As mentioned in the note above, you will need to enter each employee's current year-to-date values if you are moving to eNETEmployer part-way through the year and have paid wages to your employees. Similarly, if you need to make manual adjustments to any of eNETEmployer's calculated payroll amounts, you can do so using the Employee - YTD Deductions and Benefits screen.
The following tutorial will show you how to enter year-to-date deduction and benefit information for your employees.
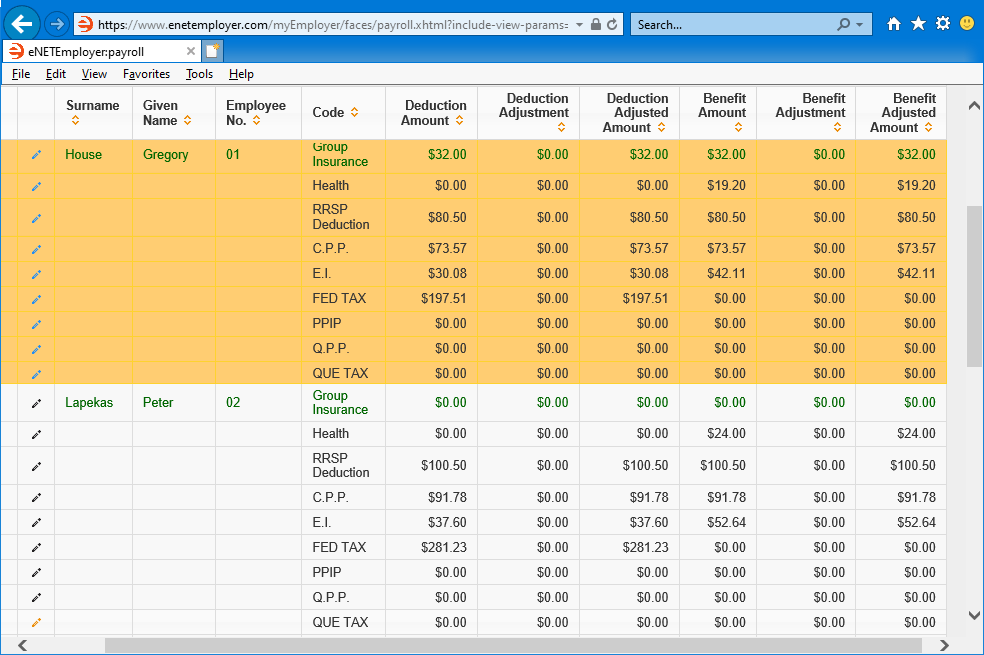
From the Payroll tab, open the Employee - YTD Deductions and Benefits screen where you enter these values.
Example: In Fig. 12 below, we have edited the year-to-date values for each of our five sample employees to reflect their payroll that has begun part-way through January.
This completes the year-to-date deduction and benefit values for the employees. You are now ready to review or edit each employee's YTD accumulators, if necessary.
4M - Define an Employee's Year-to-Date Accumulator Information (Optional):
This step is optional, but values may be required under some circumstances:
-
If your business is switching payroll providers - If you are moving to eNETEmployer part-way through the year (and your employees have already received wages for one or more pay periods), then you will need to enter each employee's current year-to-date values in this screen. This is required so that the year-end values will balance accordingly (Federal Tax, CPP contributions, EI Insurable Hours, etc.)
-
If your year-end values require editing- All earnings, deductions/benefits, accumulators, and statutory items accrue year-to-date values over the year. These values represent the total of all monies or hours that were paid to, or accrued by those items for the current year. Although most payroll situations will typically use these values as the "final" amounts for year-end purposes, you may encounter a situation where you need to adjust the amounts manually.
As mentioned in the note above, you will need to enter each employee's current year-to-date values if you are moving to eNETEmployer part-way through the year and have paid wages to your employees. Similarly, if you need to make manual adjustments to any of eNETEmployer's calculated payroll amounts, you can do so using the Employee - YTD Accumulators screen.
The following tutorial will show you how to enter year-to-date accumulator information for your employees.
From the Payroll tab, open the Employee - YTD Accumulators screen where you enter these values.
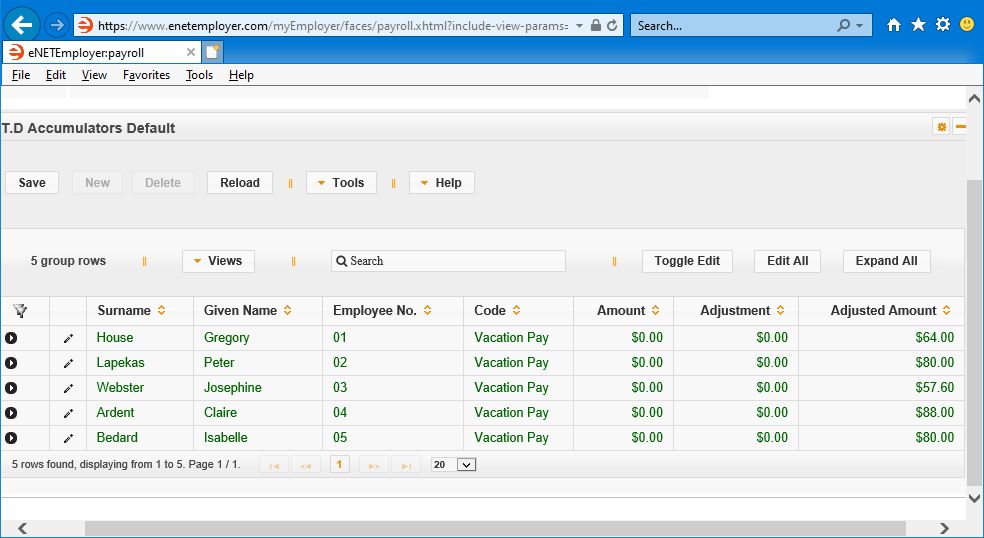
Example: In Fig. 13 below, we have edited the year-to-date values for each of our five sample employees to reflect their payroll that has begun part-way through January.
This completes the year-to-date accumulator values for the employees.
Step 4 is Complete!
This completes the employee-related settings for this Quick Start Guide. To view detailed descriptions of these and other topics, simply open the Online Help by pressing <F1> on any program screen, then browse the various topics using the Help Index at the top. You can also view video tutorials of these functions by visiting our YouTube channel at www.youtube.com/canpay-payroll-services.
You are now ready to move to the next step:
Go to Step 5: Enter Employee Hours and Process Your Payroll
Quick Start Guide Progress: 90%

